
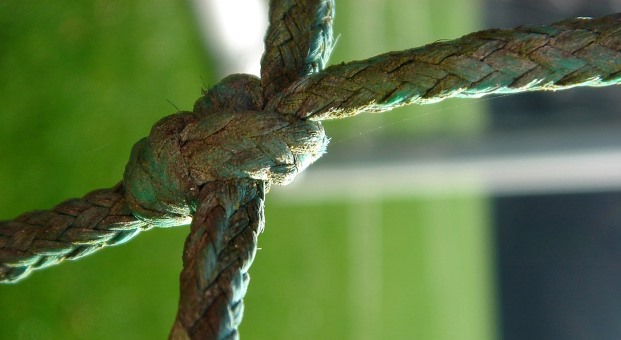
There is no such thing as prepping for survival without having rope and cordage in your stash. You can use them for fishing lines, bowstrings, trap triggers, snares, lashings, and many other things.
And do you know what items would be the first to become unavailable in a crisis? There are a few, and cordage and rope will be among them.
But even if rope and cordage will be out of stock, there are plenty of materials you can use for making it.
Here are the materials to consider and the basic info that you need to make your own usable rope.
What to Use from Animals to Make Rope
Leather Strips
You can make leather from animal skins from game you have hunted or dead carcasses, then use it for making cordage.
- Start off by skinning the animal and spread the skin out so there are no folds or creases.
- Next, scrape as much mucus and membrane off the inside of the skin as you possibly can, then dry the skin out in the air and sun.
- Cover the skin with an inch or so of dry dirt over it. Gently force in the dirt with repeated, light strokes, then remove the dirt and replace it with fresh dry dirt.
- Adding and removing several coatings of dirt helps get the skin cleaned and dried. Once the hide is in good shape, cut it into thin strips.
When you are ready to use the strips for rope, tie the strands together to get the length you need, then wet it a bit and apply it to whatever you’re going to tie or lash together. When the skin dries, it becomes very hard and strong. This is one method for making rawhide.
In order to make shoe strings, foot gear, clothing, shelter, or bags, you will need to tan the animal skins. If you plan to make furry items, remember to scrape all the flesh off on the inside only. To make leather you must scrape both sides to remove all the flesh and fur.
To tan the skin to make leather, first make a slurry with water and the cut up brain. Soak the skin in the slurry until it feels like cooked pasta. Play with it, stretch it, scrape it some more, and let it set a day or two in the slurry. Next rinse it and let it almost dry.
While it is still pliable, scrape it some more, and work it over a piece of log or stone like you were buffing your shoes with it. Do this until the leather is soft and supple.
You can also try using this method with the fur intact, however it may come loose.
Tendons and Sinew
Video first seen on EarthWalkerPrimitive.
There are two ways to get tendons and sinew in the wild. The first way is if you come across an old carcass from a dead animal. The other way is after you’ve cleaned, skinned, cooked, and smoked what you need from a fresh kill.
Look over all the animals bones and limbs and look for tendons. Tendons are the hard, almost plastic like pieces that you really can’t eat. They will come out in long strands and be tough. Scrape these tendons with rock and try to get all the excess tissue off them, then let them dry.
Even though tendons will be hard and look very brittle, they are quite strong. Use a rock and beat on them a bit to break them open into fibrous strands. Pull these apart, and wet them again to make them pliable.
The longest sinew is found in the white cords that run along either side of an animal’s backbone. Cut out the sinew and remove it’s protective sheath, then clean and dry it. To separate the individual fibers, pound each strand with a rock as you would do for plant stalks, then put the fibers in hot water.
When moist, twist them or braid them together to the desired tensile strength and length. You do not need to tie them together for length as they will dry and harden together and be very secure.
Animal sinew can be used to produce a very strong rope or twine: a strand about the diameter of a carpet thread can hold the weight of a man. This size sinew is an excellent choice to make bowstrings, fishing lines, snares, wrappings, and threads.
Another useful property of sinew is that when wet with saliva before wrapping, it will shrink and “glue” items near it. This is why you usually don’t need to tie rope ends together to increase the length.
How to Use Plants and Grass to Make Cordage
Remember these facts when using natural fibers for making cordage:
- Anything green and pliable is possible to use.
- If the material is dry or it is winter, soak the material in water.
- If a fiber is really hard to work with, try boiling it.
- Test everything with your eyes and hands to see if it’s usable before starting working with it.
- Test everything after you make it to ensure that it is usable.
Grasses
Grasses can be used to make lashing and cordage. The key to using grasses as cordage is in the bundling.
First gather a lot of grass to make bundles of same length grass. Tie the bundles about an inch from the top and bottom ends as well as in the middle. Make as many ties around the middle of the bundle as required to keep it together. When grass is bundled this way they become a flexible strand suitable for making rope.
Plants
The dried inner skin of stalks of some fibrous plants will also make good rope. When working with pithy plants such as dogbane or milkweed, it is possible to strip the material you need from the stalk in long ribbons as long as the stalk is dry. It is still better to to crush and open the stalk, then break off short sections of the woody core, leaving a long ribbon of fibers in your hand.
The best way to prepare non-pithy plants like nettles or rushes is to place a dry stalk on a piece of wood, and pound it with a rounded rock. But be careful when doing this if you use a sharp rock there is a chance of cutting the fibers. When you splice the fibers together you can make cordage of any length or thickness that is needed.
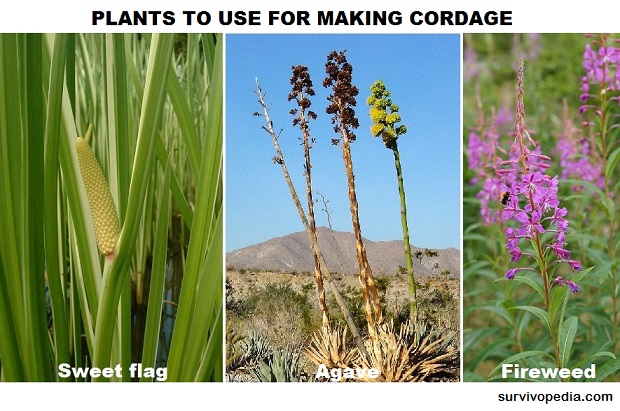
Here are a few plants that I have used to make cordage: stinging nettle, velvet, leaf, dogsbane, milkweed, fireweed, hemp, and evening primrose. But there are many other plants that can be useful for the same purpose.
Leaves
The cattail plant is an excellent source of raw material for cordage that is not good for something like a bow drill, but you can use it to lash things together. These plants usually grow in a stand of many plants. To harvest the leaves of the cattail break a bunch off near the stock and let them dry for a day or two.
To make a midsize cordage you will have to use the whole leaf and braid it into a rope. To make smaller cordage, shred the leaves lengthwise in half or even in quarters, this will make a much stronger rope that is suitable for things like tying an arrowhead to a shaft or other vital jobs that need small cordage.
How to Make Cordage from Cattails
This is the way I used to make cordage from cattails in the past:
- Twist the leaf until it bunches up.
- At this point, take a hold of the top strand with your thumb and forefinger and twist it away from you.
- Then using the small fingers of right hand, twist the whole thing towards you.
- If you need longer pieces of cordage, please refer to the sections below dealing with reverse wrapping and splicing.
Tree Bark
Many trees have naturally flexible bark that can be peeled off in strands, which can be torn into thinner strips to give you the foundations of good cordage. If you do not have the knowledge or experience in relation to which trees to use, you will have to experiment with trees that you have in your area. Practice stripping the bark and testing it to see if it can be used safely to make good cordage.
What I have found is that the bark from following trees will make good cordage: basswood, elm, walnut, cherry, cedar, aspen, maple, cottonwood, hickory, oak, and ash.
The dried inner bark of most trees will supply you with a workable raw material. If you are in a true life or death survival situation, you can also strip the sections of the inner bark from living trees and dry them. Be sure to take only a few thin strips from any one tree. Cutting all the way around the trunk can kill the tree.
Instead of using just the trunk bark, try using the bark off small and intermediate branches. If you have trouble separating the inner and the outer bark. Just soak the strips in warm or boiling water until the fibers come apart easily.
Video first seen on LearnBushcraft.
Roots
Plant and tree roots are also a good source of material to make cordage. Look for trees and plants that have long flexible roots, and take as many of these flexible roots that you can find to make your cordage.
I personally recommend digging for roots if you come across suitable trees. For example, if you find a spruce or a fir tree, digging into the ground underneath will reveal long ropy roots that can make decent cordage. Split the roots in order to make rope, but remember that plant and tree roots dry out fast, which makes them a bit more prone to becoming brittle and breaking.
I have used for making cordage roots from cedar, pine, juniper, tamarack, yucca, spruce, and sage.
Vines
Thin vines are the best vines to use but, you can also use fat vines. Often vines will have bark that is excellent for making cordage. If you find small vines, it is possible to use them as twine, and if you find big vines peel them first and then use them.
Wisteria, grape, and similar vines are very good to use. Do not use poison ivy, oak, or sumac because these vines can caused skin rashes and other health problems.
How to Make Rope and Cordage in a Survival Situation
First, you need to have a good supply of raw materials, and you’ll have to decide how long and how thick the finished cordage will have to be.
If you need a trap trigger or need to make a piece of wilderness dental floss, the odds are you would only use a couple of fibers and there would be no need to wrap it. If stronger cordage is needed, then wrapping which strengthens the fibers, will be needed.
In order to wrap fibers together, you may have to break down the materials a bit more. If you are working a ribbon of bark or other plant material, roll it between your wet palms or against the leg of your pants to separate the fibers. Work along the entire length of the strip until only the fibrous threads are left.
Making a Simple Wrap
- To do a fast wrapping job, where strength is not the primary concern, hold onto the fibers and roll the whole bundle against your pant leg in one direction.
- By making repeated strokes along the entire length, the fibers should twist into a strand of makeshift cordage that is many times stronger than the original strands of the material.
- To secure the twist, take the middle of the strand in your teeth and bring the two ends together. Warning – Be sure that the fibers are from a nonpoisonous plant.
Reverse wrap
The reverse wrap is for a much tighter and stronger wrap.
- Start by twisting the fiber bundle in the middle until it kinks.
- Then hold the kink between the thumb and the index finger of one hand.
- With the fingers of the second hand, twist the bottom strand toward you and wrap it once around the the other.
- Now hold this wrap with the first hand.
- Then twist the new bottom strand toward you and wrap it around the other.
- Continue the process along the entire length of your cord.
- If you need only a small section of the cord. Tie a knot at the end of the double wrapped piece and use it as is.
How to Splice
If you wish to make a long rope or a string, simply splice together many shorter pieces as necessary in the following way:
- Twist and kink the bundles so that one end is twice as long as the other. This will eliminate the chance of making parallel splices that would weaken the cordage.
- Using the reverse technique, wrap within an inch or two of the short end.
- Separate the fibers of the short end with your fingers so that it looks like a broom head.
- Attach a second bundle of equal thickness by spreading and fitting its fiber ends into those of the first bundle. Important note: To keep a uniformed thickness in the cord, cut out about half of the fibers in each bunch before pushing them together.
- Continue twisting and wrapping as before. Taking care not to pull the strands apart.
- When you come to the end of the original long strand, add a third piece and so on until you have the length of cordage that you need.
- Important note: Make sure that you never have two splices in the same place. A splice must always be wrapped with a solid strand.
Double Strength
When you need an especially strong length of cordage, you might think that all you do is begin with bigger fiber bundles, but this is not always the case. Strength is produced just as much by twisting and wrapping as it is by thickness. You can simply twist and double a strand you’ve already wrapped.
For cordage of even greater strength and thickness, take a pair of reversed wrapped strands and join them with another group of reverse wraps. With the use of repeated splicing and doubling you can make a rope of almost any length and thickness you might need.
Finishing Techniques
After you have completed all of the wrapping and splicing is done, there are usually a lot of fibers sticking out along your length of cordage. To get rid of these, run the piece quickly through a flame. This will burn off the stray fibers without damaging the main ones.
Finally, to keep the ends from fraying, weave them back into the twisted cord, secure them with simple overhand knots, or whip the ends by wrapping and tying them off with a thinner cordage.
How to Make Cordage and Rope From Natural Materials at Home
Video first seen on Bob Anderson.
Collecting and obtaining your basic raw materials for making cordage and rope is basically the same way as you would do it in any survival situations.
At home you must learn to be a scrounge. This means to save anything that could be cut up, shredded, or twisted to make cordage or rope. An example of this is saving plastic shopping food bags, long pieces of string or twine, lengths of cloth, the cord removed from old rugs, and other craft projects.
Making Cordage Using Hand Powered Machines
What are the easiest ways to make rope at home? It’s with a rope making machine, of course.
There are many plans and styles for these machines. There are also many free the schematics you can use as a basis for making these machines cheaply out of materials from around the house. When the machine is finally completed and tested, it is possible to make a very strong rope from any type of natural raw materials or synthetic materials.
This is how this type of machines work:
Video first seen on linen2rope’s channel.
How to Make Rope Out of Plastic Bags
When you look around the house, it is amazing how quickly and how many plastic bags pile up. Instead of throwing them out, try turning them into a plastic rope. This fun and easy method of making rope is shown below in the following video:
Another way to make rope an easy and simple way is to braid it using a three pieces of twine with a loop at one end. Place the loops over your finger and then braid the strand.
I have also used a rope making machine and recommend it because it can easily be kept in a bug out bag or backpack. Once you build the simple parts and practice with it, you can make some cordage or rope with it. Check the references at the end of this article to get the necessary information for this project.
Being able to make cordage and rope is very important for survival and off grid living. Still an easy place to build and practice your cordage and rope making skills is at home. Not only can you practice with natural raw materials found in the wilderness there, but there are a lot of household items that pile up that could be used to make cordage and rope.
Is there anything else that you used for making rope? Are there any old secrets that preppers need to know for making cordage? Share your experience in the comment section below!

This article has been written by Fred Tyrell for Survivopedia.
References:
http://rewild.wikia.com/wiki/Cordage
http://usscouts.org/scoutcraft/BoyScoutRopemaking.pdf
http://whatknot.tripod.com/knots/Rope.htm


Pingback:How To Slaughter And Skin A Cow | Prepper's Survival Homestead | April 21, 2016
|
JHS | October 20, 2016
|
Amazing, thank you very much! I’m using this to teach a group of homeschoolers how to make rope from plant fibers and enjoyed reading about all the other possible techniques, too.