


Knowing how to use what you have on hand to make what you need is one of the hallmarks of a true prepper or homesteader. So is repurposing items and avoiding as much waste as possible.
So, in that frame of mind, what do you do with all the ash left after you build a fire, or dozens of them throughout a winter? Make lye!
There are many uses for lye, chemically named potassium hydroxide. You may also hear it called caustic soda or caustic potash. There are two different chemicals referred to as lye – the type that we’re talking about today that’s made from wood ash, and sodium hydroxide, which is made from salt.
The reason that we’re focusing on the type made from ash is that all of the ingredients that you need to make it are already right there in your house. Actually, you only need two ingredients – water and ash.
That’s it. To make sodium hydroxide, which is a common ingredient in industrial cleaners and caustic products such as drain cleaner, you need carbon electrodes and a power source. Not exactly prepper-friendly.
What’s Lye Used For?
So what, you may ask, is lye used for? Well, several things. First, it’s a necessary ingredient in soap.
Think about our ancestors!
Click here to uncover the long forgotten secrets that helped our parents survive!
You also need lye to make biodiesel and can use it to adjust the pH of your soil. There are also cooking uses for lye, such as making chocolate and preserving processed foods, but that’s pretty delicate and it’s completely outside my wheelhouse.
Oh, and lye also degrades soft tissues and, given enough time, will soften and break down bone. This was actually a trick used by a famous mobster to dispose of bodies. So on that note, let’s talk about how to safely handle lye.
Handling Lye
You need to exercise extreme caution when using lye because if it comes into contact with your skin, it will almost instantly start interacting with the fatty tissue to turn you into a bar of soap!
Seriously, that’s kinda what happens. Wear goggles because it can – and will – put you blind. It’s a good idea to use gloves and wear long sleeves, too. If you happen to get lye on your skin, pour vinegar on it to neutralize it.
Lye will also erode some metals – specifically aluminum – so be careful what you make it in.
Ingredients Needed to Make Lye
We’ve already discussed that you only need two ingredients to make lye: water and ash. Sounds easy, right? Yes it is, but you can’t use any water and ash or else the lye won’t leech properly out of the ash and it will be too weak to be effective.
Rainwater is the best and cheapest water to use. You don’t want to use tap water regardless of whether it’s city or well because of the minerals and chemicals in it. You can use water distilled using a steam process, but that can get expensive quickly. So, get a nice rainwater catcher and you’re in business.
It’s always a good idea to have rainwater collection vessels anyway, because it can be used as a backup water source or as a source of gray water to wash clothes and water plants. Well now you have yet another use for it.
You can’t use just any ash, either. Well, technically you can, but the soap that’s made from this type of lye made from softwoods and coniferous trees will be soft soap instead of hard soap. Good woods include ash, apple, hickory, beech, cherry, birch, elm, oak, walnut and maple.
You want to use hardwoods for your fires anyway because it burns longer, and we all know that you can’t use pine in your woodburners or fireplaces unless you want the resin to accumulate and burn you out at some point, likely in the middle of the night.
Lye Making Methods
So now that we know what woods and water to use to make the best lye, let’s talk about a couple of methods.
There are three basic ways to make lye at home:
- the ash bucket method
- the barrel method
- the cooking method.
They all three work; it’s just a matter of personal preference and how much effort you’re willing to invest.
We’ll discuss them in the order that I just listed but again, a reminder not to use aluminum containers. Use glass, wood, enamel, stainless steel, or heavy-duty plastic.
One final tip: some of the old timers would add 2 percent or so lime to the ash mixture to make sure it produces a good hard soap. Salt works too, but you add it to the fat during the soap-making process instead of at the lye phase. Use about 2 ½ pints salt to 5 gallons of fat.
The Ash Bucket Method
This is pretty much exactly what the name implies. It’s kind of the lazy prepper’s way of making lye. Add a few cups of hot water directly to your full ash bucket and stir. Make sure you have a second ash bucket to hold your dry ashes! Let it sit for a few hours, stirring every thirty minutes or so.
Use a ratio of about 2 parts water to one part ash. Equal amounts work, too, but don’t exceed a ratio of around 3:1 water to ash if you want your lye to make quickly.
Once you’ve stirred it several times throughout the afternoon, do the egg test. This is a great way to test the alkalinity of your lye water. If you drop the egg in and it sinks, the lye is too weak and you need to let it sit for a while longer. Stirring more frequently may be helpful, too.
The lye has the perfect pH when the egg floats with about a quarter-sized part of it sticking out of the water. If your lye accidentally gets too strong, just add a bit more water. Throw the egg away when you’re done because it’s not edible after coming into contact with the lye.
Once your lye is perfect, pour it slowly and carefully from the ash bucket into another bucket making sure that you don’t pour any of the ashes into the mix.
Video first seen on Eddie Borges.
The Barrel Method
To make lye using the barrel method, you’ll need a water-tight wooden (or stainless steel) barrel and three catch receptacles. Drill several small holes in the bottom of the barrel, then set it up on bricks or blocks that you can get your catch basin underneath of it to collect the lye. Make sure it’s stable – the last thing you want to do is spill lye everywhere.
Line the bottom with a layer of clean stones so that the straw that you’re using in the next step doesn’t clog the holes. Put a thick layer of straw over in the bottom of the barrel, then fill it almost all the way with ash. Pour hot water over it, then remove the container underneath that’s now full of weak lye water.
You’ll have to repeat this process several times, just pouring the used, filtered water over the ash and straw until the lye becomes strong enough. Just so you know, the lye is perfectly fine, but the straw may discolor it a bit by turning it yellow.
After you’ve repeated this process five or six times, do the egg test and continue accordingly.
Alternatively, you can use a barrel with a spigot instead of the holes and just let the water sit in it for several hours and test. When it’s done, just drain the lye out the spigot, leaving the ash residue behind.
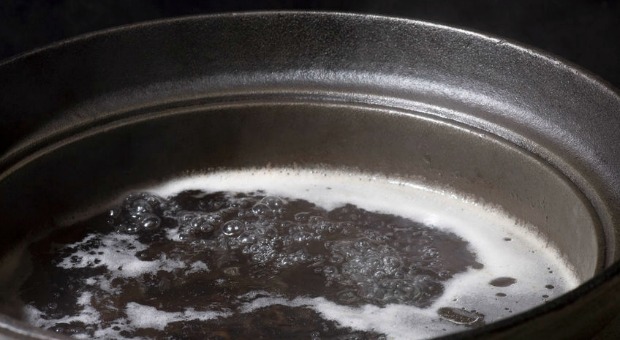
The Cooking Method
This method is perfectly acceptable but you need to make sure that the room is well-ventilated just to be on the safe side. We’re going to start the process by adding the ashes and the water to your pot. Bring it to a slow boil or simmer and cook it for a half hour or so, then allow it to cool and do the egg test.
If it’s not strong enough, pour the water over a fresh batch of ashes and repeat until your lye is as alkaline as it needs to be. And be careful that none of it splashes on you as you boil it.
See, now that you know that lye isn’t so hard to make, you can do it yourself whenever you need it as long as you have ashes and rain water, just like our ancestors used to make it.
Click the banner below to learn the old survival skills of our grandparents!

This article has been written by Theresa Crouse for Survivopedia.


Is there an all encompassing book that would have all your wonderful information in print form? I am wanting to preserve for my grandchildren and their children. I am subscribed to the newsletter and your website is the most comprehensive I have found. But let’s face it, the internet will not be here of the grid or civilization crashes.
Hello, Roy
Thank you for your feedback! Click in the image-banner at the end of the article and you’ll be redirected to a new page where you can find such a book.
Don’t hesitate to contact us ad [email protected] if you need further assistance.
Survivopedia team wishes you all the best 🙂