


If you have any experience with gardening, then you already know that there are three basic ways to waste seeds while planting:
- If the seeds are very close in color to the soil, it can be hard to tell if a seed is sitting in the location where you want it.
- Tiny seeds are often hard to plant at a proper distance from each other. This can result in areas where too many seeds are placed, which will result in seedling loss when there is not enough room for them all to grow.
- Seeds can also be wasted during the planting process when they are not placed at the proper depth.
While some seeds will tolerate being buried a tiny bit deeper than optimal, others simply won’t germinate.
Seed paper can help you overcome these limitations and make survival gardening a bit easier to accomplish. Even if you are an experienced gardener, you may want to give this method a try, especially if some seeds present a challenge to you because of their size or other sewing-related needs.

What is Seed Paper?
Insofar as gardening goes, seed paper is often considered a novelty item. You can purchase cards, notes, or other paper products that have seeds embedded within the paper. From there, you can simply take the paper, cover it with soil, water it, and let the seeds germinate like normal. Today, most sources of commercial seed paper claim that they use only organic inks and organic paper. If you look at DIY options, you will see that people use any scrap paper they can get ahold of regardless of the toxins in the ink or the paper itself.
As a survival gardener, you will not likely find commercial seed paper that includes all of the seeds you are interested in planting. This, in turn, means that you will most likely wind up making your own with a few simple adaptions. Here are a few things you might want to try once you have experimented with the basic process:
- Try making seed paper while you are out camping or spending extended time in the woods using only available resources for the paper part. This would be an excellent time to polish your paper-making skills, problem-solving skills and produce something valuable that you can work with further once you return home.
- Explore working with seed paper of different sizes and shapes to find the best for each gardening situation. For example, if you have a large outdoor garden, it won’t make much sense to use many small round disks. In this case, you might want to explore making strips or other shapes for matching your planting area.
Advantages
Even though it takes more work to make seed paper than sowing directly into the soil, here are several advantages that may be of interest to you:
- Have you ever been amazed at how such huge plants can come from such tiny seeds? Whether you are trying to plant mint or other tiny seeds, it is impossible to do so without using broadcasting instead of placing the seeds where you want them. While broadcasting isn’t a huge problem outdoors for experienced gardeners, it can be a bit tricky when using container pots, pet pellets, and various starter mediums. Seed paper makes it very easy to place the seeds precisely where you want them or move at least a few around if needed. Just remember that some tiny seeds like the ones found for various members of the mint family require sunlight to germinate. Try not to let the paper cover the seeds in these cases.
- While you may have very sharp eyes, even larger seeds can be hard to see if they are too similar in color to the planting medium. When your schedule is packed or continually distracted by one thing or another, it is entirely possible to lose track of where you planted these seeds. On the other hand, when you make seed paper that contrasts sharply with the color of the seeds, you will never lose track of where you have already planted.
- As I mentioned earlier, not all seeds need to be covered with soil. Other seeds need to be sown deeper, or they simply won’t germinate. Seed paper makes it very easy to place the seeds at one depth. From there, all you have to do is cover the seed paper with the proper amount of soil. This also makes it much easier to mix soil mediums in an outdoor garden setting. For example, over the years, I have found that I often prefer to set the seed directly into the soil in the garden and then cover then with a loose layer of lighter soil that I mix for seed starting purposes.
- Once you get started with sustainable survival gardening, you are bound to want to explore more complex plants. Consider that bell, cayenne, and sweet peppers are relatively easy to germinate if you give them the right temperature. On the other hand, as a prepper, you are bound to think about spices such as paprika (also derived from a pepper) and black pepper that can also be grown from seed. Even though both of these plants are considered “peppers,” their seeds won’t germinate unless you soak them in water first. When you make seed paper, simply keep it moist, and you will be providing a suitable starting medium and the necessary moisture to start them in the process of germinating.
- Over the years, there have been times when I was preparing hundreds of containers to sow dozens of different vegetables, fruit, and herb seeds. As relaxing and enjoyable as gardening can be, it can be challenging to find enough time all at once to sow this many seeds in a single day and take care of other matters. On the other hand, when you sow seeds into seed paper and let the paper dry out quickly, it won’t damage most seeds. This makes it possible to save a lot of time and concern when sowing the seeds. As long as the soil is prepared and ready for planting, all you have to do at sowing time is place the seed paper, cover it with soil (where applicable), pat the ground down, and add water.
- If you are planting a survival garden in a natural or wild setting, you will not want to plant in conventional rows. It is also likely that you will want to take advantage of companion planting in a way that makes it look like the plants simply grew there without human interference. When you use seed paper, you can make the disks as large as you need to accommodate several seed types. This will save time and make it much easier to plant all of the seeds at once in a specific area.
Disadvantages
Even though you may recognize many good reasons to use seed paper in your survival garden, some problems are also associated. Here are the most important ones to consider before you get started:
- No matter how sturdy some seeds may look, they may be very fragile in terms of the fluctuations in moisture levels that they can tolerate. For example, radish seeds and others that look sturdy and germinate in just a few days may be well on the way to forming a new plant even as the seed paper is drying out. If you leave the paper dry even for a day or two, there is a good chance these seeds will be killed off and fail to germinate.
- Smaller seeds or thin shells tend to produce plants with very fine or fragile primary roots. No matter how large the plant may grow, later on, that first root must break through the seed paper to gain water and nutrients from the soil. If it gets stuck in the paper, this will be no better than if the seed had landed on a rock or hard ground. It is essential to be careful about the thickness of the seed paper and how many layers the primary root must go through to reach the soil.
- More than a few people today do not realize just how common herbicides such as glyphosate. You might consider many paper products for making seed paper come from plants that were sprayed with this or other herbicides. Some of the paper may also come from genetically modified plants to carry an herbicide within them. If you are working with heirloom or non-GMO seeds, there is a good chance they will not germinate in these toxic papers because they have no resistance to the herbicides.
- When you break used paperback down into pulp, you will also be draining away any preservatives or other chemicals that may have been used to help reduce the growth of mold or mildew. Unfortunately, the longer the paper remains above ground, the greater chance it will pick up moisture from the surrounding air. Aside from increasing the risk of mold and mildew, enough water can also send false signals to the seeds. Even if they don’t show signs of germination, the changes in moisture levels can kill the seeds. While you can keep seed paper in moisture-proof containers, it is still essential to be aware of this issue.
Some Things Seed Paper Won’t Do
Even though seed paper has many uses, it cannot substitute for good seed sowing practices. Here are some things that seed paper won’t do:
- Seed paper cannot take the place of good hygiene when sowing or in the growing area – as strange as it may seem, you must keep your plants in a clean area if you expect them to grow properly and as disease-free as possible. For example, if you don’t wash your hands before sowing seeds, there is a chance you may have come into contact with mold, mildew, or fungal spores that will flourish in the warm, wet environment that you need for starting seeds. While you may not see these disease-bearing organisms immediately, they can quickly overtake young seedlings if the conditions are right. At the very least, washing your hands, equipment, and containers before you handle soil, seed paper, and raw seeds can reduce the number of pathogens that have to be dealt with.
- Seed paper cannot take the place of good airflow in the growing environment. If there is one part of gardening that has become a personal pet peeve, the sheer number of people put plants too close together while not providing sufficient airflow around the plants. While seed paper can help you space out the seeds before you sow, it cannot change your decision-making about the distance between seeds or between seed paper slips. Over the years, I have seen dozens of gardeners with plants placed too close together indoors and outdoors. They may look good from a distance, but upon close inspection, the leaves are small for the age of the plant, and there is usually at least some fungus or rot going on near the soil surface. Quite frankly, I would rather have one plant with plenty of good airflow around it and a healthy growth structure than three that are packed too close together. One plant can and will outproduce three if given proper airflow and other optimized growing conditions.
- Seed paper cannot take the place of proper lighting, water, and soil nutrients. Even though you can mix various things into the paper to boost germination and root development, it may not last long enough for the plant to reach maturity. You will still need to use the proper soil for the seeds you are working with. For example, even if you add acidic fertilizer to seed paper for acid-loving plants, it will do no good if the soil itself is too alkaline. Once the roots touch the alkaline soil, the plant will either slow down its growth or die. Similarly, using seed paper will not suddenly make it possible for a shade-loving plant to thrive in full sunlight. Seed paper can help give you seedlings a good start, but the other conditions must still be suitable for continued growth.
- Seed paper won’t turn poor quality type seeds into suitable ones – consider a situation where you don’t have much money to buy seeds, but you wish to grow many plants. Under these circumstances, it is all too easy to become tempted by those 25 cent packets of seeds and others that look cheap. Even though some may be legitimate heirloom varieties, the parent plants may not have been of good quality. As a result, the plants you wind up with may not be as healthy or as prolific as you were hoping. While you can use these seeds for practice and get some good results, seed paper will not increase your odds of success in the first crop, let alone successive ones produced by seeds from the initial batch of plants. Similarly, if you purchase seeds from GMO or hybrid plants, there are no guarantees that they will produce a viable crop of seeds for the next generation. As a survival gardener, never forget that your focus must constantly expand to consider how you will plant for the next season without buying more seeds.
How to Make Basic Seed Paper
- Materials
- Screen mounted on a wireframe. The inner dimensions of the screen should match the size of the paper you are interested in making. If you are making your paper screen, do not forget you will need to detach the pulp from the frame while it is still wet. You may find it helpful if you make it easy to separate the screen from the frame.
- Pressing board – A piece of wood, hard plastic, or some other material large enough to cover the screen.
- Tub or bucket large enough to dip the screen in horizontally
- Enough raw material or shredded paper to fill the bucket to at least ¾ full.
- Plastic sheet that you can use to layout new pulp to dry out. Later on, you can simply regrind it, add more pulp, and use it to make more paper.
- Compost tea – if you do not know how to make compost tea, you can use the following guidelines. Start by taking well-aged compost and putting it in a bucket of water. Use 4 – 6 parts water to 1 part compost. Let the compost and water sit for 3 – 4 days. Next, strain the water and compost it into a clean bucket. The recaptured water is the compost tea. Ideally, you should use it immediately. You can also use it as a leaf spray for older plants.
- If you are using raw material, you will also need lye or other alkali solutions to break down the cellulose. You will also need safety gear, utensils, and a cooking vessel that will not react with the alkali.
For the most part, making seed paper is no different from making paper bricks or novelty paper. In this case, however, it is best to limit the paper you use to organic sources that do not have toxic inks, herbicides, or preservatives in them. If you cannot find suitable paper, there are many resources you can find in nature. This includes obtaining pulp from softwood trees, kudzu, and just about any plant that grows over 2 feet tall. Grasses and leaves can also be used to make paper. Here are the basic steps that will work for most materials:
- Start by gathering the raw materials that you will be using to make the seed paper. Do not take the whole plant or dig up the roots. Leave enough of the plant in place to grow back and continue with this seasonal cycle. It is also essential to leave at least 4 – 5 of the same plant undisturbed, especially if you are gathering from the wild. Needless to say, if you are simply taking grass clippings from your yard, there is no need for concern about taking away too much material at one time. Try to gather at least 1 – 2 pounds of material. Even if you only plant a small sheet of paper, it doesn’t hurt to have more on hand if you make a mistake or wish to make more paper as soon as the first batch is done.
- Next, you will need to begin the process of releasing cellulose from the raw materials. Start by cutting or tearing the fabric into ½ inch strips. Put them in a pot with water and let everything soak for at least 24 hours.
- If you are using raw materials that have not been made into the paper before, you will need to boil them in an alkali solution. Ensure that you do not use pots, utensils, or other gear that reacts with lye or other robust alkali solutions. Do not forget to wear chemical-resistant goggles, an apron, gloves, and footgear so that you do not wind up with burns or other injuries. It is not necessary to boil materials in an alkali solution that was already made into paper. For example, if you are using old mail or notebook paper, all you need to do is tear it up and soak it in warm water until it makes a pulp. This can take anywhere from half an hour to overnight.
- Next, for raw materials, you will have to beat the materials until they form a pulp. You will know the material is broken down enough so that it is about as thick as gravy. Later on, you will be immersing a screen into the material, so keep this in mind. If the pulp is too thick, you will not be able to dip the screen in. If it is too thin, it will all go through the screen instead of having a sufficient amount stay on top. For a shortcut, you can add the paper to a food processor and then add water in small amounts until it is the proper thickness. Some people recommend using a blender. However, I have personally found the food processor is less likely to jam up or strain. Skip this step if you are using materials that were already made into paper.
- For the remaining steps, it does not matter whether you use raw material or pre-manufactured paper. Take the pulp and put it in the bucket you will be using to dip the screen in.
- Go ahead and dip the screen into the pulp. When you lift the screen, there should be a thin layer of pulp sitting on top of the screen. You can tip the screen as needed to even the paper out.
- Take the material you chose for the pressing board and use it to press out as much water as possible from the pulp. Do not use too much pressure, or you may wind up pushing the fiber through as well. This will also help flatten out any areas that have too much pulp.
- Next, take the screen and turn it onto plastic sheeting or a towel with the pulp side facing the sheet. Gently lift the screen from the pulp.
- Place another sheet of plastic or towel on top of the pulp and use a rolling pin to flatten it out.
- Lift the top sheet off the pulp and let air dry overnight or longer as needed.
Seed Paper Additives for Survival Planting
When you make your pulp for seed paper, you can also add things to the pulp to improve germination or make it easier for the seedlings and plants to thrive. Here are some things you can add to the pulp. You may also have to add more water to the pulp to make sure it remains at an optimal consistency.

- Crushed eggshells – finely crushed eggshell will give the seedlings extra calcium and other nutrients. Leave some of the eggshells in more significant bits so they will deter root-based insects. Remember, sharp eggshells can easily cut into the underbody of many insects that will attack young seedlings and older plants. As the shells break down, they will also provide a steady source of calcium for the plants.
- Compost tea – this is easily one of the best additives for seedlings. If you can use at least ¼ to 1/3 compost tea during the pulp production process, it will give your plants a tremendous boost once the paper is re-moistened. More than a few gardeners even pre-soak their seeds in compost tea before planting them.
- Coffee grinds – if you are planting acid-loving plants, use coffee grinds that haven’t been used for making coffee as these grinds will be more acidic. If you aren’t interested in decreasing the pH of the paper, then go ahead and use spent grinds. These grinds have a pH closer to neutral and add nitrogen, potassium, and magnesium to the seed paper. Both types of coffee grinds will attract earthworms, which will help reduce soil compaction and ensure better airflow into the soil. You may also find that raw coffee grinds in the seed paper will increase the caffeine levels, which will help keep slugs and other garden pests away from seedlings and young plants. Even if you decide to add coffee grinds while the plants are growing, it doesn’t hurt to add some to the seed paper to be ready and available right where the seeds are germinating.
- Tea leaves – if you are the kind of person who can’t get started in the morning without a good cup of tea but can pass on the coffee, you will be glad to hear that you can also use tea leaves seed paper. In this case, tea leaves will also decrease the pH of the soil. While acid-loving tomato plants may not like coffee grinds, they will do better with tea leaves. Tea leaves will also increase the nitrogen, potassium, and phosphorus levels in the soil. Even though tea has less caffeine than coffee, the leaves may still deter some garden pests.
- Epsom salts – from improving germination to increasing essential nutrients in the soil, few additives work better than epsom salts. If you have seeds that are a bit hard to germinate, using epsom salts is one of the cheapest, best-kept secrets of gardeners worldwide. While most people add epsom salts only to the soil, you can also try adding them to seed paper. In this case, I recommend making a sandwich-style disk with some soil in between the seed area and the epsom salt layer. This will give the roots of the plant some time to develop before they encounter the epsom salts. Epsom salts are pH neutral; therefore, they will work for just about all seed types. Since epsom salts increase magnesium levels in the soil, you can expect faster root, leaf, and fruit development.
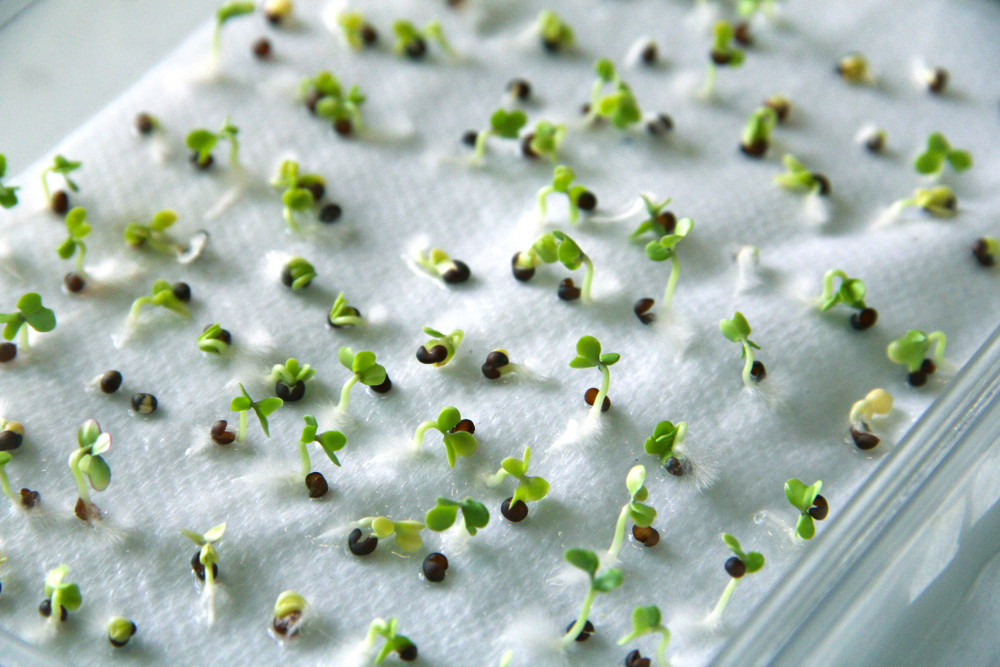
Using Napkins or Paper Towels
Whether you are making seed paper from natural materials or recycled paper, it is a time-consuming task that uses a good bit of water. Suppose you are in a situation where you need to plant quickly and have limited resources; napkins or paper towels maybe your best option. For the simplest form, start by moistening 2 – 3 napkins or paper towels. It does not matter if you use warm or cold water, although room temperature will be better for the plants. Lay the moistened napkins on top of each and press together. Set the napkins or paper towels on some plastic or other material that they will not stick to.
Next, press out as much water as possible. Set the seeds onto the napkins as you would for other kinds of seed paper. Finally, moisten another 2 – 3 napkins or paper towels and place them on top of the seeds. Gently press the seed paper with your hands to get as much water out as possible. Do not run a rolling pin over the seed paper or anything else that might damage the seeds. Once the napkins dry, they will be solid enough to use as any other seed paper.
If you want to apply epsom salts or other additives to the napkin or paper towel-based seed paper, it is better to liquify them first and then dip the material into the mixture. You may also want to experiment with multiple layers and using different additives for each layer. Remember, seedlings and their primary roots are tiny, so even the difference of 2 or 3 layers may be enough to change how well the plant does.
Advanced Seed Paper Ideas
Chances are, you already know that plants go through specific stages of development and have different needs at those stages. Since seed paper can take some time to degrade, it may be the perfect way to create a slow-release fertilizer medium that will always be right where the plant is. Here are some ideas for adapting seed paper to be the ideal way to boost survival plant growth:
- Start by thinking outside of paper as just thin layers that must always include paper. In this case, you might want to add a thin layer of grass clippings along with another one for epsom salts and another for coffee grounds. Even if the seed paper is now an inch or two thick and looks more like a sandwich, it may be the best formula for starting seeds. This is especially important if you are the type of gardener that relies on seed starting medium and tends to have little success using regular soil. Simply consider what you would do in a situation where these seed starting mediums are not available, and you have no means to take cuttings from established plants.
- Most people that use seed paper try to make the paper as small as possible. On the other side of the equation, the plants are likely to develop enormous root systems that will stretch for several inches around the plant. Why not make seed paper that will provide nutrients for the roots even if they are 3 – 4 inches away from where the seed germinated? Do not forget that root structures are very similar to branch structures. The newest and most active parts of the root area at the tips. These are the areas in the water and nutrients, while older sections do more transport-oriented work. If you want to get the most out of seed paper as a slow-release fertilizer medium, then it is best to use a larger disk so that newer roots have access to it.
- As you work more with seed paper, you may find yourself wondering if “paper” is the only thing you can use for the layers. If you are familiar with seed balls, then you already know that some people use a combination of clay, soil, and water to create fast planting seed mediums. If you are primarily concerned about toxins in a modern paper, it may be worth your while trying some other materials. This includes simply moistening fresh leaves and layering them together. You can also try using grass-clipping mats mixed with soil or anything else that will solidify once dried out.
- Finally, don’t think of seed paper as just one disk or sandwich that must contain seeds. As a rule of thumb, a plant’s roots will extend as far down as the height of the plant you see above ground. If you know that a plant will be a few inches to a few feet tall, it doesn’t hurt to bury seed paper disks further down in the soil. Whether you want to add eggshells, coffee grounds, or even compost tea, this is the best way to ensure the materials stay in the area where the roots are for the most extended period. Sadly, no matter how much time you spend layering soil, mulch, and fertilizer in a garden or container, eventually, it will all just leach downward. Seed paper will also leach, but not as fast.
If you have a knack for plants, you may not need to do much more than throw some seeds into some soil to get a thriving garden. However, other people seem to struggle with established plants and have an even harder time getting seeds to germinate and flourish.
Unfortunately, when food becomes unavailable, it won’t matter whether you have a “green thumb” or not. You will have to be able to grow plants from seeds to survive.
Seed paper is often seen as a novelty item that can enable just about anyone to start a survival garden with ease. At the very least, if you have failed with outdoor or container gardens in the past, you can try making simple seed paper from napkins or paper towels and see if it helps. Individuals that are advanced gardeners trying to navigate the challenges of more complex plants or growing conditions may also find that seed paper can be adapted and used to make these situations easier to master.


