


In a survival situation, ensuring you get enough protein will make a big difference. But you can’t always depend on electricity to be there.
What’s more, where I live, we hunt a lot of game. So, our freezer fills up fast. Which is a big reason we preserve our food. To save on space, and to avoid waste. So, without delay, let’s get to it!

Step 1 – How to Prepare Your Stock
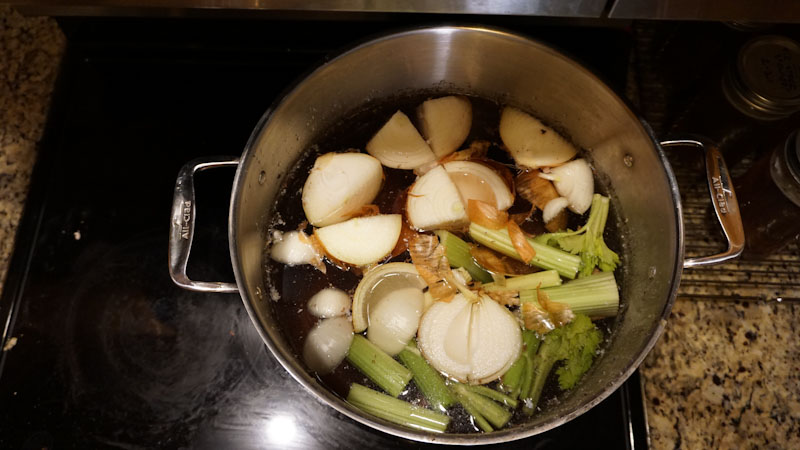
For the stock, your first step is to boil a bit pot of water. Here you will add whatever vegetables, bones, meat, and scraps you wish to use. Before you leave it to simmer overnight (ideally).
Once it’s ready, after filtering the bits out, add your stock to some pre-warmed jars (this’ll stop them from shattering).
Leave about an inch of headspace as you do this.
When you’re done, wipe off the surface and the rims of your jars and lids to ensure a clean point of contact. Then secure your lids tightly.
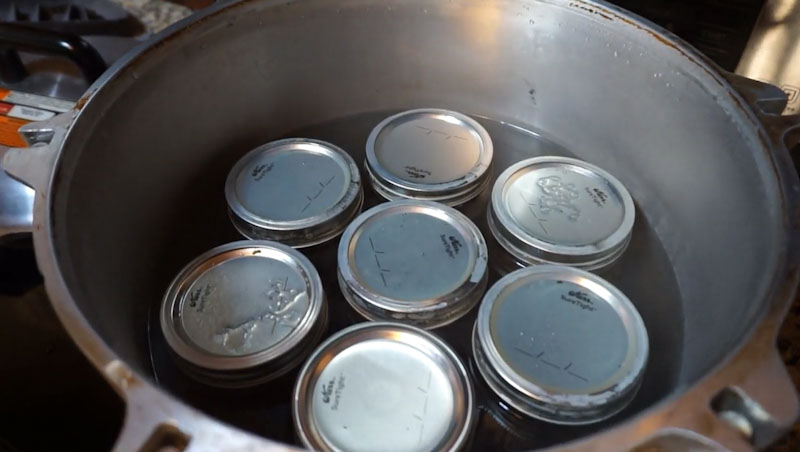
Step 2 – Adding Your Meat
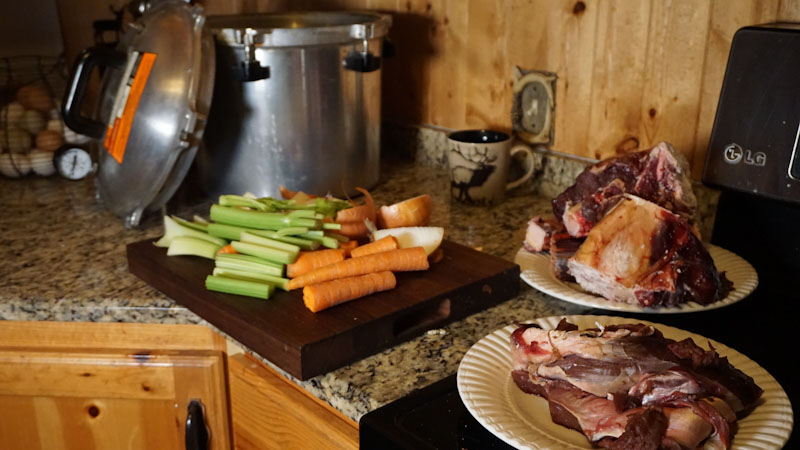
Next, take some cooked meat and pack it into your jars. If it’s still a little pink this is fine as your meat will continue to cook while canning.
As a sidebar, if you’re preserving store-bought meat that’s OK, but in the video above I’ve used cuts from a buck I caught. Just know that, if you buy your meat, high quality chilled meat is best. But the rest is a matter of preference. For example, anything from beef, to lamb, to pork, sausage, veal or even bear meat will do fine.
Ideally your meat would also be freshly cooked, but I have never found that to be practical. One way to avoid this issue is to slowly raise the temperature of the jar as you can it.
Once your meat is really packed in, top up your cans with either water or stock. Again, while leaving a little headspace. Press your mixture down to remove any bubbles before wiping your lids and secure them tightly.
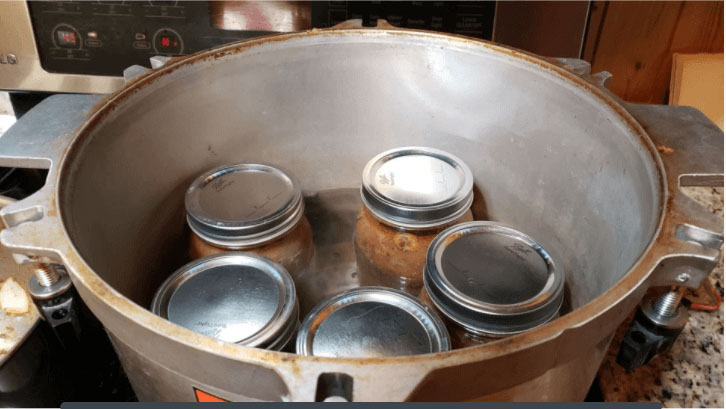
The next step is to put your jars into a pressure canner. They should be also be fully submerged.
Before you close the lid of your pressure canner add some olive oil to your canner’s rim so it’s easier to remove later. Now you’re ready to heat your canner.
Step 3 – How to Can Your Meat
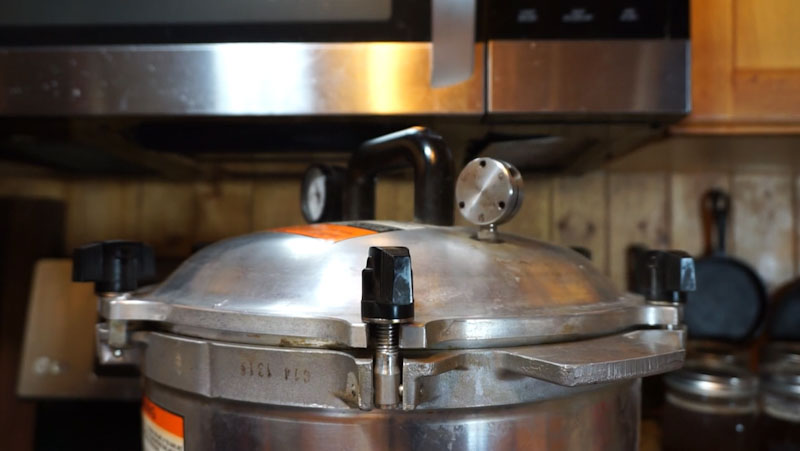
Switch on the heat. Once it’s been venting for 10 minutes, you’ll want to put on the weight. I have set mine to fifteen pounds. But, for a more accurate image of what to do, you should consult your canner’s instructions.
Weight Pointers:
For weighted-gauge canners:
- At up to 1,000 feet above sea level, use 10 pounds of pressure.
- At above 1,000 feet above sea level, use 15 pounds of pressure.
For dial-gauge canners:
- At up to 2,000 feet above sea level, use 11 pounds of pressure.
- At 2,001 to 4,000 feet above sea level, use 12 pounds of pressure.
- At 4,001 to 6,000 feet above sea level, use 13 pounds of pressure.
- At 6,001 to 8,000 feet above sea level, use 14 pounds of pressure.
- At 8,001 to 10,000 feet above sea level, use 15 pounds of pressure.
Once your weight starts to rattle, leave it for 20 minutes. That’s all you need when it’s stock only (for pints). When it’s meat you’ll need to leave it for 75 minutes.
For quart jars you’ll need to leave them for 25 and 90 minutes, respectively.
Do not remove the weight from the vent early. Otherwise, you could negatively affect the seals of your jars. Then wait for the pressure and temperature of your canner to dissipate naturally. Take care to check the pressure and temperature of your lid before you remove it.
Step 4 – Removing Your Jars
Then transfer your jars (with tongs) to an appropriate surface to cool off on. Here, they’ll continue to bubble for a few hours.
If your jar lids pop up, this indicates that they did not seal properly. But don’t worry, you can always reprocess them. Once your jars have cooled, simply store them in a cool-dark place until they’re ready to eat. These should safely store for 2 to 5 years. Or even longer.

Final words
I hope you enjoyed this tutorial.
Remember, this is just one of the many lessons you need to survive. You’ll find many more inside The Amish Ways. So why not check it out? It’s one of the best ways to get inspired and to discover practical shortcuts you’d otherwise miss.
Others Are Watching Now:


You do not fully submerge jars to pressure can. The temp is reached by superheated steam under pressure. You submerge jars in water bath canning used for high acid foods. There are many canning manuals and websites online. Please get full instructions before canning so your food is safe to consume.
With that said pressure canning is a great way to preserve meat and have shelf stable cooked meat on hand. I have been canning for 50 years.
Trudy,
Do you also write about canning? I would like to follow you if you do. Or, more specifically my better half has been canning for four years and agrees with you and is always in search for the most correct way to can and freeze dry.
I don’t have any kind of blog about canning. I follow best practices in most cases but have done some rebel canning. I have canned milk and heavy cream and butter. I feel like if you pressure can liquids at the right weight and time it will be safe. Just because the government doesn’t put this out as safe doesn’t make it so. If you can can broth and make it safe then you can pressure can milk and make it safe. Some people don’t pressure it long enough imo so I do it same timing as broth. I would never water bath low acid foods. Why risk it? I mostly freeze dry to preserve at this point since we invested in a freeze dryer 8 years ago. But still like canning meats and tomatoes. Be safe is my motto.
While the article does have good information with the one glitch about pressure canning versus water bathing, it does underscore something she shares with me that there is a wide range of opinions of best practices regarding canning and freeze drying. Experience is the greatest determinant of best practices and after 50 years of canning and you ain’t dead yet is a pretty good indicator of best practices.
I have a lot of the All-American brand of Pressure Canners by Wisconsin Aluminum Foundry – very high quality and a machined metal-to-metal seal which means no gasket and that’s the part that goes bad, so from a preparedness perspective, it will last. My first one was used and went through three generations and still works, so that impressed me so much I bought a lot of new ones. I use the model 930 mostly because each does two layers of 7 of quart jars or 14 each and I can prepare and keep three going at once — staggered. I mostly pressure can meats.
I also have a pallet of cases of tapered Can or Freeze half pint canning jars to make my homemade versions of meals ready to eat. They’re great for camping because they are instantly ready and taste great even cold with just a spoon. I like that I can not use them yet have them when I cook up a big meal of fish I catch for a group while camping. The good part is they are there for the odd time the fish don’t want to be caught or when there is a diversion yet I still need to eat. I don’t need to freeze protect them and I can just put them back on a shelf when I don’t use them.
I’m tempted to take a fishing vacation. There are some fish that have high or no limits, so camping with my pressure canners and fishing is a way to put up a lot of fish in canning jars which is a good way to get free food storage. I like canned fish.
Mainly, I keep a small mountain of cases of canning jars. I bought several full pallet loads. Food will come in abundance all at once like an elk or a crop is ready and ripe in a short window of opportunity. Keeping food will be important, so my empty canning jars are for that.
Vegetables are best fresh from the garden. I don’t have that, but I have a huge amount of seeds of great variety packed tight in a large refrigerator.
I’ve also noticed that there are a lot of people with fruit trees productive way past their needs and offer fruit free to be picked at the peak of readiness. I’ve been tempted to take some vacation days to can up a lot of fruit. But, I’m also tempted to do freeze drying for that and seal them up in canning jars with the Tila brand adapter used with my high-vacuum pump that removes all of the air down to twenty microns and very effectively reduces typical 10% moisture contents of dry foods like rice or dry fruits down to nearly zero.
Fermenting and sprouting is something I’m very prepared to do, but don’t do now. I have all the supplies. I have starters in the freezer. I have one for vegetables with the bacteria select to produce high levels of vitamin K2-MK7 which is very important for healthy living. My bone density is very high and I plan to keep it that way and continue to be highly resistant to injuries which is a preparedness advantage aside from the advantages of enjoying being healthy.
I have a huge box of sprout seeds of a large variety. Broccoli sprouts have 50 times the nutrition of mature broccoli. But, I don’t have much time to spare for either sprouting or fermenting and just buy what I eat, so I just keep the supplies and take probiotic capsules instead. In the harsh times to come, we won’t have jobs with industry and society, so our jobs will be doing things for ourselves and it will be important to have the skills and supplies for then.
But, for now, my job helps me stock up on more preparedness supplies in this rapidly closing window of opportunity for these times will be known as the good times when our preparedness was still possible.
It’s never too late to be prepared until it is.
Let’s talk preparedness!
Ronald H Levine
[email protected]
I add to this that I’m likely going to purchase a very large Harvest Right freeze drier.
I have cooked homemade pasta sauce to 200 degrees and then placed and sealed in a ball jar.. Most are in the freezer. How long can I keep the ones that I stored @67 degrees in a dark room? These are not frozen.
Thank you,
Mark
They will most likely start growing mold and you are running the risk of botulism. You can water bath can tomato sauce by adding 2 tbsp of vinegar per quart. To water bath can you need to immerse cold jars in cold water that covers them and bring it to a boil then boil for times stated in canning instructions you can find online. Properly canned they will keep for several years if you just poured hot sauce into jars and they sealed from the heat they will not keep as those temps aren’t high enough to kill botulism spores. Look up how to can tomato sauce on the internet and follow those instructions. It they were just done a few days ago then I would recan them properly immediately. I would open the jars not in the freezer dump them in a pan and reheat and bring it to a boil, boil it for 10 minutes to neutralize any botulinum toxin then put it into hot jars( you can warm your jars in a 170 degree oven by putting them on a cookie sheet that has a cotton towel on it. Do not put them right on metal cookie sheet as they can break. ) then can them properly in a water bath canner. You can get a water bath canner at Walmart for under $30.
I was brought up with canning in the house since the early 50’s. We had to because food was a luxury when the sole provider was on a new job hunt about every other month, and the Steel Strike occurred any extra meat cooked had a portion set aside for canning.. My wife and I do canning when we hear of conflicts occurring and we see the start of food shortage. My preference is going on to freeze drying because of the weight and the storage space saved. compared to canning space.
Preheating the jars in the oven is a dangerous practice. The jar manufacturers warn against it since the glass is not tempered to withstand dry heat. Instead, wash the jars with dish soap, rinse thoroughly, then place them in a rack in the hot water bath until ready to fill them. Once the food is ready to be put into jars and the jars are hot, pull a jar out with a jar lifter, pouring the water in it back into the hot water bath. Fill that single jar. de-bubble it, wipe the rim with a damp paper towel, then put on the lid and ring. Tighten the ring “finger tip tight” and put it into the rack in the hot water bath. Pull out another jar and repeat all the steps. Continue until all the jars are filled or all the food is put into the jars. Any jars not used can be left in the hot water bath for processing. They don’t need lids and rings. That way, the jars with food will remain upright in the pot and not fall over. Follow headspace and processing time instructions from your safe and tested recipe. Be sure the water level is at least 1″, preferably up to 2″, above the top of the tallest jar in the pot. Bring to a rolling boil with the lid on, then start your timer.
For pressure canning, heat your jars in another pot on the stove. If using an electric pressure canner, follow the manufacturer”s directions. Somd of them have a jar warming cycle.
Canning is a science, not an art, and “tweaking” a recipe is very limited. You can usually change dry herbs and spices but not much else. Be very wary of most instructions and recipes found online. Thd USDA recommendations are not a conspiracy. They have been developed to include pleasant tastes and textures as well as safety. Find a safe and tested recipe that closely matches your favorite family recipe and try it before risking the safety of your family and friends. Science and testing methods have improved over the past 50, 60, 100 years. Some recommendations and recipes have been changed to reflect those improvements.
Unfortunately, for those of us who are Beanderthals—like myself—who know nothing about canning, this article pre-supposed that the reader had a basic grasp of canning. Such articles should always aim for the lowest common denominator among the readership, that way informing everyone. After all, isn’t that the goal: informing as many people as possible?
I learned a lot more from the commentors, especially the ladies and gentlemen who’d been canning for 50 years.
Hi Christie
The Ball Bluebook of Canning is the book most of us elder canners use. Any time I have a question about canning, I look to that book first, even before going on the internet.
It’s been around for decades, and hasn’t failed me yet.
Christie,
I second TAL’s suggestion. There are several books published by Ball/Bernardin, the manufacturer of canning jars and lids. They manufacture undef the brand names of Ball, Kerf and Golden Harvest in the USA and as Bernardin in Canada. Be sure that any book you buy from them shows the Ball name in their copyrighted form, in a modified cursive, at a slant. If the name “Ball” on the cover is printed horizontally in Times New Roman, the book is probably a pirated copy and might not be accurate. If you find the USDA/NCHFP book at Tractor Supply, printed in China, it is a pirated copy. Instead, go online to the NCHFP (National Center for Home Food Preservation) website at http://www.NCHFP.uga.edu and you will be able to download or print their entire library of information. They are the ultimate source on safe and tested food preservation methods, techniques and recipes. The authentic book is only available through them and any profit goes toward their research, testing and education programs.
There is a facebook group, “Canning Recipes, Safe and Tested” that adheres to the guidelines set up by the NCHFP, Ball/Bernardin, the USDA and one or two other sources. They do not allow any spam or bullying and you must agree to follow their rules in order to join. An excellent resource with lots of knowledgeable moderators who answer every question, no matter how repetitive or complicated it might be. I spend WAY too much time reading the posts and comments that come through every single day.
The information is out there. Stay away from the YouTubers, the rebel canners and those who say, “That’s how my granny did it and nobody died.” Actually, they all died and nobody really knows what killed a lot of them. Don’t forget….doctors used to recommend smoking cigarettes, cribs were coated in lead paint and we didn’t have seat belts for many years. We have learned better since then.
Oops… That should say…. Ball, KERR and Golden Harvest….