


When visiting food stores, some are easily led to believe there are no upcoming food shortages. That said, one look at meat offerings, limited produce selections, and shelves filled with the equivalent of single ration dry goods should be enough to indicate food is becoming scarcer by the day.
In addition, if you look at the price of all these subpar foods, you will also realize that something other than inflation and transportation cost is causing a rise in prices. With that in mind, every person preparing for crisis should realize that the window for managing food supplies is closing at warp speed.
Rather than go on hoping food prices will go down, it is important to start storing foods in ways that keep them safe and edible without using a conventional refrigerator or freezer.
One of the easiest method to do this would be drying or smoking, as they don’t rely on energy and still be available when living off-grid, or in the aftermath of a major blackout.
1. Freezing
Fresh cleaned and packaged game and fish can be frozen for safe storage during the late fall through the winter months.
The temperature of the food must stay below 30 degrees at all times.
Use fresh packed snow or ice cut from a nearby pond or a lake to build an ice house.
Wrap the ice in sawdust or wool to slow down the melting process.
2. Cooling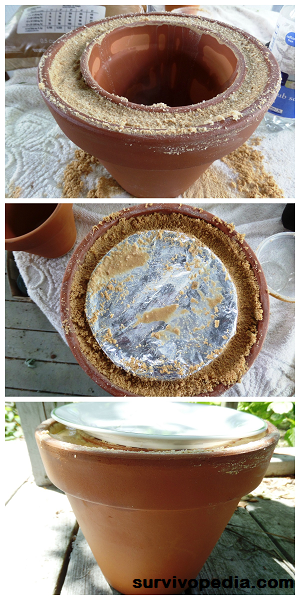
Aside from longer term preservation systems, there will always be a need to keep milk, meat, or other fresh foods cool for a few days or weeks. In this instance, evaporation based coolers are an inexpensive way to keep foods anywhere from 20 to 40 degrees below external temperatures.
How to Build a Simple Evaporation Based Cooler
To create a simple cooler start by obtaining two vessels made from porous material: unpainted wooden boxes or unglazed ceramic work well. One vessel should be small enough to fit inside the other with a cushion all around the inner vessel.
- Next, place a filler between the two vessels that can hold a good bit of water. Sand, sponges, and even paper towels can be used for this purpose.
- Cover the inner vessel with a white towel or reflective surface to deflect as much heat as possible from the environment
- Use a fan or a sunny, hot location to pull water out of the vessel as quickly as possible. As the water evaporates, it will pull heat from the inner vessel along with it.
- In order to replenish water, you can use a pump and irrigation drip tube over the sponge/ sand or simply pour water in when needed.
Solar Coolers
Once temperatures cool during the evening hours, evaporation based refrigerators will not be very effective. Interestingly enough, the addition of a simple aluminum foil cone can keep the box cool.
To use this method, place the narrower part of the cone inside the cooling chamber and aim the larger side at a clear area of the night sky. The darkest areas will act as a heat sink and draw heat from the chamber.
If you are using an aluminum foil funnel for a solar cooker during daylight hours, you can use the exact same funnel for refrigeration purposes at night. As an added bonus, you will not need to pour water into the sponge layer of the evaporation cooler while the funnel is in operation.
3. Dehydration
Overall, if you are looking for a low cost, space efficient method to store foods, few can rival dehydration. When preparing foods, simply cut the food into evenly sized pieces that do not exceed 1/4 inch in thickness. You will need to experiment with different drying times and thicknesses to determine what will work best for each food type.
In order to get the best results, you should always choose fresh fruits and vegetables. If you buy extra produce from a farmer’s market or even the local food store, make sure that you are prepared to start the drying process within 6 – 12 hours. Even though some foods may last longer, you will get the best flavor and quality by dehydrating as quickly as possible.
Just because you dried foods, it does not always follow that they will be edible, tasty, and visually appealing. For example, once you cut apples into slices, they will begin to turn brown. To prevent this, simply dip the pieces in lemon juice. You can also use this method for other light colored vegetables and fruits that tend to discolor soon after cutting.
There are also a number of vegetables that do not lend themselves well to dehydration in the raw state because they contain enzymes that cause them to become tough during the drying process. In most cases, blanching or steaming will help alleviate this problem and also reduce the chances of discoloration developing.
There are 4 ways to dehydrate foods
- Solar – This method works best for fruits and vegetables. Simply lay food out on a clean surface and let it sit in the sun for a few hours.
- Heat Box
- Smoke House
- Electric dehydrator for foods – It would not be available in case of a major blackout unless you harness alternative sources of energy.
Sun Drying Foods
The fastest and easiest way to preserve meat and fish is to sun dry them. Start by removing any tissue that is bruised, discolored, or infected. The wet surface of fruit, fish and meat is an ideal growing area for bacteria and fly larva. Drying greatly reduces this problem plus keeps the dried items fresh.
- Clean and cut the foods to be dried into thin strips.
- For meat and fish, cut the strips 4 inches wide by 10 to 12 inches long by about 1/2 inch thick.
- Cut scoring marks on both sides along the length of the meat or fish to be dried.
- When this is done skewer the meat or fish open and suspend it on the racks or on the rope to dry.
Try to locate the rack or the suspending ropes outside of the camp to prevent scavengers from reaching them. Choose an area where there is plenty of sunlight, and also a light breeze to keep the flies away. If this is not possible, fan the rack or ropes to keep the flies away.
Note: Dried meat or fish should be kept on the rack till it has the look and feel of jerky.
Dried fish and meat can be store for a long time as long as they are stored in air and water tight containers. Once they come in contact with moisture, they must be consumed or discarded.
Dried fish and meat can also be ground and pounded to be added to wilderness soups or stews.
Use a similar process to dry fruits and vegetables. Since plant based foods have different water content levels, you should know how long it takes to dry each one, as well as how long they can be safely stored.
How to Build a Drying Rack
- Cut 4 poles about 8 feet tall and 3 inches in diameter.
- Cut 5 poles about 6 feet long and 3 inches in diameter for horizontal meat or fish hanging poles.
- Take the 4 tallest poles and make 2 sets of 2 poles lashed together about 1 foot from the top.
- Lash 4 of the meat or fish horizontal poles into place starting at the top of the “V” of the longer poles across to the other set of longer lashed poles. Each of the horizontal poles should be spaced about 1 foot down from each other. The fifth horizontal pole will be lashed to the back of the rack to help support the structure.
- After you have chosen the location for the drying rack anchor it by burying each leg about 1 foot down.
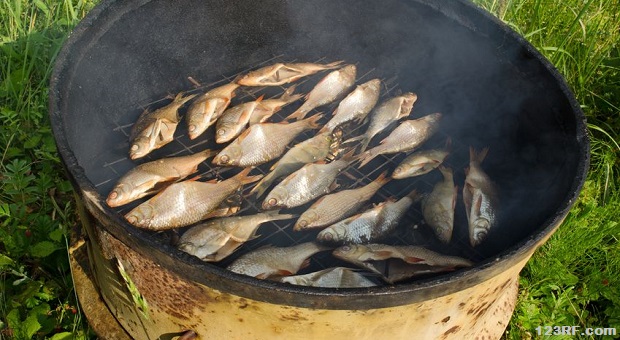
Smoke Drying Technique
Smoking is another method of drying meat and fish if flies and other pests will not stay away during the drying process, or you do not have enough sunlight.
Once again, start off by removing infected, bruised, or damaged tissue from the fish or animal during the butchering and dressing process. Follow all of the basic guidelines for preparing the meat or fish for drying in the sun.
Instead of laying strips out on racks to dry, skewer the meat or fish open and suspend it on the smoking racks. Place the meat and racks in the smoke house and seal it shut.
See below for how to build and use smoke house.
Smoked fish and meat can be stored for a long time if its dryness can be maintained. Store in air and water tight containers.
How to Build and Use a Smoke House
- Cut 3 poles about 4 feet long and 3 inches in diameter.
- Lash these 3 poles together to form a teepee frame.
- Cut 4 horizontal rack poles that will be used to hang the meat on. These poles will be cut to different lengths to be lashed to the teepee frame at different heights.
- Dig the fire pit in a circle 1 foot deep. Make sure that the teepee frame will cover it.
- Cover the teepee with clods of earth. Leave a small opening to hang up the skewered meat or fish, and put two shovel fulls of smoldering hardwood embers in the fire pit.
- Close up the small opening with sod. This will make the smoke house almost airtight, thus exposing the strips of meat or fish to the maximum amount of smoke.
Meat to be made into jerky will need a temperature of about 140 degrees F for 3 to 4 hours or until done.
To cold smoke fish the temperature must be between 80 to 90 degrees F for 1 to 5 days or until done.
4. Canning
While canning is an important form of food preservation when done correctly, it does tend to take up more room and resources than dehydrating foods.
Contrary to popular belief, canned foods can be destroyed by freezing as well as excessively high temperatures. That said, when it comes to storing foods in a way that keeps them tasty and easy to eat on the run, few can rival delicious jellies, jams, preserves and sauces.
In order to can foods you will need the following equipment:
- A large enough pot or pressure canner to immerse canning jars in boiling water, plus cover them with at least one inch of water.
- Pectin or other thickening agent (optional)
- jars with ringed lids and seal rings. If you are using the jars from year to year, you can reuse the rings, but may need to replace the seal lids.
- tongs for removing jars from the pot, or a basket that fits into the pot with all the jars
- towel and heat protect mittens
Unlike dehydrating foods, you will find that canning is much more of an art form that includes finding the best spices for pleasing flavors. Therefore, it is somewhat difficult to arrive at one recipe that fits different types of food.

For example, you might want to use less sugar when canning cherries and strawberries, yet use a bit more for marmalade or apple sauce. So, all canning comes down to preserving foods in a way that inhibits the growth of pathogens. Most fruits and vegetables can be prepared by using water baths. If you are going to can meats or fish, you will be better served by learning how to do pressure canning.
5. Fermentation
Fermentation is perhaps the most favored yet least discussed form of preserving food. No matter whether you subject fruit or vegetable mash, raw sugar, or even milk to brewers or baker’s yeast, alcohol will be produced in the liquid. Simply add more sugar or honey until the yeast are no longer able to survive in the alcohol produced.
Depending on the recipe and foods used for fermentation, you can easily create medicinal wines as well as low level alcohol drinks that help fight bacteria in water. No matter whether you trade these beverages or keep them for use in your own survival group, rest assured that developing your skills in the arena of fermenting will be well appreciated.
If you are struggling to choose between buying food at inflated prices or paying a sky high electric bill, then you are one of millions of people living in a crisis scenario right now. Rather than wait for the situation to get even worse, you can look for ways to preserve food using a combination of methods that do not rely on electricity for refrigeration and freezing.
While you may need to experiment with these systems to arrive at a reliable model, it will be well worth your effort.
Others Are Watching Now:


This is actually a valuable page to have. I wish the video’s were actually printed instructions though so I could print and add them to my prepping boxes. One of the things in the book “Nine Meals To Anarchy” which I think is the best prepper book I have read by the way. One of the things he did was to take all the food in his freezer and can it or smoke it in a smoker to save all of it when the lights went out. It created his first month of survival foods.
Great article, but sure would appreciate “printer friendly” versions
I like fresh produce so I have been using a product called Green bags. They double the shelf life of my produce and allow more time to consume fresh. I can cook, can or dry the remaining before it goes to waste.
I find it interesting that this is called “off-the-grid survival”. When I was growing up this was the normal thing people did. Smoked meats, canned & freezes veggies of all kinds. Dried fruits veggies, meats, fish ( I especially like dried squid). This was the way we did. How did this suddenly become “survival”?? Even now I have friends that have a garden and they keep lots of foods canned to use during the time of year they aren’t growing fresh. Why is there such a big deal about it? Probably because most people have gotten LAZY & depend on the grocery stores that sell not so fresh fruits and veggies that have been treated with who knows what!! Even the organic foods are questionable. Most people just will not do what it takes to have real fresh grown food. So as a result those of us who have done this all along are labelled survivalists and the gov’t for reason only they know have to “keep a watch” on us so we don’t do anything we shouldn’t… ( such as grow fresh fruits and veggies and can them up. Oh we also buy our grains for the whole year in the fall ( this has been done for years). Now we’re looked upon strangely when this used to be the norm for people all across this country.
Robert you and your family obviously were taught such things. My family were not. These days we have to look at what we call alternative ways.
One tip to sun dry food is to place it on a screen and put it inside your car (assuming you are not planning on using it anytime soon). Park your car in the sun. This dries them quicker and keeps the bugs off them as well.
I appreciate, cause I discovered exactly what I was looking for. You’ve ended my 4 day long hunt! God Bless you man. Have a nice day. Bye
I wanted to thank you for the wonderful food preservation guide you’ve created. As a farmer with 15 years of experience, I can attest to the importance of knowing how to properly store and preserve food for survival situations. Your article covers a wide range of techniques and methods, from drying and canning to smoking and fermenting, and provides valuable information for anyone interested in food preservation.
One thing I would like to add is the importance of rotating stored food regularly. It’s easy to forget about items tucked away in the back of the pantry or basement, but they can quickly become expired or spoiled. Make a habit of checking your storage area regularly and using the oldest items first to ensure nothing goes to waste.
Another tip I have is to focus on preserving foods that are in season and abundant in your local area. Not only will this help you save money, but it will also ensure that you have a variety of fresh, nutritious foods to enjoy throughout the year. Plus, by preserving foods when they are at their peak, you can capture the full flavor and nutrients of the food.
I recently discovered “The Lost SuperFoods,” a book that has transformed the way I think about food and nutrition. I was blown away by the comprehensive information on little-known superfoods that have been used for centuries to promote health and vitality.
Once again, thank you for your informative and well-written article. I’m sure it will be a valuable resource for many survivalists and preppers out there.
Stay safe and healthy out there!