


Because commercial flour is so cheap and accessible, the art of making and storing flour at home is practically lost. However, store-bought flour has very little nutrition because the germ (which contains the nutrients and healthy oils) is removed during milling to extend the shelf life.
Processed flour is also being linked to a number of diseases of excess such as obesity and diabetes. It also doesn’t taste nearly as good as freshly ground flour!
Wheat allergies and gluten (wheat protein) intolerance are also on the rise. Though the reasons for this aren’t clear, many attribute it to the genetic modification of the wheat plant, which is another topic altogether.
Add these reasons to the fact that many people are trying to become self-sufficient and you’ve got the perfect reason to make and store your own flour at home.

Another reason to mill your own flour is that, if you use specialty ingredients such as those listed below, it’s generally cheaper to buy the seeds or nuts than it is to buy the ready-made flour.
The process of making flour isn’t overly complicated but it does require some extra work. The effort will be well worth the result, though! One thing to note: freshly milled flour doesn’t last as long as store-bought flour when left in the open so you may want to vacuum seal it or can it if you’re going to make up more than just a few pounds at a time.
Ingredients
There are many different nuts and seeds that you can use to make your own flour. Traditional flour is made with wheat, rye or a combination thereof. Barley is also a grain but it doesn’t taste very good so making flour from it isn’t recommended (though if you’re making beer, you may want it!).
There are also many other ingredients that you can use if wheat or rye aren’t readily available or if you’d like to keep it gluten-free. These include:
- Almonds
- Amaranth
- Arrowroot (ground to a starch and used similarly to corn starch)
- Brown Rice
- Buckwheat
- Cashews
- Corn (you can use popcorn kernels. Think cornbread, corn cakes or crunchy taco shells!)
- Flax Seed
- Hazelnuts
- Kamut (not gluten-free)
- Millet
- Most Beans
- Oats
- Potatoes
- Quinoa
- Soy Beans
- Spelt (not gluten-free)
- Sunflower Seeds
- Sweet (sticky) Rice
- Tapioca
- White Rice
 You can order all of these online or through specialty food stores. The nuts and seeds can be purchased at the grocery store though you will most likely find a much better deal by buying them online or at a specialty food store (check Asian markets), too.
If you have access to a co-op, you’re in luck because you can save a ton of money by buying from them. Unground seeds keep for much longer than flour, so only grind what you need.
Note that to make regular wheat, spelt or kamut flour into bread flour, all you have to do is add 1 tbsp of wheat gluten, aka gluten flour, to each cup of wheat flour that you use. Since you can’t make this at home, you’d have to buy it. Of course, these grains already contain gluten so as long as you don’t mind a bit of a heavier loaf, you really don’t need the extra gluten.
Adding gluten isn’t an option if you’re going gluten-free. In that case, you need xanthan gum in many cases to make the flour rise and stick together properly.
A Few Words about Growing Wheat
Though it would take a bit of space, you can most likely grow wheat right in your own backyard. A 10’x10’ plot will yield enough wheat to make enough flour for 10-25 loaves of bread. Then to harvest it, you remove the wheat berries from the stalk. Generally, you want to leave it sit for a few days after you harvest it before you remove the berries. Then you just grind it up. Piece of cake.
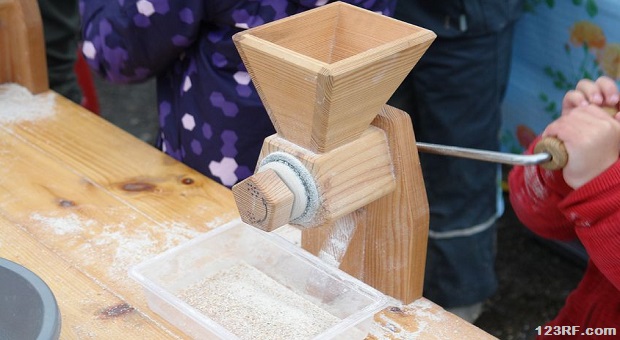
The Equipment
Some nuts and seeds, such as oats or wheat, grind well in a food processor or even a high-powered blender but for others, you’ll need a grain mill. There are many different types on the market; some of them are electric and some are manual. Fortunately, many manufacturers have made ones that can be operated both with power and without, so be on the lookout for that feature.
Grain mills come in a variety of sizes and grinding powers so do your research based upon what you’ll be grinding, how often you’ll use the mill and how fine you’d like for the flour to be.
Prices range from about $25 for a small hand-crank mill to several hundred dollars for high-powered electric mills.
If you plan on milling large amounts to stockpile, you’ll also need canning jars or a vacuum sealer and bags so that your raw products and flour don’t go rancid.
The Process
The process of milling your kernels is fairly simple. You just put your grain in and crank. Once it comes through, it may only be ground into a coarse meal. Think corn meal. This is good for many recipes.
Depending on your model, you may need to run it through your mill a few times in order to get a fine flour. Just keep running it through until it’s reached the consistency that you want.
It’s crucial that you clean your mill well after every use. Flour goes rancid quickly, as we’ve already discussed. You don’t want rancid flour leftovers getting into your next batch of fresh flour. This also helps keeps bugs at bay
Storing Your Flour
Because seeds and grains store much better whole, we recommend that you only grind what you’re going to use in a couple of weeks. After that, your flour may go rancid or at the very least, the flavor will change.
There’s a problem that we haven’t really touched on yet, and it’s of the pest variety. Grains are notorious for having bugs. They may even come with them, or with larvae. Have you ever noticed that there are bugs in your flour even though you had it stored in an airtight container? That would be because it came with the larvae, which hatched over time and with warm temperatures.
To combat bugs you have to clean (by sifting through and visually inspecting) your grain, seeds or beans as well as possible and store them somewhere cool and dry; ideally the freezer. If you freeze your grains for a few days, purportedly you’ll kill any larvae and won’t have a bug problem. Store your flour in the same manner.
Canning is also a great idea if you have room to store the jars. The process is similar to canning vegetables.

Finally, you can vacuum pack both your grains and your flour. The little nasties can’t live without oxygen and neither can bacteria that will cause spoilage. Just make sure that you seal it well and leave no air inside.
Now that you know how to make and store your own flour, start experimenting. If you’re using gluten-free flours, play around with them. It’s good to mix lighter flour and starches that add air and lightness with heavier flours such as nut flours that add protein, elasticity and texture.
Have fun and enjoy your healthy, delicious breads and baked goods!
Others Are Watching Now:


Alternative flours cannot be substituted into your existing recipies on a 1:1 basis.
A couple of safety issues to be aware of. Grinding wheat or any other grain creates a tremendous amount of airborne dust. First, you must wear a dust mask while grinding. At one point in my younger days, when my father and our neighbor were a large number of pigs for market, we decided to buy and grind wheat for a feed supplement. After doing this for a few months, we all came down with dust pneumonia from breathing the dust. We all coughed up biscuits for several days, and decided to discontinue grinding wheat to save money. Second, that airborne dust can be extremely explosive. In an enclosed area with little or no air movement, it can quickly become concentrated in the air and will explode like a bomb from a tiny spark. Google “dust explosion” and see how big a problem this has been over the years.
Don’t have that problem if U use a L’Equip NutriMill grinder…
Another precaution to use when grinding wheat flour is…… NO SMOKING!!!!!!
Wheat dust floating in the air is just as explosive as Gasoline fumes. That’s why smoking, or any other burning, is forbidden in commercial flour mills.
Another thing about boughten flour is that the big tankers that deliver it do not wash out their tanks after every load. I have been told by the people that unload it, that sometimes they will haul 15 to 25 loads before they have the tank trailers washed. This allows old flour to get mixed in with new flour.
I have an electric Whispermill, and the dealer told me NOT to grind corn without first toasting well in the oven or the oil will gum up the mill. She also did not recommend grinding nuts in it and suggested a blender instead. It does fine for buckwheat, rice, millet, and tapioca as we need to be gluten free.
What is added to rice flour, almond flour, bean flour, or any of the others to get it to hold together and rise? Can you make it at home or do you have to buy the other ingredients?
I agree with Rick about having some sort of mask, even if it’s just a handerkerchief (as in masked bandit). Also, yes to ventilation. I would add, putting a bay leaf with your flour will discourage bugs. I’ve done it for 40 years. 🙂
Great article full of information some of which I’d forgotten. Now to get my bike out and adapt it to the flour mill. BTW: who made the grinder used in the picture?
What most people don’t realize about grains… in fact all seed, which includes nuts, is that they contain a natural preservative that locks the nutrition away until the seed sprouts. After all, the seed will need that nutrition to support it’s own growth when it does sprout. The problem? Most of the nutrition in seeds is not bio available to us until it’s either sprouted or fermented which are processes that destroys the preservative and makes the nutrition fully available to us. South and central American peoples learned a long time ago to add lime to their corn which does the same with that seed. They would literally starve to death with full stomachs without the aid of lime. Got tooth decay? Blame it on eating seeds/flours. Want to stay away from the dentist? Stop eating seed products that are not sprouted or fermented. Eat sourdough bread… the process of making real sourdough bread destroys the preservative. Most people don’t realize… and I was one of them at one time, that teeth are able to heal themselves. I’ve always wondered why every other part of the body was capable of healing itself but the teeth couldn’t. This problem looked like a major error in the evolution process or a omission in the creation process. However I learned that each tooth has a many as three miles of tubules in the dentin that goes from the tooth’s blood supply to the enamel which is how the tooth is supplied with nutrition to heal itself. Apparently the preservative in seeds shuts off the healing process of the teeth. Cultures that ferment their foods don’t have the same problems with tooth decay and there are some people who have done studies on this subject and published their findings. So, in a post apocalyptic world where we may not have access to dentist it might be a good idea to learn how to really thrive.
Teresa… I find ur article quite interesting… U lived in W. Va. and moved to central Fla… We lived in central F, most of our lives, and moved to NE Tenn the same reason U moved… no longer worry about hurricanes from 06/01 to 11/01 especially on labor day weekends…. We took the lessons we learned down there and use them up here… Oh friend of mine up here… taught me to make bread from scratch… She & I lived in the Orlando area. WE grind our MONTANA wheat berries for our flour – Bronze Chief & Prairie Gold mixture… YUM!
Does anyone know where to purchase a canning machine that uses metal cans?
Herman, contact Wisconsin Aluminum Foundry Co., Inc. and inquire about their All-American Automatic Master Can Sealer for canning in tin cans.
Their web store is: store.wafco.com (no www.)
Their email is: [email protected]
Address is: P. O. Box 246
Manitowoc, WI 54221
Phone: 920-682-8627
Fax: 920-682-4090
I’ve used a few other things for flour replacement as well. White Oak Acorns (after leaching out the Tannic acid), Pine seeds, dried Dandelion roots, and various grass seeds. Soe work better that others, but they’ll all do in a pinch.
Vacuum does not kill all bacteria. Ever heard of botulism? That’s one example of illness caused by anaerobic (meaning it doesn’t use air) bacteria.
Has anyone had success with making hard tack from alternative “flours”? I’ve already made one batch from whole grain oat flour that has lasted several months so far (using a slightly different recipe than the on posted here). I now plan to try a batch from almond flour, considering nuts don’t store all that great long-term. Anyone else have any experience with this? Thanks in advance.