


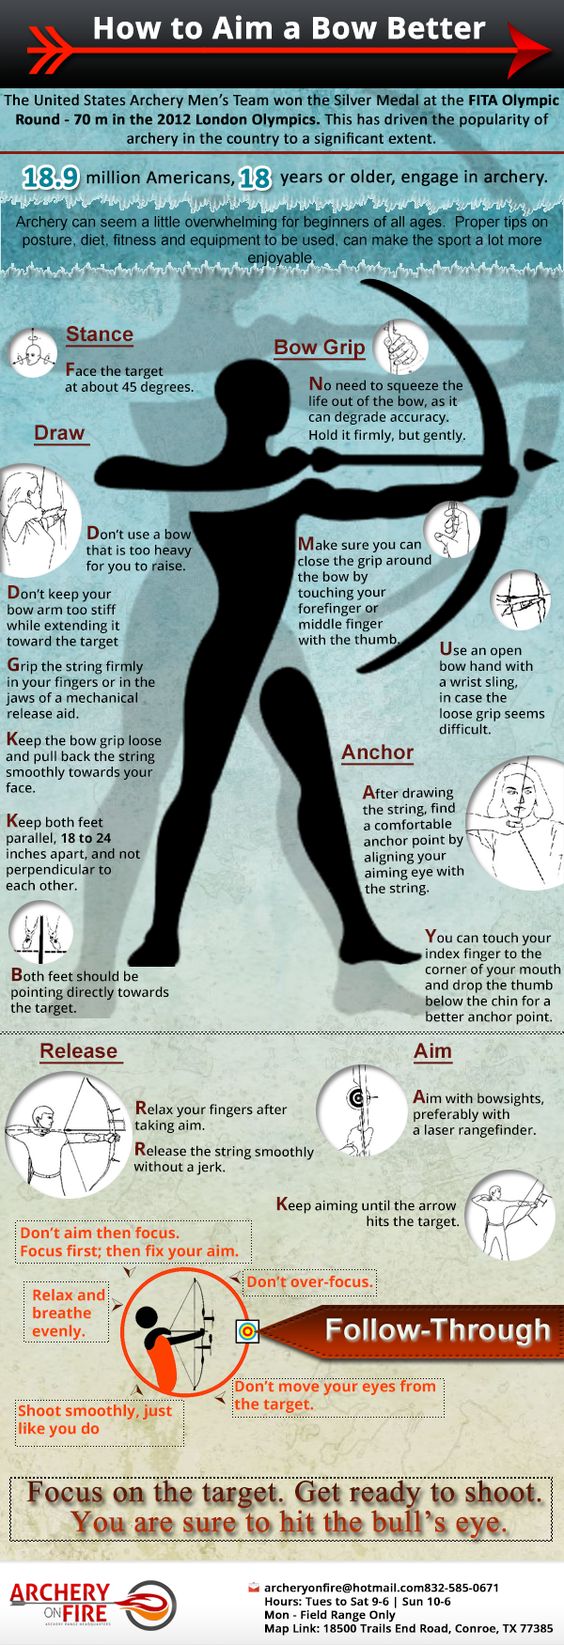
- Keep the task of making a bow and other primitive tools in mind when selecting pocket survival kit contents.
- The calories you harvest with your bow must exceed the calories expended searching for materials and constructing the tool.
- Cracking is the enemy of primitive bows. Proper drying, use of moisture barriers, stave selection, scraping vs whittling and wrapping limb ends all prevent cracking.
Scenario set by the editor:
“How to make a bow in the wilderness using only materials one would have with them on a regular outdoor ‘escape’.”
I knew precious little about primitive bows when I build my first survival bow. I was just a kid, but I will always remember that first time taking game with a bow and arrows that I built myself because it felt like a real accomplishment at the time. It was only useful for a couple of days and I was lucky it didn’t break. Perhaps some of you can learn from my mistakes.
I went on to build more and better bows, learning as I went. The best tips came from Outdoor Survival Skills by Larry Dean Olsen, a book recommended to me by David Holladay.
Survival Bow Tools – Every survivalist should carry a core layer of survival/self-recovery gear on their person. This equipment should be carried in the pockets to prevent loss. I will list a few extremely multi-use items to include in such a kit that have applications in making a survival bow. While not an absolute prerequisite of survival by any means, tools reduce calorie expenditure, increasing chances of survival.
- Wood Saw – A saw is useful for harvesting staves and making precise cuts. A thin, fine-toothed blade is preferable for making precise cuts.
- Knife – A sharp knife is useful for harvesting and processing materials, notching arrows and making precise cuts in duct tape, especially when used in conjunction with a flat surface such as a small or a few sheets of paper on top of a signal mirror.
- Ferro Rod Striker & Ferro Rod – The precise 90-degree spine and extreme hardness of a quality zirconium ceramic or zirconium carbide ferro rod scraper is a useful scraping tool, provided the edge is long enough. Fire is a very important tool for bow-making and can greatly speed the process.
- 100 MPH Tape – Makes quick work of fletching arrows or atlatl darts.
- Glue Stick – Compact and effective adhesive useful for limb ends, fletching and mounting projectile points, applying sinew backing to bows. If a glue stick is not available, make hide or pine pitch glue.
- High-Strength, Low-Stretch Cordage – Bow string. Should support several times the draw weight of the finished bow, be light and abrasion-resistant. Unlike toy bows, it is the bow that flexes, not the string stretching, that imparts energy to the arrow.
- 60-80 Lbs Kevlar Thread – Wrapping fletching, fore-shaft tubes and projectile points. Use with glue in place of gut or sinew or even braid or twist several threads together to make a bow string.
- 50-60 Lbs Coated, Knot-able Leader Wire – Wrapping ends of limbs to form string notches and prevent splitting and cracking. Tie wire loops on bird arrows.
- Modified MRE Hot-beverage Bags – Moisture barrier to prevent cracking of limb tips during drying.
The Survival Bow
The distinction between survival bows and primitive bows is worth noting. For someone living a hunter-gatherer lifestyle, building a proper primitive bow was well worth the effort, but this may or may not be the case in a survival situation.
When you see survivalists hunting with bows or atlatls in survival challenges on TV, they nearly always bring them with instead of making them on the spot because an authentic primitive bow or atlatl and projectiles are time-consuming to make.
In a survival situation in which self-recovery or rescue is likely to happen quickly, a single kill with an inferior bow that does not take days to make, may be the wiser choice. In a longer-term scenario, invest the time in a proper weapon. Unfortunately, you may not know how long you will be using the bow.
Also, understand when it is worth the effort to make a bow. Foraging wild edibles, fishing or trapping typically delivers better return on investment.
For hunting weapons as you embark on direction sampling searches, rabbit sticks, rodent skewers, gigs and weapons require less time and fewer calories to build.
Select a Bow Stave
When the bug bit to build my first bow, tamarisk (Tamarix) was the only wood in the area that was long, straight and elastic enough for a bow. While not ideal, it did manage to get the job done. Wood only has an elasticity of around one percent.
It is the length of the limbs and a low-stretch string which impart great velocity to arrows with relatively little movement of the limbs of the bow. The more the limbs bend, the likelier the bow will crack, so keep the physics in mind as you construct and use the bow.
Good Species for Survival Bows
- Serviceberry (Almelanchier) – Genus of the rose family found in every state of the US except Hawaii.
- Mountain Mahogany (Cercocarpus) – Another Genus of the rose family found in the Western US and Mexico.
- Ash (Fraxinus) – Genus of the olive family found in much of North America, Europe and Asia.
- Fruit Trees of the Genus Prunus (Prunus) – This genus includes cherry, apricot, peach, plum, nectarine and almond trees include some 430 species across the northern hemisphere.
These are some great species, but for survival purposes, a functional bow can be made of most hardwoods. Avoid pine, poplar, cottonwood and willow (Salix), not to be confused with desert willow (Chilopsis) which is usable if necessary.
A good bow stave should be straight and free of knots and large branches. The diameter of this type of bow should be about 2 inches thick, including the bark, in the center where the hand grip will be. The length of the bow should be around four feet, but can be shorter or longer than that, as determined by the height of the archer or availability of materials.
Note that the branch will be thicker at the base than at the top and the thicker end will become the bottom limb, just as it grew out of the ground or trunk.
Saw the stave clear through instead of breaking it at any point or the ends of the limbs will develop cracks, which is a frequent problem, especially in the Rockies where it is so dry that the ends of a stave can dry out and crack minutes after cutting a green stave.
One way to prevent the ends of the stave from drying out too quickly is to put plastic bags over the ends and tie them in place, which I will address in the section on seasoning the staves.
If you cannot find a staff of sufficient length, shorter and smaller-diameter segments can be bundled together and tied to create a bundle bow. Whichever type of bow you build, collect and season multiple staves at a time.
Primitive bows are far more likely to break than their commercial bows and starting two or three bows will cut construction time by days should you need to replace your bow.
Dead wood laying on the ground will too dry and brittle, resulting in fragile bow. If you can find a sapling or branch on a tree killed by fire or knocked down by the wind, you are in luck. Otherwise, you are going to have to use green wood and season it.
Season if Necessary
Most of the time, only green wood is available. The wood must dry, but if it dries too fast, it will crack. Depending on the humidity, temperature and other options, process may need to be adjusted if a stave cracks.
After scraping off the bark, protect the ends with plastic bags or another moisture barrier and let them dry overnight in cool, dry storage area to prevent them from drying too fast and cracking. If harvested in the daytime, keep them out of direct sunlight until the following day once the bark is removed.
If they are drying out too fast and cracking, leave the bark on longer.
Survival Tip: I keep two MRE hot beverage bags in my pocket survival/self-recovery kit to collect and treat water, irrigate wounds, keep tinder dry, collect food and near-endless other uses … including moisture barriers for seasoning bow ends and first aid.
I tape the corners and install brass eyelets so the bags can be carried like a pouch or canteen and suspended to keep them off the ground and away from twigs and cactus spines which can puncture them.
Hot beverage bags also withstand considerable heat which is a useful property for boiling water via the introduction of heated rocks which can be suspended in the water using a little aluminum sheeting and heat-resistant Technora or Kevlar cordage.
Determine the Bend
Every stave has a natural bend. Seat the thicker end of the stave on the ground hold the top of the stave in place with an outstretched weak-side arm. Pull on the center of the stave with your dominant hand, turning and gently flexing the stave until you can feel the natural bend of the stave. Then mark the front of the bow with a light scratch. Every limb or sampling has a natural bend imparted by irregularities in growth, wind, gravity and physiology.
Shape the Bow
I say ‘shape’ instead of ‘carve’ because a bow should really be planed or sanded as opposed to carved. Using a knife, it is temping to whittle the bow which will leading to cracks in a primitive bow no matter how careful the carver. I made this mistake on my first bow.
One of the best ways to remove material is to scrape the stave with a stone tool held at a 90-degree angle. A scraping action with a stone edge removes material in a similar fashion to a plane. This method avoids cuts and damage that will split under load.
Find the center of the stave using a length of cordage or cloth. Mark the length and then fold the length in half to find the center and mark the center with a light scratch on the stave. Four inches in either direction will be the handle.
Make sure that the large end of the limb or sapling is the bottom limb of the bow, just as it grew from the trunk or out of the ground. Shape the upper limb first since it is the thinner end of the stave and once it is shaped, shape the lower limb to match. It is easier to remove material from the larger limb to make it match the smaller than vice versa.
For this type of bow, make the cross-section of the bow oval in shape and give the limbs a graceful taper to the points. Do not notch the points for the string as it will invite splitting. Instead, rough the surface, apply glue and wrap with strong thread or sinew.
If you have a source of fat available, the bow should be greased. If not, grease the bow after your first kill to prevent cracking.
Set the Recurve
Set the Recurve into the tips after greasing. This is accomplished in much the same manner as straightening arrows. Heat a tip over coals, bend it over a round rock and let it cool in position.
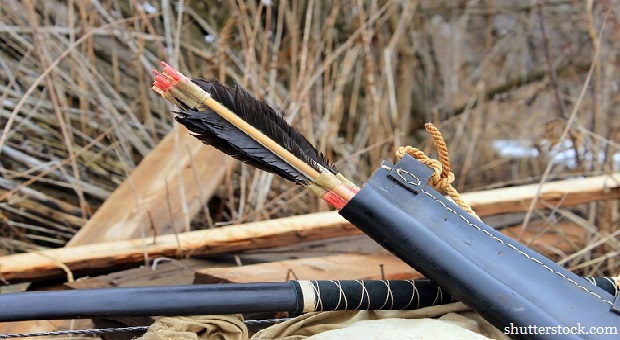
Arrows
My first arrows employed wooden shafts. I straightened them by heating and bending them and fire-hardened the tips but did not fletch them. Still, they got the job done, so keep your calories spent vs gained in mind as you decide how much work to put into a survival bow.
Shafts
Reeds, willow or any sufficiently straight, dried material of the correct diameter and at least 2 feet in length can serve as arrow shafts. Reed shafts are straightened by greasing them and heating and then bending.
Wooden shafts are selected from young, straight shoots and should be sun-dried for a day, peeled and dried in the shade for two days or heated over coals to cure them. Once completely dry, the shafts can be straightened, smoothed, nocked, the points fire hardened, fletched and tipped.
Projectile Points
The tips of my first arrows were fire-hardened, but not tipped. For small game, a casing of spent center-fire pistol brass makes a great blunt tip for taking small game. Projectile points can be knapped from the bottom of a glass bottle if available or from stone or carved from bone or antler.
Spent shell casings can also be stomped or pounded flat and sanded with rock to create projectile points. Points can be notched, tied and glued into place. Reed shafts should be cut about halfway between joints to create a hollow tube that can accept a point set into a hardwood fore-shaft.
Hardwood shafts can be notched and tipped with broadheads like the fore-shafts of reed arrows.
Fletching
I used arrows without fletching on my first attempt at bow because I lacked materials to fletch them. Without fletching, arrows do not fly as straight, especially at longer ranges. Fletching creates drag if the back end of the arrow begins to wobble out of alignment.
This drag keeps the point of the arrow pointed at the target and the arrow on course.
Unfortunately, feathers suitable for fletching can be hard to come by. Fortunately, un-fletched arrows are still capable of taking game. placing the fatter end of the arrow shaft toward the target can also help arrows travel straight with an effect like a rock in a sock, and this is what I relied on with my first bow.
It requires honed stalking skills as the hunter must get very close to game, but at very short ranges, such as hunting frogs, fletching does not matter as much.
The most common fletching materials are duct tape and feathers. Feathers can be cut and split and attached to arrow shafts using fine cordage and glue. There must be as many methods for fletching arrows as there are cultures who use bows.
Most survivalists carry duct tape or 100 MPH tape in pocket survival/self-recovery kits. Tape can be used to fletch arrows with minimal work compared to finding and preparing suitable feathers and attaching them.
Knocks
A knock is a notch in the back of an arrow that straddles the bow string. Reed shafts should be cut just under half an inch below a joint to create a strong nock. Wooden shafts must be notched. Both types of shafts should be wrapped with sinew or strong thread to strengthen the knock.
Bowstring
When I made my first bow, I strung it with a length of paracord, kernmantle sheath and all. A heavy string slows down the arrow, especially if it is heavy in the center where it is 3.5x worse than the same weight at the limbs. A bow string should be a foot longer than the bow it will string.
Natural Materials
Bowstrings made of natural materials must be processed and braided to join fibers to achieve sufficient length, a process that can take days to make a strong string.
Twisted sinew is one of the most effective natural bowstring materials, but gut and leather are natural materials that will also work. The sinew string is finished by rubbing and smoothing with saliva and allowing it to dry. Care must be taken to keep sinew, gut and leather dry or they will stretch, weaken and break.
If enough sinew and glue are available, many Native American bows were backed with sinew (on the side facing away from the archer) which added durability, strength and compensated for defects in the stave.
Bowstrings can be made from plant fiber. In my neck of the woods, stinging nettle is an abundant option. Hemp and other vegetable fibers work. Linen and flax are preferred natural fibers, but the processing can take many days and typically involves the time-consuming creation of tools to process.
Man-made Fibers
Unless a survivalist literally escapes in his boxers, he should have cordage on his person. Necklaces and bracelets can be made of Technora or Kevlar which are low-stretch, heat and abrasion-resistant fibers that can serve as a friction saw for restraint escape, cordage or a bowstring and do not create the hygiene problems of para cord in these roles.
I do not want my necklace or bracelet to soak up body fluids and hold them next to my skin, so I am not a huge fan of para cord for these applications.
Survival Tip: I lace my boots and shoes with composite cordage where possible. I lace dress shoes in sheathed Kevlar which is thinner, and boots with kernmantle-sheathed composite-core cordage. I pack Kevlar thread, Fire-cord, high-strength Technora, knot-able leader wire, fishing line and other useful cordage types in my boot laces.
This way, I always have cordage types suitable for a variety of tasks on hand. I make it by measuring my boot laces, gutting an appropriate color of para cord, removing the inner strands from the kernmantle sheath and replacing them with more useful cordage and then crimping new aglets in place.
Normally, a bowstring should be low-stretch, but this can cause shock to a primitive wood bow, so do not over-draw a wooden survival bow strung with Kevlar, Technora and similar fibers.
Knots
The timber hitch is a traditional knot for securing bowstrings amongst western archers. For a survival bow, Larry Dean Olsen suggested attaching one end of the string permanently and then looped two or three times at the other end and secured with two half hitches.
Keep knots simple with primitive cordage.


ALL GOOD INFO ! Thank You, Prepper. Some wood types I have found to be “OK” to Good : 1.) Old Growth Plum (Native, Not Hybrid) is Best. 2.) Old Growth Peach is OK – May be more brittle (Also Nectarine, Apricot, PlumCot, etc;) Cherry wood is Unpredictable, and slow to cure. 3.) Ash and Hickory is usually pretty good and Cures Well.
Thanks! And thanks for reading and commenting.
There are a number of poor bits of advise in how to make a survival bow and arrows. This is for the armchair survivalist and not the real thing!
Incidentally, the notch cut into arrows and bow tips is called a ‘nock’ not knock!
I make short term use, ok but not great bows from the abundant elm trees in my part of the juniper forrest landscape in high desert country.
Cut longer than desired. Shave off about one third of one side the length of the stick you choose to work with. Then do the same on the length of the otherside. Next if there is a difference in thickness shave from each side to nearly make both end about the same thickness. If you have it, rub in a tiny bit of fat to cover the entire “bow”. Let it lay in the shade for the rest of the day and a night. Then gently shave the wood into the shape and thickness you desire. Heating the wood over the coals of a camp fire you can shap it as it cools. A stone close to the desired shap may become your tool to bend warm wood over it. I keep the center of my bow thicker while I’m working the wood until i am ready to make the grip to fit my hand comfotably. Then scrape to smooth and finish as desired. Cut nothes near the ends to hold the bow string. Flex the bow now and then as the wood finishes drying for a few hours or days if you have the time to work it.
Whatever you use as the bow string must be strong and have little to no stretch in it. My prefered “string” is dried, greased, deer sinew. Keep it dry but not brittle. Other choice if you have it is kevlar thread braided and tied with knots to keep it together. Next tie a loop and slip it into the notches cut at one end of your bow. Tie a second loop so the string is shorter than the bow but only by a few inches at most. The bow must bend to allow the second loop to be slipped into the notches near the other end of your bow. The first time stringing the bow, go slow and let the bow flex naturally as you string it.
My prefered bow is the long bow so I aim for a finished bow between 5′ and 6′ long. My string is just 3″ to 6″ shorter finished length than the bow. I judge that by the flexability of the bow. If I can have a bow with the string when on, 3″ to 5″ from my hand when ready to shoot I feel good about the bow. It still must be able to flex more to shoot your arrow far. It is the bow flexing that shoots the arrow when it is released.
Arrow making is an art but you can start with what it at hand and do ok for small game and rodents. Just pick the straightest stick you can find. Scrape it to make the thickness the same from end to end. Shape a point at one end and harden it by slightly charing it in hot coals from your fire. Then scrap it sharper. Cut a notch to just fit loosly onto your bow string. These are ok for a rabbit or things close. To shoot more accurately at longer distances you need fletching which consists of attatching cut and split sections from feathers. These can be just glued on toward the notched end of the arrow or bound on with very thin strong thread. They help the arrow fly straighter to target. The feather sections should lay so they seem to point toward the sharp tip of the arrow and flair up toward the notched end.
If you have the skills or materials handy to make arrow heads by all means do that then glue and bind them on the arrow. Even a cut out tin can lid will make a sharp arrow point. You want a sharp, strong point to aid penetration when hunting food.
Take some practice shots to get the feel of the draw and when to let the arrow fly. Aim by looking down the length of your arrow. The more you do it the better you will get. Dont “lock” your elbow straight with the bow arm. Keep it slightly flexable but straight when shooting. Pull with your dominant hand.
This is a skill best learned before it is a survival situation. Still it is worth trying if needed.
Many archers have a wrist protecton on the bow arm. The bow string can rough up the skin if you happen to hold it too close or too tight. The protector is usually leather wraped or tied to protect the inside of the wrist or the part closer to the palm of your hand. It isn’t necessary but can save broken skin and a painful small injury. In a survival situation every injury is a potential infection.
Have fun with learning a new skill set.
My favorite bow is an old fiberglas bonded long bow consisting of many layers. It is flexable and has a pull weight of 45 lbs. My other favorite is an old recurve wood bow with a 75 lb pull. It would be a good hunting bow. My bow string on those bows lays almost 8′ from my hand when holding them ready to aim at my target. They have been built for strength and flexability. The modern bows have a series of pullies to increase pull strength for you. I suppose they would give better penetration. I just stick to what I’m comfortable with. My bows are almost as old as I am. Occasionally I make a bow for the joy of creating something. A shart nkife of a stome hand knife both work well to scrspe and shape a bow and arrows. You can straighten arrows with heat too.
Have fun