


Main issues with survival are fire, shelter, water and food. And if you have run out of food, where can you find some more? So, in that effort, here’s one for the foraging for food in the wilds department: gathering acorns as a food source.
Today I’ll just discuss the ‘Black Oak’ and ‘White Oak’, merely because they’re large acorns and will require the least amount of processing to obtain a quantity of food in return for the effort. One can consume the acorns from most any oak tree, but some, like the Water Oak, are tiny in comparison and will require a lot more time and energy per pound of returned food product.
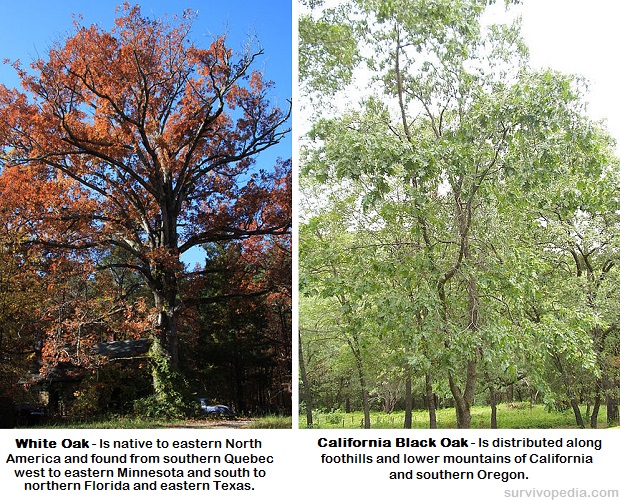
If you’re fortunate enough to live in regions where we have the majestic Black Oak and White Oak trees, you have a very useful, but vastly under utilized food source in gathering their fairly large nuts.
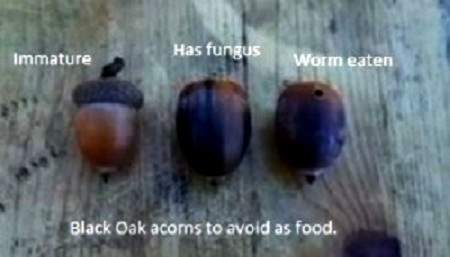
When gathering acorns, Black Oak in this example, don’t waste time with these shown above. The one with the cap still firmly attached dropped off the tree prematurely and is no good. The center sample, showing dark streaks, is internally infected with a fungus. The third has obviously had a worm consume the nutmeat and has left behind nothing useable. The cap on the usable acorns should already be off or can be popped off fairly easily with your thumb.
After gathering an amount of acorn nuts, they should be washed to remove dirt and debris. After a brief wash, lay the acorns in a single layer into pans, tote or storage bin lids, boards, tarps, skins, sheets or other off the ground surfaces, fully exposed to the sun to dry them for storage and for easier processing into food. The dry nuts will peel far more easily than messing with nuts right off the ground.
Properly dried nuts will also store well for a year or more. Obviously, avoid leaving them out during rain and bring them in before dark every night to avoid dew condensing on the nuts. It will take a couple weeks of continuous fall sunlight to dry Black Oak acorns, the White Oak acorns will take a week or two longer. If the weather is not favorable, fall back to your wood stove, dehydrator or other indoor methods. As far as the wood stove or other stoves, your goal is dry nuts, not roasted! Perhaps some home made racks or screen trays above the wood stove about the height where you can comfortably keep your hand, say around 110º Fahrenheit.
After the acorns are dried, you will find they have shrunk in their shells just enough to be easy to crack and peel. Find a board and a small hammer or round smooth stone (or whatever is handy), place the acorn with it’s little pointy end down against the board (or flat rock) and tap it lightly with your hammer / stone. It should split open fairly easy. Peel off the shell and inspect the nutmeat, removing any remaining shell fragments.
You can toss the nutmeat into a pan of water to keep them from turning dark on you, like cut apples do when exposed to the air. Doesn’t really hurt anything if they do darken, but the finished product will also be darker. Don’t worry about the reddish ‘skin’ the nutmeat has, it will be dealt with as we progress.
The best method to remove the ‘tannin’ from acorns is cold water leaching, which gives the best nutritional result if the end product of the acorn gathering is to be a flour substitute / alternative for breads, pie crusts, etc. There are other methods, boiling water, lye and other processing which may even be slightly faster, but the end product is not so good for making acorn flour / meal and some of the food value is lost in the process. The boiling water process takes out most of the useful food starches, but makes up for it by providing an astringent water that has multiple uses, from tanning leather to working on poison ivy rash.
To begin the leaching process, you need to crush, grind, pound the acorn nuts into as small granules as possible, using a stone mortar and pestle, couple rocks, food processor, blender or even an inexpensive corn grain mill. The smaller the mush, the more quickly the cold water leaching process will work.
Put the ground acorn material into a bowl or container large enough to hold however much you have made. Cover with generous amount of water, stir in the acorn meal until it’s all well covered. Just let it sit, pouring off the amber colored water twice a day without losing any of your acorn material. Recover the meal with fresh water and stir or shake the mix well.
This continues for up to six or seven days, and the water will start becoming reddish. The reddish water will now be there every time the water is replaced. How do we know when we’re ‘done’? The acorn material will be kind of bland tasting and there will be no ‘astringent’ (bitter) taste / sensation in your mouth. This will have to be a personal experience or matter of preference, but you’ll want it bland for sure.
To extract the maximum amount of water from the final stage of leaching for a week or so, pour off the water in the usual way. Take a colander and cover it with a clean cloth. Pour and scrape the acorn material into the cloth inside the colander. Now, wring the cloth and acorn material out as best you can, squeezing out as much water as possible.
All done! If you intend to use the product within the next couple days, just put it in your fridge or somewhere very cool and use it up in your baking.
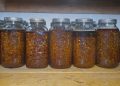
If you intend to use it much later, then dry your acorn ‘flour’ out in the sunlight or near your stove or in your dehydrator, spreading the material in a nice thin layer to maximize the drying effect. Once completely dried, it can be stored like regular flour or corn meal.
ACORN BREAD
- 2 cups acorn flour
- 2 cups cattail or white flour
- 3 teaspoons baking powder
- 1/3 cup maple syrup or sugar
- 1 egg
- 1/2 cup milk
- 3 tablespoons olive oil
- Bake in pan for 30 minutes or until done at 400 degree
Using the ingredients given above will produce a sweet, moist, nutty bread. The ingredients can be varied to produce different types of bread or muffins or pancakes, etc.
Acorn bread is highly nutritious. It has an energy giving combination of protein, carbohydrates, and fat.
So, mom, what’s for dinner, say the kids. Mom says, ‘nuts to you’….acorns, that is!

This article has been written by Silas Longshot for Survivopedia.
Sources:
Wikipedia.com
Recipe from http://www.jackmtn.com/acornbread.html


Good article, one we definitely intend to try, but after teotwawki getting this much water or sitting still long enought to do proper leaching will be a major problem or impossible depending on the situation. Do you know of any “field expedient” methods for leaching. Thanks
I’m experimenting. I picked a pot full of acorns, mature. I added water to cover and boiled 4 (four) times using fresh water each time. The meat swoll up and the shells split. Shelling was a breeze. Each time, the water was lighter in color. Some, maybe 5-10% did not split easily, boiled again and again until easily opened.. I’ll grind them by hand after I slice and dice them for drying. I’ll dry over a low fire in a pan. Most of the directions I find do not lend to survival but to posh camping or luxury of kitchens. The nut meat that was darker than the rest I added to the boiling batches until light “camel” color.
“take a coriander” ???
I’m experimenting. I picked a quart size pot of mature acorns, no mold, no holes, no caps. My goal was more of a trail mix for survival food, soup, stew, etc. for later. I boiled the acorns at least four times. poured off the water and added fresh each time. after cooling with cool water on the fourth boiling, each time the water was less dark, I examined. Most of the acorns had split, the shell no longer hard. The meat came right out very easy. For the acorns that did not split, boiled again, more split. biting the stubborn acorns, now having a soft shell, they split easily, too. I found cutting them when soft too time consuming. I used the bottom of a wine bottle to mash the soft meat, not fine like flour, but more chunky and some fine. The mashed/chunky meat transferred to a skillet to cook over low fire. Stirring to prevent burning, I noticed the amounts of steam escaping the meat. Wait a few minutes, 3-4, keep stirring to dry the meat.
Taste testing, still too much tannin. Back into the pot. Dark water again. Having a lid for my pot helped to strain the water and retain the meat. Operation a success. It basically took the better part of a day to come up with the product start to finish. Taste test: little tannin. In a survival situation, I would advise a set of hobo stoves using a whole group of people to process the acorns. Dire necessity to store any ample amount for all, talking not pounds but hundreds of pounds of acorns.
If I had my druthers, I’d druther sow and harvest buckwheat and/or have much stored away. Good thing we live where we may never have to use this info. Research how survivors managed in Bosnia. Good luck.