
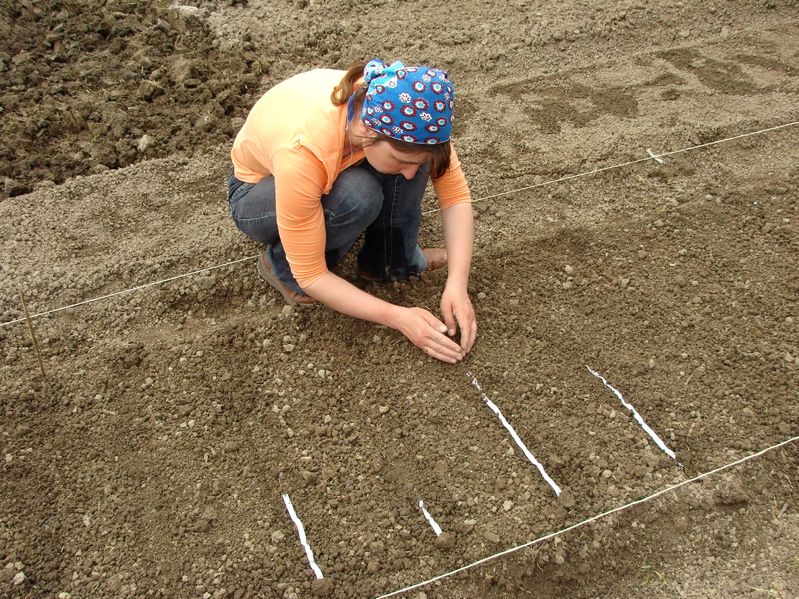
Planting fruits, vegetables, and herbs is easy – you just toss some seeds into some dirt, add water, and wait for them to grow, right?
Well, in the most basic ways, yes. But if you want to grow quality plants and preserve your seeds long-term, you need to put a little more effort into finding quality seeds.
A tomato seed is a tomato seed, right? Wrong. It’s a good thing you’re reading this article! There are different types of plants, thus different types of seeds, and which type you choose will drastically affect the quality of future generations of plants.
Here’s how to make the smart choice for growing healthy crops!
You Need to Know the Types of Seeds
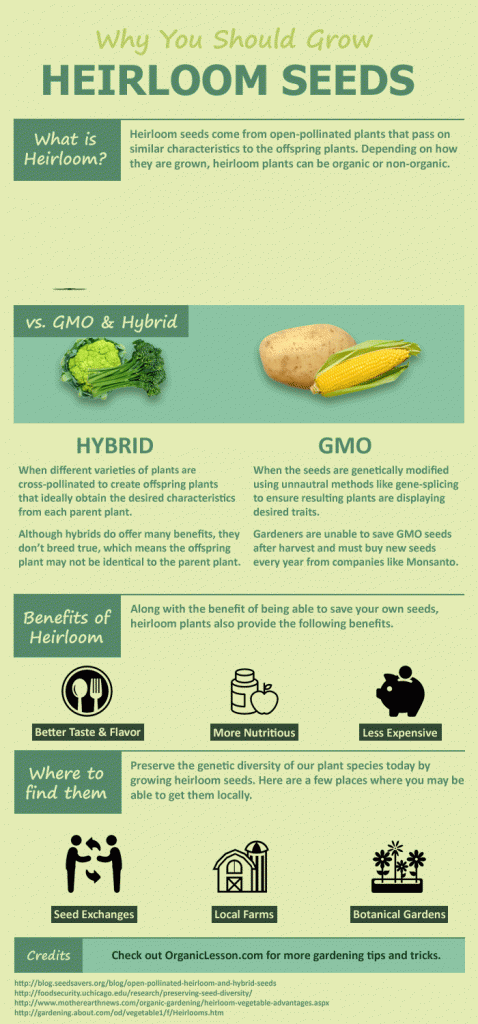
GMO Seeds
GMO stands for genetically modified organism. What it means is that scientists take a standard seed or seeds and add organisms to the DNA strands of the plant. They may do this to make the plant more resistant to disease, or to make it grow denser is smaller space. Regardless of why it’s modified, the seeds from these plants may not sprout, or thrive even if they do.
Hybrid Seeds
These seeds have been made by pollinating one strain of plant with a different strain of plant. This is usually done to create hardier plants or plants with the best features of each parent plant. By doing this, hopefully, you’ll get the results that you want.
However, future generations of seeds are unstable. It’s sort of like breeding “boutique” dog breeds. For instance, a puggle is a cross between a pug and a beagle. Don’t get me wrong – I’m not making fun of this breed because I have one that sleeps with me every night. I’m just saying that, even though he’s adorable, the mix was unreliable.
He could have been born looking like a pug with spots, super long ears and a long, straight tail, or he could have been born looking like a beagle with a curly tail and a long snout. There are a million variations that could have happened, and you can see that for yourself just by searching “puggle”. And even by breeding him to another puggle, there’s no telling what the puppies would look like.
Anyway, you get the idea about why hybrid seeds may not be the best way to go if you’re going to store seeds for survival.
Organic Seeds
Don’t let the name fool you. The term “organic” simply means that the seeds were obtained from plants that were grown using natural methods. That’s it. They may still be hybrids or from GMO plants.
Heirlooms
These are seeds that have been handed down from generation to generation. They’re going to grow the same type of plant and produce the same type of fruit each season and the yields will be similar, given similar growing circumstances.
The only warning that I have about heirloom seeds is that you should make sure that the seeds will grow to crop in whatever area you intend to bunker down in.
Open Pollinated Seeds
These are seeds from plants that have been grown and allowed to be pollinated as nature intended – by local birds, wind, etc. They’re more genetically diverse, which allows plants to slowly and naturally adapt to local growing conditions. As long as the pollen isn’t shared between different varieties of the same species of plants, these seeds will remain true-to-form every year.
How to Test the Quality of Seeds
This may be putting the cart before the horse if you’re storing your own seeds butt many new growers overlook a critical step in planting crops – making sure the seeds will germinate. If you’re planting seeds to grow food for survival, you could starve to death waiting for the seeds that you plant to grow.
Fortunately, it’s easy to tell if a batch of seeds is going to grow. There are a few germination tests that you can use instead of just tossing the seeds in the ground and hoping for the best.
Water Test
Maybe you’ve found a really good deal on a batch of seeds at a trading event or even a yard sale, but will they grow? Toss them in a glass of water and wait a few minutes. If the seeds sink, they’re good. If they float, they’re not.
Test Germination Run
Put at least 10 seeds from a single batch onto one half of a paper towel then fold the other half of the towel over the seeds. Spray it down with enough water to moisten the towel. It may be helpful to spritz it with a 1:10 bleach to water ratio to keep them from molding.
Place them in the baggie and only partially seal it so that air can still get in. Label the bag and start a record with the date and how many seeds were started. Store it in a warm, dark place and dampen the towel as necessary to keep it from going dry. Within a couple of days, you should start to see germination.
Note daily how many seeds either germinate or mold and remove those seeds from the bag. All seeds will germinate within 14 days if they’re going to.
Now, divide how many seeds germinated by how many seeds you started with and you have a pretty good idea of the germination ratio of your batch. Even if only half of them germinate, but they do it quickly, you may want to just plant twice the seeds instead of tossing the batch. If the germination ratio was low and they germinated slowly, you may just want to toss them.
Now that you’ve found some great seeds that you know will grow where you need them to, you need to store them.
Preparing Seeds for Storage
This is an extremely important step in storing seeds so that they don’t go bad, but it’s fairly simple.
First, you need to decide if your seeds will germinate if you dry them. Seeds that can be dried are called desiccation-tolerant. Most garden plants fall into this category and can dried and stored long-term. Desiccation-intolerant plants produce seeds that won’t germinate if dried, but they can still be stored short-term. Some seeds, such as citrus seeds, are semi-tolerant which means that you can dry them but that they lose viability quickly and germinate slowly once they’re dried.
Preparing Desiccation-Tolerant Seeds for Storage
These seeds are great for storing dried because during natural the ripening and drying process, they’re preparing to go dormant. Most of their physiological processes slow down or stop altogether and they convert food reserves from sugars to fats and starches.
As a matter of fact, many seeds REQUIRE drying and a dormancy period before they can ripen, go dormant, and germinate again. Dry your seeds slowly and thoroughly using the sun (if you’re in a low-humidity area) or a low-humidity, airy environment such as your air conditioned counter. You want the relative humidity to be between 30-40%.
Spread them on a tray or baking sheet 1 or 2 seeds deep. Most seeds should be dry in 1-2 weeks though larger ones will take a bit longer. You don’t want them to be zero moisture, but they should be hard. For instance, corn should be dry enough to require a hammer to break it and squash seeds will break instead of bend.
Preparing Desiccation-Intolerant Seeds for Storage
You can store these seeds for up to several months with some seeds by keeping them in cool, moist condition. Put them in a container with damp material such as peat moss or damp paper towels. Choose a container that allows at least some airflow (poke holes in the lid or leave the lid loose).They have to continue the respiration process to remain viable.
Store in the fridge but don’t let them dry out or freeze. Plant them ASAP because they will eventually mold or rot.
What About Storing Seeds?
If stored properly, seeds can last for years. To remain viable in storage, seeds need a proper temperature and moisture level. If there’s too much moisture and enough warmth, seeds will germinate; not exactly what we’re looking for!
Here are some tips:
- Keep the seeds out of light. They should be stored in a dark place or in opaque containers.
- Store in waterproof (actually, moisture-proof container. Tossing in an oxygen absorber in will help, especially if you’re in an area that has an average of greater than 30% relative humidity.
- Store in an airtight container. Mylar bags are great, but baggies, mason jars or Tupperware containers will work, too.
- Keep seeds cool – under 40 degrees F and avoid fluctuations of temperature.
- Rotate your seeds on a first-in-first-out basis just like you do the rest of your supplies.
- Always, always, always perform a germination test before you plant your seeds.
If your seeds sweat inside the container, you haven’t dried them enough and need to take them out immediately and finish drying them before they mold.
That’s what you need to know to make a smart choice about your planting. And believe me, you will need this knowledge, because things are going to get from bad to worse about our food independence! CLICK on the banner below to find out more!

This article has been written by Theresa Crouse for Survivopedia.


gary Metcalf | April 7, 2016
|
I highly recommend “The Seed Garden” published by Seed Savers Exchange.
Over 300 pages of why and how to save and store seeds. Covers over 75 crops, germination testing, diseases etc. Has species by species profiles. It provides a deeper understanding of the art, the science and the joy of seed saving. It will help the seed saver to preserve heirloom and open-pollinated varieties that make up our gardening heritage.
Marian | April 7, 2016
|
What about vacuum sealing your seeds?
Linda | April 7, 2016
|
Can I freeze vacuum sealed seeds to extend their storage life?
Pingback:Did You Choose The Proper Seeds For Planting? | NewZSentinel | April 10, 2016
|
Pingback:Basic Survival Food From Your Garden: Corn | Prepper's Survival Homestead | June 24, 2016
|
Pingback:Basic Survival Food From Your Garden: Corn | | disasterdefense.us | June 24, 2016
|
Pingback:Basic Survival Food From Your Garden: Corn | NewZSentinel | June 27, 2016
|
Pingback:10 TO DOs In Winter For Your Survival Garden | Survivopedia | December 13, 2016
|
Pingback:Basic Survival Food From Your Garden: Corn | Survivopedia | November 10, 2017
|