


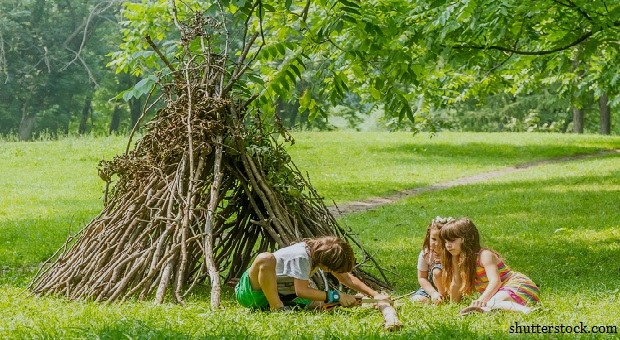
Should SHTF day come, kids may very well have to depend on what you teach them now, as that knowledge may be the only thing that keeps them alive.
Be it only for a short while, as they are separated from you or a prolonged time because of some misfortune that befall you, that knowledge will be one of the most important legacies you can leave them.
As always, you will need to judge the maturity of your own children and teach them age-appropriate skills. This may not be the same for all children, even within the same family. My father gave me my first pocket knife when I was about seven, and I have carried one ever since.
Of course, that was in a time when it was not considered criminal action to take a pocket knife to school. Today, you have to be more careful, as the schools are not as understanding, with their “zero tolerance” policies.
Making Signal Fires
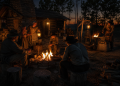
You’ve probably already taught your children how to make a fire, as that is one of the first bushcraft skills most people work on. But do your children know how to use that fire as a signal fire to call for help if they are lost in the woods?
The number three is the international signal for distress. Three blasts on a whistle, three gunshots or three fires indicates that someone needs help. To make the fires visible for a longer distance, it works best if they are smoky fires. All it takes to make smoky fires is to put fresh, green branches on them.
The water in the branch will evaporate as water vapor, giving the appearance of white smoke.
One of the most important things about any signal fire is to space them out far enough so that the smoke from the three fires doesn’t merge into one column. Any searchers or rescuers need to be able to see it as three distinct columns of smoke.
Building a Debris Hut
The debris hut is one of the simplest survival shelters you can build in the wild. It consists of a framework, made of sticks, providing a place to pile leaves off the forest floor. The leaves create insulation, as well as doing a remarkably good job of keeping the rain off, while the sticks provide a cozy room, under the leaves.
One of the nice things about the debris hut is that you don’t need anything, other than what you can find on the forest floor. It consists of one branch, sticks and leaves. To make one, start by picking out a branch to act as a ridge pole.
Stick one end securely in the fork of a tree, and allow the other end to sit on the ground, facing towards the direction the wind is coming from. Then, lean sticks against this ridge pole, with their ends on the ground, forming a triangular space underneath the ridge pole.
Learn Forgotten Recipes On How To Make The World’s Best Superfood
The final step is to pile as many leaves on this framework as you can. The more the merrier. Remember, the wind may try to blow some away, so you want enough that some will last through the night. You can use a wad of leaves as a door as well, plugging the end near the tree.
Making a debris hut is a fun project for the kids; even more fun if you let them sleep in it that night. You might want to let them use their sleeping bags for comfort, even though in a survival situation they might not have those available.
Making Cordage Out of Grass
Cordage is a useful thing to have when you’re trying to survive in the wild. That’s why “survival bracelets” made out of parachute cord are so popular. Some of the skills I’m going to talk about later in this article require it. But what if you don’t have any available? Make your own.
Granted, cordage made out of grass isn’t really strong; but it’s better than not having any at all. You’ll need long grass for this (3 to 4 feet tall); preferably still green. If you have to cut the grass near the base, rather than breaking it off, that’s a good sign, as it means that the cordage won’t break real easily.
Gather a bunch before you start, as you won’t want to stop and gather more.
There are two ways of making cordage, by twisting or by braiding. For our purposes, braiding the grass to make cordage will work better, as it is more difficult to twist cordage. While just about any type of braid will work, a standard three-strand braid is easiest.
Braiding grass is much like braiding hair, with the exception that the grass is thicker. You’ll want to use several strands of grass for each of the three strands of the braid. There should be roughly the same number of pieces of grass in each strand of the braid, but it doesn’t have to be exact.
Start out by tying off the end of the grass on a tree branch to anchor it. Then start braiding it. As you go, add additional pieces of grass to each strand.
The idea here is that you want to make sure that none of the three strands reaches a point where it runs out of length or whereall of the grass is being replace at the same time. Nor do you want to start a new piece of grass just where another ends; rather, you want to start it a couple of crossings before, to maintain the cord’s strength.
By continuing to add strands constantly, you stagger the ends, which will prevent a weak point from forming. But don’t add so much at once, that you end up making the cord considerably thicker. That would produce a weak point, just before the wider section.
If you need thicker cord, for more strength, then make it all that thick.
Tie off the end of the cord by wrapping around it with grass and tying. Do the same back at the start end, and then cut it off of the branch it was anchored to. As the grass dries, it will retain its strength, although it may lose some of its flexibility.
Building an Emergency Backpack Frame
Now that you’ve got a cord, you can make a backpack frame to help carry anything you need to. This is an extremely easy project, which could be useful for carrying whatever supplies you have, in a number of survival situations.
The frame is made out of three sticks, about an inch in diameter and 2 to 2-1/2 feet long. Place the sticks in such a way as to form an equilateral triangle and tie the pieces together with cord. Take two more pieces of cord and tie them, forming loops from a common corner to the two other corners, to be used as arm straps. The common corner will become the top of the frame and the opposite side the bottom.
You can tie things directly to the frame for carrying, or wrap them in a coat, tarp or other piece of fabric. Another option is to weave a basket out of grass and attach it to the frame. The frame will make it easier to carry, with the weight being carried by your back and legs, rather than your arms.


