


Making jerky is an ancient skill, and over the centuries, this skill has been constantly improved even though the basic formula remains the same. With the apparition of modern appliances, the process of making jerky has been made “safer,” and the proper handling of meat and other food safety rules have become law.
However, the old process of making jerky is somehow in opposition with all these new food safety rules and our modern understanding of the temperature and time of safe meat preparation and storage.
How about we look back at the old ways of making jerky and doing things as our ancestors did, in the safety of our backyards?
How about taking some meat, trimming off the fat, and drying it out in the sun?
And after breaking all the rules you’ve learned about food safety, you’ll be surprised to discover that your jerky is going to be safe to eat and tastier than ever. Sounds good, right?

Now I’m not saying that you can’t make delicious jerky using all your modern appliances and whatnot, but as preppers, we also must assume that we won’t always have it easy. So if you’re a hunter, a die-hard meat-eater, or a resourceful prepper, knowing how to handle raw meat is an invaluable skill regardless of where you may find yourself.
The chances are you may bring down a large animal one day, and you most certainly won’t be able to eat it all in one sitting. Or perhaps Lady Luck comes your way, and you manage to hunt several animals at once. How do you make sure that precious meat won’t go to waste?
Making traditional-style jerky is the way to go in those cases, and such skill will help you preserve meat for later use without worrying about any of it going to waste. All you need is some fresh raw meat, a dry day, and patience to practice this skill.
Let’s prepare some jerky
The origins of jerky are still debatable, and many variations exist, or you can find it under various names in different cultures. You’ve probably heard about biltong, meat floss, kilishi, or perhaps bull cheese, but all these are just jerky variations with colorful names.
And contrary to popular belief, jerky is not some primitive survival snack or “traditional product” we can now find in colorful packaging pretty much everywhere. This powerful protein snack has traveled beyond the reach of ordinary folks, and it’s a recognized snack by NASA, helping feed shuttle crews since the 90s.
Now to make your jerky, there are some ingredients you will need:
- Firewood: Here, the options are many, and all the classic food-smoking woods will work great for your project. I like mesquite, maple, and hickory. The thing to remember when picking out your firewood is that you need to avoid pine, spruce, and other woods that produce a resinous black smoke. Also, you should avoid any toxic woods or wood that has been sprayed with chemicals. To make things more interesting, you also use a traditional or primitive method to start the fire. It makes things more challenging and fun, and if you’re not successful, you can always use a Bic lighter.
- Meat: Believe it or not, any meat you have available can become jerky meat. Some folks wrongfully assume that only deer and beef meat is turned into jerky, but you have many other options, even if these are excellent choices. Any edible animal can provide you with meat for making jerky. You need to pay attention to the fat and remove it entirely before drying the meat. Also, I don’t think I need to specify this, but here it goes anyway, the meat must be raw to last for your long-term storage plans safely.
- Rack: You can improvise a drying rack based on what’s available and how skillful you are at tying things together. You can improvise a rack from branches, or you can dangle the meat strips from a paracord. If needed, you can even lay the meat or rocks or concrete or any other absorptive surface you can find. However, dangling the meat in the air remains the fastest method to dry the meat.
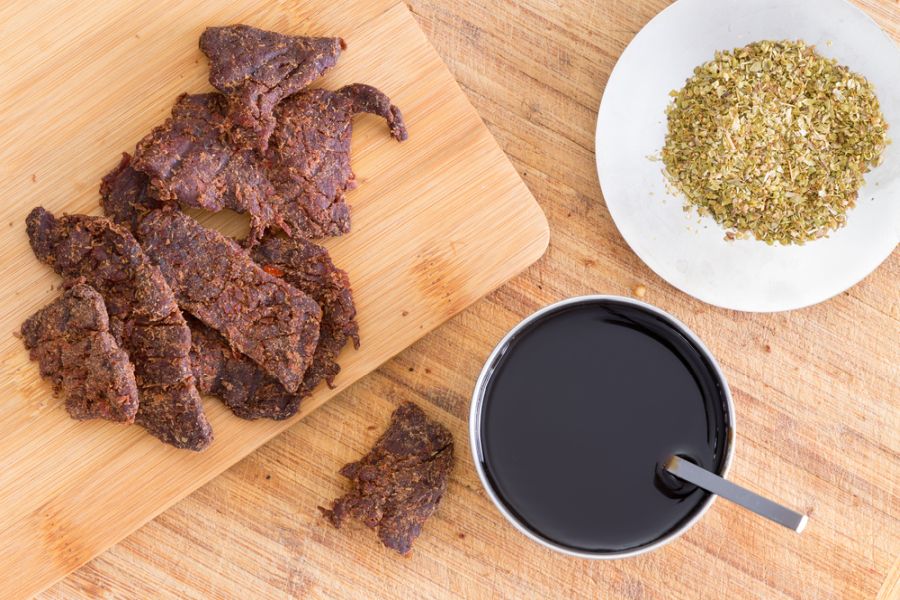
- Seasonings: Here, you have many options, although salt and pepper remain the traditional choices for many. You can use soy sauce, garlic powder, sugar, vinegar, and many other spices and preservatives to flavor your jerky and help preserve it.
Step by step guide
Once you have your firewood, drying rack, and other ingredients available, you can go to work. Hopefully, the weather will be on your side, and you will have an excellent jerky day. But even if that’s not the case, there are still alternatives.
- Start by cutting the fresh, raw meat into thin strips. Once you work the meat, you have to remove all visible fat and figure out ways to reuse that fat without letting anything go to waste. Don’t waste valuable calories and use the fat for a stew or figure out other ways to cook with it. When making jerky, some folks prefer perpendicular cuts, perpendicular to the bone or, to put it simply, cuts perpendicular to the muscle fiber. Other people will go with cuts with the grain or the muscle, and they cut in the direction of the muscle that once contracted and stretched. I don’t mind either cut, but you can try them both and see how tender your jerky gets after the first batch and if it’s to your liking or not.
- Add the seasoning such as salt, pepper, sugar, spices, and vinegar. You can either sprinkle the dry ingredients over the meat cuts, soak the meat, or wipe it on wet ingredients. You can even soak the meat cuts in a brine or marinade if you like. When seasoning the meat cuts, you have to keep in mind that your marinade should not contain any oil, and you want to avoid any “oily” ingredient because that oil will go rancid and spoil your jerky. Ingredients such as salt, sugar, and wine are used because they help preserve the meat and prevent bacteria growth on and inside the meat. Saline or acidic environment will prevent any invisible organism from colonizing the meat, and it will keep bacteria away from your meat. However, if you don’t have any of these preserving nor flavoring agents, you can still make delicious jerky and move directly to step three.
- It’s time to lay your meat out to dry by hanging it on the rack or by stringing it up with twine. You will have to do this during a sunny and breezy day, and you will have to make sure you place your rack a few feet downwind from your smokey campfire. Your drying rack should be mobile because you will be able to easily move it around if the wind shifts or when the sun moves. It’s also important to never leave your jerky unattended because birds and animals will probably want to check if you did a good job or not.
- Let the meat dry until it begins to turn stiff and feel leathery. If you place the meat on a drying rack or a flat surface, you will need to turn the meat so that every wet spot is exposed to sunlight. Keep drying the meat, making sure it’s exposed to sunlight and smoke at all times. You will need to dry the meat until it becomes brittle when you bend it. As a general rule, the red meat should become purplish-brown, and the white meat needs to have a grayish-pink color. If the weather turns on you and the sunny day ends up becoming a cloudy, rainy day, you shouldn’t despair because there’s still hope. There’s also a chance that the drying time takes longer, or perhaps the meat hasn’t all dried before the sunsets. In those cases, you can move the meat into a shelter (preferably not yours) and resume the drying process the next day. It’s better to avoid leaving it out in the open overnight because the dampness will hinder the drying process, and chances are the scavengers will have their full long before you get the chance to do so. In case there are a few days of rain, you will have no other choice than to dry (although it is technically more cooking than drying) over the open flames of a fire. You will save a week or two of meat storage before the meat goes to waste. To be on the safe side, do not use cooked, dried salted meat that was stored for more than a week or two.
- If the weather plays in your favor and you can successfully dry the meat, you can store your jerky in a paper bag or a cloth sack. You want to use a breathable container to prevent the meat from sweating and help it last longer. When storing jerky, it all depends on the weather and your environment. For example, if the weather is cool and dry, your jerky will last for months. However, if the weather is humid, you will have to consume the meat as fast as possible to prevent it from getting moldy. Always inspect the jerky before eating it and if you notice mold spots or if it has a bad smell, throw it away.
Concluding
Making traditional-style jerky is a challenging and rewarding experience. It can provide you with a staple food when you lack the modern appliances we all use for cooking and storing food. Or perhaps you have a freezer full of meat, and you are dealing with an extended blackout case in which making jerky will help you save your meat investment.
Regardless of how you obtained the raw meat or the reasons behind wanting to preserve it long-term, the jerky-making skill is something you wish to master today! It has some profound benefits when it comes to meat preservation, and you will be able to enjoy your jerky for months to go if you do things right.


this is the easy way to make jerky at home . this is really amazing and delicious. thanks for sharing this amazing article and best way to make jerky easily at home.
too bad can’t print it or save as pdf as the lines of type are too long and are cut off on the right side even when you zoom page out to 80%.
other wise good general information.