The Secrets You Need To Know About Fermenting Food

Foods have been fermented for centuries. It was used originally for preservation but modern knowledge about nutrition has revealed that fermentation provides several nutrients including probiotics, or good bacteria, that helps keep your GI tract healthy.

For survival purposes, this makes it a no-brainer but there are some things that you need to know to safely and effectively ferment foods at home.

What is Fermenting?

Fermenting is actually fairly similar to wine making, except it’s easier and you don’t need as much specialized equipment. Fermentation takes place during a process called lacto-fermentation, in which natural bacteria feed off of the sugar and other carbohydrates in the food to create lactic acid. All you need is the produce, the starter, water, and an anaerobic (air-free) environment.

Some foods are fermented using sugar as a starter, and some are preserved using salt, whey, or even seaweed. Obviously, sauerkraut is salty, but wine is sweet. In a pinch, most foods don’t need the starter because they will eventually create the starter themselves. It’s already on the skin of the produce. Salt does, however, speed up the process and help keep the food crunchy.

Fermentation preserves the nutrients in the food. It also creates other nutrients including essential Omega-3 fatty acids that your body needs but can’t produce, B vitamins, and enzymes that help with digestion. The probiotics created during the process help keep the bacteria in your GI tract in balance.

Fermentation creates a unique, pungent flavor that you may initially find overwhelming (think sauerkraut) but once you get past that, you’ll find that the flavors are actually quite delicious.

What’s the Difference between Fermenting and Pickling?

This gets bit confusing, especially when you think about the fact that salt is used in the fermentation process. So, simply put, the difference between pickling and fermenting is that pickled foods are preserved in an acidic medium such as vinegar. Fermented foods create their own acidic liquid during the fermentation process.

This process is why fermented foods have the wonderful probiotics and other enzymes that pickled foods don’t.

Also, there is no heating or canning process necessary for fermentation. In fact, heating fermented foods in order to can them will likely kill the enzymes.

c92255d3ea244dd10266f3e285475420

What Foods Can Be Fermented?

When you think of fermenting, foods such as yogurt, sauerkraut, ginger, and kimchi probably pop into mind. You may be surprised to learn that cheese, salami, bread, vinegar, and olives are other examples of fermented foods. Wine is included in there, too.  Just about any vegetable or fruit can be fermented, but not all of them, such as leafy greens, taste good.

Today, we’re concentrating on fermenting vegetables. Here are some examples of foods that ferment well:

  • Cabbage
  • Cucumbers
  • Okra
  • String beans
  • Green tomatoes
  • Turnips
  • Parsnips
  • Carrots
  • Garlic
  • Beets
  • Peppers
  • Sweet potatoes/yams
  • Ketchup

You don’t have to use just one vegetable at a time; you can combine them to create chutneys and vegetable blends.

When it comes to fruit, you can most certainly ferment them, but they need to be consumed quickly before the fermentation process turns the sugar to alcohol. You probably don’t want the kids to get drunk off the strawberries.

What Vessels Are Good for Fermentation?

Two of the best vessels to allow your food to ferment in are glass canning jars and stone crocks. You absolutely do not want to use plastic because chemicals can leach into you foods. Metal aren’t good either because the salt corrodes them.

If you choose to use canning jars, use the wide-mouthed variety. You need to use your hand or a tool to pack the veggies tightly. Self-sealing jars are ideal because they lock the air out.

If you use stone crocks, use ones that are glazed inside and, preferably, have airlocks with a release system. You can buy these online and they help you control the fermentation process by making the environment anaerobic. That being said, you can use a standard stone crock. Just make sure that the vegetables are weighted so that they stay submerged so that they ferment, and covered so that bugs can’t get into the brine.

Tips for Fermenting Food at Home

Though fermenting food is almost bulletproof, there are some steps that you can take to make the process more successful and ensure that the food is properly preserved.

  1. How you slice, dice, or cube your veggies doesn’t really matter as long as you keep the pieces fairly uniform so that they ferment at the same pace. Dense vegetables such as turnips, carrots, and beets should be sliced, diced or chopped so that the lactic acid can reach the center.
  2. Keep food submerged in the brine. This is important because food left above the brine will spoil instead of ferment and will ruin the batch.
  3. Fermented foods are acidic and need to have a pH of at least 4.6 or lower.
  4. Though botulism found in home-fermented tofu and other bean products is one of the top causes of food-borne illnesses in china, there’s only been one reported case in the US. Still, follow refrigeration and preservation protocols to avoid this. Botulism is not your friend!
  5. If your food has slime, mold (yeah, some people say it’s fine, but experts say don’t risk it for home fermenting), a creamy white film, a yeasty smell, or your cabbage is brown or pink, it didn’t ferment correctly and isn’t safe to eat. A white film on top is OK as long as there’s no slime.
  6. Be careful if using sealed containers because the fermentation process releases gases that can cause your container or seal to blow. Using airlock devices helps with this.
  7. A film of olive oil across the top of your brine lets gas out while keeping oxygen from getting in.
  8. Though many recipes may call for a starter, you may not want to buy one, or you may not have access to a retailer in a SHTF situation. You don’t really need one – it just hastens the process that will occur anyway.
  9. Don’t forget to sterilize everything that comes into contact with your food, including the jars, utensils, table top and weight. Wash your hands well, too.

How to Ferment Your Food

plumsNow we’re getting down to the good stuff.

There is no blanket recipe for fermenting foods because some veggies obviously already have a lower pH than others.

These foods won’t need as much salt. You’ll also see recipes that call for whey or a starter.

Both of these are to add extra bacteria to get the fermentation process started.

The veggies will do this on their own if you ferment them correctly, so you don’t necessarily need them. Salt is used for preservation.

There are a couple of different ways to begin the fermentation process: You can make salt water brine, or you can salt the produce and use the natural juices from the produce to make the brine.

If using salt brine, simply add 1-3 tablespoons of salt per quart of water. Pack veggies tightly into container, cover with brine, weight the veggies with a heavy plate (you can add a freezer bag full of water to the plate to help weight it if you need to, or a sterilized rock), then let it ferment as follows.

Here are the steps for using the natural juices.

  1. Choose your vegetables. Use only organic produce to ensure that there are no chemicals and the good bacteria can flourish.
  2. Begin by chopping or slicing your food in whatever manner suits you, as long as the brine can penetrate. Are you going to eat it as a relish or in the form of slices on a sandwich? Prepare you food according to what you’re going to use it for.
  3. If you’re using whole vegetables, pack them into your jars or crock. If not, salt your vegetables in layers as you slice them to draw out the moisture, then squeeze, knead, or mash the juice out of your produce and place it into your fermentation container. This will be your brine.
  4. The amount of salt you use depends on the product, but a good rule of thumb is to use 1-3 tablespoons per quart of food or brine. Any type of course sea salt (gray, black, pink, or red), or Himalayan Salt is a good choice if you don’t want the food to taste super salty.

You can use whatever salt you like as long as you make sure that it’s pure salt – no anti-caking agents or any additives. As long as you reach the proper pH, the level of salt is a matter of personal taste. Salty sauerkraut may be fine, but you don’t want your chutney to be so overpowering. Experiment to find what you like.

  1. Tightly pack the food into a fermenting crock or jar and cover completely with the brine.
  2. Add the airlock lids or, if you’re using another type of container, weight the food with a plate or whatever you want to use (not plastic) so that the food stays under the brine. The liquid, and even the veggies, will likely expand during the process, so prepare for that.
  3. Let the veggies ferment and ripen for 7-30 days in a dark place at room temperature. When they process is complete, refrigerate, vacuum can, or store in a cool, dark place. Fermented foods can keep for months.

The Three Fermentation Stages

As I said above, the fermentation process can take anywhere from 3-30 days. This varies depending upon room temperatures and vegetables. During the first stage of fermentation, you’ll notice bubbles. Next, you’ll notice a pleasant, sour aroma. It shouldn’t be yeasty, exactly.

Finally, you’ll notice a sour, tangy flavor. Smell and taste your fermenting veggies daily if you can so that you know when they’re to a stage that you like. If you smell anything rotten, the process has failed. Throw it out.

After your fermented veggies are finished, store them in the fridge, or at least in a cool, dark cellar.

Now you know how to ferment foods at home! But wait, there are more survival secrets to learn from our ancestors! Click on the banner below to discover them!

the lost ways cover

This article has been written by Theresa Crouse for Survivopedia.


How To Make Outdoor Paint The Old Way

Bright red barns setting in the middle of a pasture are beautiful, but paint does more than just make a house or building look good. Paint also protects your wood from the weather. If you want to live sustainably, it’s easy to make your own outdoor paint that will look great and last for years!

Now in the old days, it was common to paint wood with motor oil or tar to waterproof it. Both methods were effective but extremely hazardous and definitely not environmentally friendly.

There are other homemade outdoor paints, including whitewash and milk paint, that have been used for centuries that are both effective and safe.

You probably haven’t given much thought to what exactly goes into making paint because it’s much easier to grab a can or a bucket of it from your local superstore or home supply store. It’s OK. We looked for you, and you probably have just about everything that you need to make your own indoor or outdoor paint already in your cabinets.

To make paint, you need three primary components: a binder, a thinner (solvent), and a pigment. The last is, of course, optional but it’s not that hard to make your own pigments out of berries, roots, or clay. Clay is often used as the binder too, so you can kill two birds with one stone. If you don’t think you live in an area with clay, think again! You can extract clay from just about any soil using just water.

A fourth component, a filler, is often used to add texture and bulk. Common natural fillers are hydrated lime powder (pickling lime), clay (great to use with flour) and powdered chalk (called whiting).

Binders are what makes the paint stick to the surface. Common binders are clay, flour, milk, linseed oil, and even beeswax (it’s a great waterproofer). Common thinners are water, citrus thinner, turpentine, and mineral spirits (the last two serve as drying catalysts as well). Pigments, of course, can come from anything from clays and minerals to flowers and berries. If you’re using clay as a binder or filler, you may want to keep that color in place of adding pigment.

How to Make Whitewash

Up through the ‘50’s or so, most picket fences and even white buildings and houses were often painted with whitewash. This is a simple paint to make and can last for several years. The catch is that you need to add several layers because it’s extremely thin. It’s made with hydrated lime powder and water, which is why it’s chalky.

You can also add fillers such as salt, flour, clay, or milk to make it thicker or more durable. Whitewash as is, with just lime and water, has almost zero sticking power until it cures, which can take a few days. It’s really only good for porous surfaces.

You may have noticed that old whitewashed surfaces chip off but still have color underneath – that’s because there are so many layers, and they’re doing exactly as intended! Making whitewash isn’t an exact science. Add enough water to the lime to make it fairly watery – thus the name. Add fillers to give it more substance if you want.

Paint on in layers, adding a new layer as the previous one dries.

How to Make Flour Paint

This is a paint that’s easy to make and will last for as long as 5-10 years, even outside. Though most of the time, it seems like flour recipes are designed for indoor use, this one incorporates linseed oil. That makes it good for outdoor use.

 Video first seen on TheGridTO.

How to Make Milk Paint

The recipe for this paint sounds almost like a cheese recipe! Milk works for paint because the protein in it, casein, gives it sticking power. As you may suspect, it will have a milk smell until it dries and cures.

As with whitewash, milk paint is fairly translucent so you’ll need to add several coats. You can also add fillers to give it more substance.

To make one gallon of milk paint:

  • Juice from 4 lemons or 2 cups vinegar
  • 1 gallon skim milk (this part is important – it MUST be skim!)
  • Pigment of your choice, if you’d like
  • Cheesecloth or towel

Mix the lemon juice or vinegar with the water in a bucket and let it sit to curdle at room temperature overnight. Strain it using the cheesecloth or towel. Add the pigment. If you’re using a powdered pigment, add a bit of the milk mixture at a time to make a paste, thinning it until you can mix it into the batch without lumps.

Milk paint is going to be super thin, so if you’d like to add fillers or other binders, then you can and still have paint that’s the consistency of, well, paint.

As you can imagine, milk paint will spoil quickly so you need to use it immediately. It’s great to use on porous surfaces, so just brush it on. .

How to Make Oil Paint

Oil paint seems to take forever to dry but is probably the best paint to use on outdoor surfaces. Some may never harden completely. Instead, it remains a bit plastic, which is a good thing because it allows for natural expansion and shrinkage of the underlying wood. Oil paint also adds waterproofing, and it lasts longer than other paints that we’ve discussed.

It’s best if the wood you’re painting is sanded down so that the paint can cover it well. Priming it is preferable, but if you’re doing large surfaces such as a barn, you probably won’t want to take the time to paint it twice, or maybe you will.

The one problem that I’ve found with making outdoor oil paints is that you will need A LOT of oil for large projects, which may be in short supply if SHTF. It would be great for small projects that you only need a gallon or so to complete, though. At any rate, here are a few recipes.

Oil Primer

Primer helps to seal the wood and prepare it to hold the paint better. You can apply 2 coats, 48 hours apart, if you’d like. It’s simple to make a primer. Just combine equal parts of linseed oil and solvent. Paint it on with the grain, wipe off excess, and let it dry for 48 hours.

Oil Paint

There isn’t an exact recipe for oil paint because it depends on what fillers and pigments you use. Those components make a difference because they absorb the oil differently. Combine the fillers (clay or flower are probably best), pigment, and oil until you get a paste that’s the color that you want. Add more oil until it turns into a thick liquid that flows, then thin with solvent until it’s the consistency that you want.

It will keep for quite a while in a sealed 5-gallon bucket but it is, of course, best if you use it immediately. Just paint it on with a brush – you probably won’t need more than one coat.

Oil Glaze

Oil glaze is great to add waterproofing to flour and milk paints. They’re also great to use as stains. You can add pigment, or just use it to protect and waterproof the natural color of the surface that you’re glazing.

To make a quart of glaze, dissolve 3 tablespoons of filler into 1 cup of linseed oil by adding oil to the filler a bit at a time to avoid lumps. If you want to add pigment, do that now, to the color that you want. Once you get it combined, add another cup of oil, then add 1 1/3 cup solvent. Stir until there are no lumps and strain through cloth if necessary.  It’s ready to use immediately. Remember that since it’s an oil, it will take a couple of days to dry completely.

These are just a few tried-and-true ways to make outdoor paint at home. Some are more durable than others, but each has its advantages and disadvantages. One advantage that they all have, though, is that you can make them yourself from ingredients that are readily available to you.

If you’ve made any of these paints or have suggestions for others, please share with us in the comments section below. And click on the banner below to find out more secrets of our ancestor survival!

the lost ways cover

This article has been written by Theresa Crouse for Survivopedia.


How To Extract Clay From Soil

Is with all things survival-related, knowing how to extract clay from soil has multiple uses. The first thing that most people think about when they hear the word clay is pottery or cobs and making roof tiles, but clay has been used for centuries in other ways, including medicinally and for pigments.

Extracting clay from soil takes a bit of time but it’s possible just about anywhere.

There are, of course, regions that are rich in nearly pure clay, but other regions have soils that are mostly sand or rock. Still, there are ways to get clay from your soil.

A good sign that soil is rich in clay is that it gets slick when it’s wet and becomes sticky as it dries. You may also see the soil cracking as it dries after a rain. When clay is dry, it’s almost as hard as a rock. If the clay is close to pure, it will be sort of like Play Doh – you’ll be able to roll it into a coil if it’s dry (or wet) enough. Pure clay is the exception, not the rule though.

What is Clay?

Clay is a particular type of soft rock made up of minerals. It’s the leftover particles of rocks that have decomposed. Some clay stays where the original rock, such as feldspar, was. This is called primary clay.

Secondary clay has traveled from its original home and likely picked up other minerals and rocks such as quartz, iron, or limestone. Limestone is an absolute no-no in clay used for pottery because it will make your pot crack when you fire it.

There are two types of clay – earthenware and stoneware. The difference is that stoneware and earthenware vitrify at different temperatures, which means that the two have different uses. It’s critical that you know what type of clay you extract from your soil.

Earthenware has a firing temperature of 1300-2120 degrees F. This means that this is the temperature that it takes for the clay to “cure”, or harden. Bonfires heat to about 2120 degrees F, so earthenware can be fired in open bonfires. However, if you fire it beyond this point, it will melt and create a puddled mess in your kiln.

It’s also rare to find an earthenware-type clay that will vitrify enough so that it doesn’t leak. That doesn’t mean that it’s useless – it just means that you can’t use it for food purposes such as fermentation. It’s great for bricks, tiles, planters, and steamers. The vitrifying (firing) temperature is the temperature at which a piece reaches its maximum hardening and tightening. It’s comparative to glass, which is completely waterproof.

Stoneware clay, which is a much harder clay to find, vitrifies at temperatures of 2100-2372 degrees F. Stoneware is great for creating vessels such as vases and fermentation containers. It’s tough and will be much harder to break or chip than earthenware products.

I highly recommend firing your local clay before you decide what you’re going to use it for. It’s common for people to mix clays for either aesthetic or functional purposes.

Extracting Clay

Video first seen on buildnaturally.

Good places to find soil to extract clay are places like creek banks and beds, sea shores (yes, even though you think of that as mostly sand, there’s likely clay there), construction sites, excavations, and other places where the topsoil has been removed. This is because the top 8 inches or so of earth is made up of decomposing organic matter such as leaves and grass.

If you don’t have access to any of these, you’ll have to do a bit of digging of your own in order to extract clay from your particular soil. You can use a shovel or a set of posthole diggers – as long as you get deeper than 8 inches or so. You may want to do a sample first to see what your yield of clay per pound of soil is.

I’d recommend the posthole digger method – dip out the first scoop or two to get through the topsoil and set that aside. Collect the next couple of scoops in a bucket. Now, there are a couple of different ways that you can proceed from here: the water method or the smash and soak method. I personally prefer the water method because it’s easier and I live in an area that’s rich in sand instead of rock.

The Smash and Soak Method

This method is exactly what it sounds like – you dig the clay in the form of rocks, smash them up into dust, then soak them in water until they turn into slurry, which basically means liquid clay. This is a process that requires a couple of steps because you have to collect the clay, dry it, bust it up, and soak it. Then when it’s broken down into a clay, you have to screen it and soak it some more.

Simply soaking the clay won’t be as effective because it would take longer to absorb excess water than if you dried it first. This is a good method to use if you’re working with clays that are obviously plastic enough that you can work with it without straining out a ton of impurities.

You can usually pick up a sample of this clay from a creek bed (for example) and it will roll into a ball.

  • Collect the clay
  • Lay it out in a thin layer on a tarp or something and let it dry
  • Smash it up and remove any foreign matter such as leaves or pinecones.
  • Pound it with a rock or hammer (use a mask) into a pulverized clay and put it in a bucket. Add an equal amount of water to the bucket.
  • Let it stand at least overnight to absorb the water.
  • Screen the clay using a screened box with 1/4 inch screening to filter out the larger chunks and debris. Just pour the water/clay mixture through the screen into a bucket. You’ll probably have to smash it through with a flat tool such as a spatula.
  • Let it settle for a couple of days, then pour off the extra water. Repeat this process until you have a smooth, mud-like product.
  • Place it in a cloth such as cheesecloth or a pillowcase and hang it up until enough moisture drains and the clay is moldable. Alternatively, you can spread it out on a plaster slab until it dries to clay consistency. Fold it as it dries so that it dries evenly, then work it and store it as you store other clays.

Video first seen on Jerad Spencer.

The Water Method of Extracting Clay from Soil

This method is good for extracting clays out of just about any type of soil, but particularly if the soil is relatively free of debris and sandy or fine.

  • Fill a container about 1/3 full of soil. I highly recommend starting with a small amount, 10 pounds or so, to see what the quality and firing temperature of your local clay is.
  • Smash up the dirt and clay with your hands until it’s as fine as you can get it, removing as much debris (sticks, etc.) as you can during this process.
  • Add enough water to fill the container.
  • Stir the mixture and let it settle for several minutes. The working premise here is that clay is lighter than the heavier sediment such as sand, etc.
  • You’ll start to see a color change where the clay and sediment separate. The “clay water” is what you want to keep.
  • Pour off the clay water into a separate container until you start to see bottom sediment, then stop pouring.
  • Repeat this process until all sediment is removed.

Now it’s time to let the clay settle. Let it sit undisturbed for at least several hours, or overnight so that the clay particles will settle to the bottom of the container. You’ll see an obvious delineation of the water and clay.

  • Pour off the water, then let it sit for a few more hours and pour off the water again. Repeat until you can’t pour any more water off.
  • Pour the remaining wet clay slurry through a pillowcase, bed sheet, or other fine cloth.
  • Tie the top of the cloth together with twine and hang it from a tree limb or some other structure so that the water can drain from the clay.
  • After 24 hours, check the dryness of your clay. If you can shape it into a ball, it’s ready to add to your clay collection. If it’s still a bit wet, let it dry for another 12-24 hours. When it’s moldable, it’s ready.

As I’ve suggested, do a test batch; first process it, then do a few small sample pieces and fire them at different temperatures, or cones, to determine what the vitrification temperature is. Then you’ll have a better idea of what type of clay you have and what you can do with it.

Now that you have a couple of methods of extracting clay from soil, give them a try. Remember that after you know what type of clay you’re working with (earthenware or stoneware), you’ll have a better idea of what your limits are. You can also add your local clay to purchased clay to add special appearance or specific effects.

If you’ve dug and processed your own clay, please share your experience with us in the comments section below. And click on the banner below to find out more secrets that helped our ancestors survive!

the lost ways cover

This article has been written by Theresa Crouse for Survivopedia.


How to Make And Use Liquid Manure Compost

Manure tea – doesn’t that just sound like something you’d like to have some crumpets with? Well, no.

But your garden will most definitely enjoy a cup, so today we’re going to talk about how to make and use your very own manure tea to get the best out of your crops.

Don’t mistake manure tea with compost tea; they’re two completely different beasts. Compost tea is all about microorganisms that are beneficial to both soil and plants. Manure tea is all about the nutrients in manure.

What is Manure Tea?

Manure tea is pretty much what it sounds like: liquid compost made from manure steeped in water. It’s not just manure that you add water to – well it is, but it’s a bit more involved than that, but not by much. Just like everything else in prepping or homesteading, it just requires a bit of effort and a small bit of time for a big payoff.

It’s high in nutrients needed by plants, especially nitrogen. It’s particularly good for deep-rooted plants such as vine plants and cereal grains that are deep feeders that take a toll even on fertile soil. Since it’s liquid, it seeps down deep into the soil to nourish the plants where they need it. It’s a wonderful compliment to the benefits that your compost adds to the soil.

Benefits of Manure Tea

There are several benefits to making and using manure tea, including:

  • Even if you have to buy a bag of manure, which will make several 10-gallon batches of tea, you’ll still only spend a few dollars – less than you’d pay for a fancy cup of coffee.
  • Unlike commercial chemical fertilizers, manure tea won’t damage your soil or add chemicals to your plants.
  • It’s nitrogen-rich, which is the primary nutrient that many plants lack. Lack of nitrogen is what contributes to bottom rot in tomatoes and soil often gets “tired” and needs this boost.
  • In addition to nitrogen, manure tea contains many other natural enzymes and micro-nutrients that your plants need that aren’t in commercial fertilizers.
  • It’s quick, or sort of. Unlike your compost pile, which can takes months to break down, tea can be made in a matter of a few days, or a couple of weeks, tops.
  • Since it’s in liquid form, it’s easy for soil to absorb, and your plants can use it right away.
  • You can use it, diluted of course, right in the soil around your plants.

Manure tea sounds even better for plants than herbal tea is to us!

Rules to Making Manure Tea

Like I said, making manure tea takes a bit of time and effort but, unlike many of our gardening tasks, it’s not particularly labor-intensive. If you have some manure on hand, you can easily do it.

There are only two main rules for making manure tea: don’t use manure from carnivorous animals and don’t use the original tea without diluting it. Think of it as any other concentrated fertilizer, except it’s organic, arguably of better quality, and practically (or completely) free.

What Type of Manure is Best?

Just like there are things that you can’t put on your compost pile, there are also certain types of manure that you shouldn’t use.

You can use horse manure, cow manure, goat manure, or even rabbit droppings to make the best manure tea. If you’re in an area where you have elk, moose, or other large, herbivorous animals such as elk or moose, you can use that too. If you’re in a survival situation after a SHTF event, you can use just about anything as long as it isn’t a meat eating animal.

The reason that you don’t want to use manure from a carnivorous animal is that it contains toxins and pathogens that can make you extremely sick.

Fresh manure is best, but dried will work just fine. You may need a bit more dried manure in order to get the tea strong enough.

Either use your own manure or make friends with a local farmer or horse stabling facility. You can also buy bagged manure from a garden center or a nursery. Believe it or not, there are actually places online that sell manure tea bags so that you can make your own without having to source the manure.

It kind of makes you wonder if they come in single serve or family size, right?

manure tea

How Do You Make Manure Tea?

There are three basic ways to make manure tea. They’re all easy, but one requires some easily-obtainable materials. However, it has some additional benefits too, so you may consider it worth the extra effort. Regardless of which method you choose, consider using pond or lake water for the additional nutrients.

The toss it and stir it method

This is probably the easiest way to make manure tea, but there are a couple of downsides that we’ll get to in a minute. To make the tea this way, you simply toss your manure in a bucket or barrel, cover it with water (about twice as much water as manure), and let it steep preferably in the sun so that the water stays warm, which helps break down the organic material. You’re making sun manure tea!

Stir it once a day or so to help the chunks break down, and add more water if it isn’t extra soupy. Let the tea steep for a week or two. The longer it steeps, the stronger it gets but you can start to use it after a few days – it just won’t be as strong.

Though this is crazy simple, you’re going to have to strain the leftover organic matter from the liquid using either a fine screen or some kind of cloth such as an old pillowcase or burlap. That can get sort of messy, but you don’t want any of the larger chunks to make its way into your tea. This is where using a “tea bag” comes in handy.

Another downside to this is that it doesn’t smell so great. You could, of course, put a loose lid on it to keep it from smelling too much.

The tea bag method

This one is exactly what it sounds like – you put the manure in a “tea bag” of burlap or an old pillowcase (use whatever fine cloth you have on hand), then steep it in a bucket or barrel of water, depending upon how much you’re making.

“Dunk” it good once a day or so to help break up the matter and speed up the steeping process. As with the first method, let it the manure tea steep for a week or two in order to get maximum effect. After it’s steeped long enough to be the color of strong coffee, pull the bag out and tie it above the bucket or barrel for a day or two so that it drains, then.

The Manure Teapot Method

I like to refer to this method as the teapot because it’s quite literally sitting in a barrel while it steeps, then is filtered as you drain it out. Cut the top off of a 50-gallon drum and clean it well. You’ll also need:

  • A spigot with an open/close valve
  • Enough sturdy, medium-mesh screen to cover the back of the spigot (about 6 inches in diameter, so that you can bow it toward the inside of the barrel a bit instead of having it flat against the hole)
  • 2 pieces of fine-mesh chicken wire, cut just a bit bigger than the diameter of the barrel
  • A couple of bricks
  • Enough hay or straw to fill the barrel about 1/3 of the way full (straw works best because it breaks down a bit slower)
  • Enough manure to fill the barrel 1/2 – 2/3 full
  • Water to fill the barrel almost full
  • A lid (plywood works) for the barrel
  • 3 concrete blocks

This is super simple to make. The hardest part is securing and sealing the spigot to the barrel. Speaking of which, that’s the first step.

  1. Cut a hole in the barrel about 4 inches from the bottom and secure the spigot permanently; if you use a metal barrel, braze it, if you use a plastic one, you can either do it yourself or buy a spigot kit from your local home improvement store.
  2. Shape the screen into a bowl shape and secure it over the hole inside the barrel. I prefer to secure it temporarily by simply duct-taping it so that I can clean it when the barrel is empty.
  3. Push the first piece of chicken wire down into the barrel, being careful not to squish the screen. The wire should be above the screen.
  4. Place the barrel in a sunny spot on top of the cinder blocks
  5. Put the straw in the barrel.
  6. Put the second piece of chicken wire on top of the straw and weight it down with the bricks.
  7. Add the manure.
  8. Add the water.
  9. Add the lid.
  10. Once a day or so, circulate the water so that the tea steeps better. Do this by filling a bucket from the spigot and then pouring it back into the top of the bucket. Drain and circulate a few buckets full each time.
  11. Steep for a week or two. You can actually keep adding to the mix as necessary, though I prefer to drain the barrel so that I can clean the screens and add more straw.

The straw or hay serves two purposes: it acts as a filter and it adds its own bit of nutrients to the mix. I’ve wondered if leaves would work as a filter because they’re so nutrient rich, but haven’t tried it yet because I’m afraid they’d clog the screen. I may try just adding a few in with the straw.

Tip: This can be scaled down if you don’t need this much manure tea. Use a 5-gallon bucket instead of a drum. You could also use a plastic garbage can of any size.

How to Use Manure Tea

Regardless of which steeping method you use, the tea will be strong enough within just a few days to burn your plants if you don’t dilute it. It should be the light-brown color of fairly weak tea when you use it. This tea is great for your patio plants and vines as well as your edibles. Just about every plant loves manure tea!

The only vegetables that you probably shouldn’t use manure tea on are root vegetables such as turnips, carrots, beets, radishes, and potatoes. They prefer a more potassium-rich soil than nitrogen-rich, and if you use tea on them, you’ll likely end up with big, beautiful top greens but not-so-beautiful veggies.

Now that you know how to make your own manure tea, your plants are going to love you. If you’ve made or used manure tea, please tell us about your experience in the comments section below.

the lost ways cover

This article has been written by Theresa Crouse for Survivopedia.


10 Essential Medical Resources You Can Get From Nature

Just because there is a currency collapse, martial law, or a natural disaster, that does not mean you can ignore medical needs. 

What will you do when there are no bandages, no medications, and no way to get help?

Even if there is only “weeds”, trees, and moss around, you may have a number of useful medicinal aids at your disposal.

Learning how to recognize natures medical resources is a very important part of preparing for a crisis. Aside from simply reading a few books and going on a few field trips, take the time now to make sure you know how to prepare specific treatments in a range of situations.

How to Use Nature’s Medicines

As someone with a keen interest in herbal remedies and natural medicines, I concluded long ago that it is truly difficult to remember all the incredible healing resources in nature. It is truly to your advantage to gain hands on experience and keep a well organized journal that contains detailed information on both the resources and how to use them. This journal should be treated with as much care as other sources of information such as maps and anything else that you consider indispensable to long term survival.

If you choose to keep a copy on your computer, do not forget that it may no longer be accessible if you do not have access to electricity.  A good medical journal may span several hundred pages and may also be quite thick from pressed specimens, however it is well worth its weight.

In time of need, you would truly be amazed at how confusing a sketch or even a photo may look when compared to a specimen that you can see and touch for a closer comparison.

celandine

Taking courses in how to use natural medicines is critical if you expect to know what you are doing in time of need and be successful. No matter whether you study online or actually attend wilderness medical excursions, do not simply put the materials aside once you are done with the courses. Always make the information part of your personal wilderness medicine journal and try to practice making medicines and equipment as much as possible.

Herbal Remedies for Chronic Illnesses

Most preppers already know that good quality medical care is essential for preserving health, managing injuries, and ensuring that the next generation of humans can be born and grow to maturity.

Many people also realize that in a major crisis or social collapse, medical care will be unavailable. Critical medications such as antibiotics and other drugs will be even more important in the post-collapse world. Even though you, and others may already know about herbal remedies and may also know how to grow and prepare them, that does not mean your work is done.

Consider a situation where you have been growing garlic, ginger, turmeric, and other herbs that can be used as herbal antibiotics. Perhaps you have even made oils from these herbs or dried them out for later use. Now let’s say  a major crisis occurs and you cannot get home for several days in order to retrieve your stash of herbs, or worse yet, your stash gets ruined while bugging out. In these situations, not knowing about the local wild plants in your area can spell disaster.

Here are some things you can do right now to ensure you will always be able to find and prepare the wild herbs in your local area for medicinal needs:

  • Get a field guide that features pictures and descriptions of medicinal herbs in your local area. The guide should give you full details about where they grow and also how to recognize them. The guide should also give you a listing of plants that are commonly mistaken for the plants you will need for medicinal purposes.
  • Make a list of all herbs that may be of interest to you. Do not list herbs that are from rare species or ones that are listed as endangered.
  • Go to sites where you can find the plants you identified as useful for your needs. Once you find a good sized patch of herbs to work with, take samples of leaves, stems, roots, flowers, and any fruit the plants may bear. These small samples should be done for all four seasons and folded into your journal.  You can also take pictures of the leaves and other parts of the plant, print them out, and keep them with the actual samples. In your journal, also make note of the spot where they are growing and the basic characteristics of the area.
  • Find a local herbal specialist or Cooperative extension and ask an expert to confirm that you have all the plants labeled correctly.
  • Once you have confirmed that your listings are all correct, you can begin looking for other places where these herbs grow well, and also start learning how to prepare them for medicinal needs. If at all possible, try to gather seeds from the wild plants. If you have to bug out or move to another area, you can try planting these seeds indoors and see if you can get them to grow.

In a major crisis, it is entirely possible that you will wind up traveling hundreds of miles as part of a massive evacuation form a dangerous area. Since there is no telling where you will wind up, you will need to use some additional methods for spotting medicinal herbs. You can try keeping field guides on hand.

One way to expedite the process of finding medicinal herbs in foreign locations is to see if you can find ones related to herbs that you already know about.  Herbs that grow in other regions may be more or less potent than the ones you are used to. Make sure that you know how to test herbal potencies for your own safety and well being.

Non-Herbal Remedies for Skin and Wound Management

No matter whether you are trying to find your way out of the city, navigate through a woods, or move objects from one place to another, injuries are bound to happen. During a major crisis, you can also expect infectious diseases to increase because of poor sanitation and increased risk of exposure to infected individuals.

In many cases, wounds that you would normally pay little attention to may become infected and require direct application of antibiotics.  If you are moving through unfamiliar areas, you can also expect increased problems with wounds because your immune system may not be as well adapted to the exact strains of pathogens in the area.

Here are some natural remedies that you can apply directly to skin and wounds:

1. Honey – even though honey has a sweet taste and seems very mild, it is one of the most powerful antibacterials you can find.  It has been used successfully on both oral and skin wounds for centuries without major side effects or other problems.  If you are able to find a beehive, be very careful when gathering the honey.  Since while honeybees are at very high risk for extinction, try to take only as much honey as you need, and try to avoid breaking apart the entire hive.  You should also do your best to subdue the bees with smoke instead of killing them.

2. Sphagnum Moss – Since sphagnum moss contains iodine, it will work well as an antibiotic. You can usually find this moss in bogs or other marshy areas.

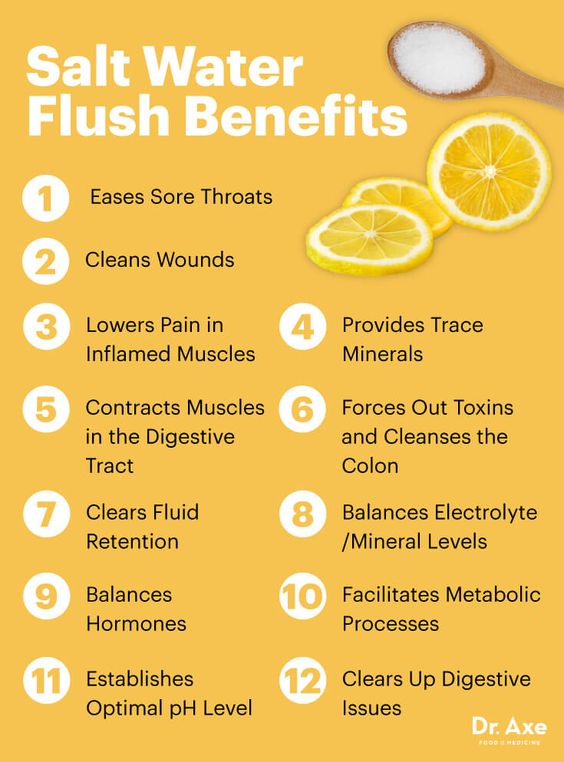
3. Salt Water – If you are near an ocean coastline or other source of salt water, you can spray salt water onto wounds as a form of antibacterial. Do not rub the wounds with the salt water. Instead, try to run the salt water over the wounds similar to taking a shower.  Before using salt water, you should also filter it and boil it to make sure it is as clean as possible.

salt water

4. Tannic Acid – If you have rashes, blister, sores, boils, or other skin ailments, tannic acid may be of use.  You can obtain this acid from boiling acorns, and also from nutgalls that form on oak trees.

Splints and Bandages

To make bandages, non-poisonous leaves can be used to put pressure on the cut, and also to protect it from the elements. The best leaves to use are from the Plantain plant. If you chew on the leaves to release liquid from within the leaves, you will also have a natural antibiotic in the form of mashed leaves to put on the wound. From there, just use a second leaf to wrap around the crushed Plantain and the wound.bandage

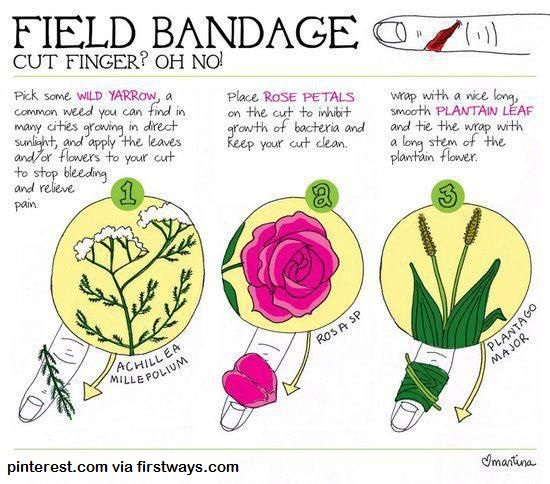
Some fungus that grow on oak and silver birch trees may also be safe to use for bandaging.  Since it is notoriously difficult to tell safe fungus from poisonous ones, be sure to ask a local expert on mushrooms, molds, and mosses so that you know what to look for. As with locating and identifying useful herbal remedies in a woods or field, be sure to take samples and photos for your journal of useful organisms as well as ones that it may be confused with.

Splints for broken bones and injuries can be made from just about any tree branch.  To keep the splint in place, make rope from yucca leaves or any other leaf that has strong, straight fibers in the leaf.

If these plants are not available, tree bark from smooth bark trees can also be used. In order to avoid friction burns and abrasions, use mullein leaves (or any other non-toxic leaf) as a cushion between the splint and the the body part being immobilized.

In order to make a splint from a branch:

  • Choose a branch that is long enough and wide enough to support the area that needs to be immobilized.  The finished splint should also be long enough so that the joint above and below the injured area will also be immobilized.
  • The branch should be as straight as possible and of even thickness for the required length.  You can use a branch that is bent or curved, but try to use the straightest area parallel to the injured area.
  • Try to avoid branches that show signs of fungal growth, insect damage, or anything else that might increase the risk of developing an infection.
  • If you have sharp enough knife, try to smooth out the rough areas of the branch so that it is as smooth as possible.  You may also want to flatten out the splint so that there is a wider surface area.  Just make sure that all areas that you cut are covered so that your skin does not come in contact with the unseasoned wood.
  • When placing a splint, make sure that the rope or cord is not too tight or too loose.  A wrapping that is too tight can cut off blood circulation and lead to further problems.  If the wrapping is too loose, the splint will move around and cause more abrasions.  A loose splint will also fail to support the injured area and keep it properly immobilized.
  • Remember that if you have a broken bone or a dislocated joint, splinting the injured area is only a temporary fix.  You will still need to find a competent medical professional to move the bone or joints back into place.  Unless you have taken courses and practiced bone and joint setting, it is best to leave these matters to a doctor.  A broken bone or dislocated joint can still be near blood vessels or nerves that are still intact.  The last thing  you will want to do is try to manipulate the broken or dislocated areas and wind up causing damage to other tissue in the area.

Tourniquets and Wound Packing Materials

When you have a deep wound, or one that is bleeding heavily, you may need to use several different methods to stop the bleeding and then make sure the wound is protected.  Once you address the most immediate problem, you may still need other items from nature to ensure that the wound is managed as well as possible.

1. Tourniquets –  When blood is spurting or pouring form a wound limb, there is no time to prepare a bandage let alone a wound filler. Your first job may well be to cut off the blood flow as quickly as possible using a tourniquet.  Just about anything that can be wrapped tightly between the wound and the heart can be used.

For example, if you are in a meadow or field, tall grass or straw can be twisted together quickly and wrapped above the wound.  Anything that is pliable enough to wrap, and then twist will work to form a tourniquet.

Remember that you must be able to loosen and tighten the tourniquet every few minutes in order to avoid gangrene.  If you only have straw or other relatively weak stalks or even tree bark to work with, you may need  to make several tourniquets to manage the injury.

2. Pressure Bandages – If you have an abdominal wound, or some other wound that cannot be isolated using a tourniquet, you will need to make a pressure bandage. Once again, just about anything will do as long as you can apply pressure without completely stopping blood flow. You can try taking several leaves from safe plants and roll them up to form a pad large enough to cover the wound.

If soft, absorbent leaves such as mullein are available, use them close to the wound, and then stiffer ones on the outer layer. From there, use your hands, or even a flat rock to hold the leaves in place and apply additional pressure.  Remember that as with a tourniquet, it can take several minutes for pressure and blood clotting factors to finally stop the bleeding.  Try to make additional bandages from leaves so that you can apply new ones as needed.

3. Cauterizing Agents –  If you are bleeding from a major artery, then it is possible you will need to burn the wound so that it stops bleeding.  While cauterizing carries many risks, those problems can be dealt with later on. If you are bleeding heavily, stopping it needs to be your first priority. Even though you may not have access to metal in the woods, you can still build a fire and heat up rocks (after you remove soil and debris from them)  that can be applied to the wound. Be very careful about the rocks you choose, as they can explode when heated, or just as bad, have poisonous chemicals that will get into the wound.

In a sense, choosing rocks for cauterizing, and other medical needs is not so different from choosing herbs.  You will need to know a good bit about the geology of the area and the chemical makeup of rocks and their inclusions.  For example, if you found a nice, flat piece of gray shale, that does not mean the entire rock has the same chemical composition.  It may have some hidden parts that have toxic chemicals that will move out of porous areas of the rock when it is heated.

As with herbal remedies, try to obtain a comprehensive field guide that gives you detailed information about rocks in the local area and how they are most inclined to form and mix together.  Next, go out and collect as many samples as you can. Bring your samples to a local geologist and ask him/her about which rocks can be safely heated up and used for medicinal needs such as cauterizing.  If you can find a geologist or rock hound that has a special interest in hiking or natural medicine, then he/she may be a more viable source of information.

4. Wound Fillers – After you stop a wound from bleeding, there may still be large holes that need packing in order to prevent further damage.  Here are three substances that you can use. While some require more preparation than others, at least you will have some options to choose from based on the materials available.

  • Pine Sap – warm up the sap so that it is soft and sticky.  Aside from having antibacterial properties, pine sap will protect the wound and will also stop the bleeding.
  • Calcium Alginate – if you happen to be near a bed of kelp, or brown algae, you can extract calcium alginate from the leaves.  When applied to a large or open wound, the moisture from the wound will cause the calcium alginate to form a protective gel.  As with cauterizing, you still run the risk of developing a serious infection of the wound is not managed properly or if the  calcium alginate does not all form up into a gel.  That being said, this substance can also help stop blood flow, and may be of value if you have the time to prepare it.
  • Sphagnum Moss, Leaves, and Other Soft Materials – Non-toxic mosses, leaves, and even grass can be used to pack wounds and keep them from reopening.  If you must use leaves, try to find herbs to mix in that also have antibacterial properties.

Makeshift Syringes

Chances are, if you are working with herbs or other natural medicines, there may not be much need to inject substances into the bloodstream.  Nevertheless, it may still be necessary to isolate insulin from animal sources  to treat diabetes, or other injectables that require some kind of syringe or needle.  If you think about the basic parts of a syringe, you may be surprised to find that there are quite a few ways to make a makeshift version from natural materials.

  • The Needle – to work effectively as a makeshift syringe needle, the material used must be very thin, strong enough to resist breaking when puncturing the skin, and hollow.  Some possible sources of needles include wasp and hornet stingers (do not use bee stingers because they are barbed), fine porcupine quills, and very thin reeds.  If you are going to use insect stingers, make sure that the all of the venom is removed from the stinger.
  • The Barrel – this is where the medicine will be held until injected into the bloodstream.  Just about any rigid, hollow stem from a non-toxic plant will do.  Thicker reeds, bamboo stem, and other dried, durable stems can be used for this purpose.  To attach the needle to the barrel, you may need to set the needle at an angle so that there is less chance of breaking it.  Next, you can seal off the space between the needle and the barrel with pine pitch or some other natural glue like substance.
  • The Plunger – anything from a well trimmed tight fitting small branch to a solid, rigid plant stem can be used for the plunger.  Just bear in mind that the plunger must fit snugly inside the barrel so that the medicine is pushed through the needle instead of squirting out the back end.

Some problems that you may encounter when using a makeshift syringe:

1. It will be very hard to make exact dosage measurements.  If you have a way to determine how much material is ejected from the needle, then you can try making notches in the barrel and the plunger so that you can make  a reasonable estimate.  Before you go into a crisis situation and run out of syringes, make it a point to know exactly how much liquid should be discharged with each dose. You can do that with a measured syringe now, and then make a circle representing that amount in your journal.  If possible, try also allowing one single dose to stain the page so that you can observe the size of the liquid stain on a known paper source.  Make sure that you have an additional blank page so that you can make comparisons in the field.  Do not forget to make these comparisons for herbal or animal based injectables that you may need to prepare from scratch.

2. Even though you may be able to get medicine to move through the needle, you may not be able to create enough of a vacuum to pull medicine into it.  You will be best served by creating a simple leaf funnel or using some other means to pour the medication into the syringe.

Once you are able to make needles in a wilderness setting, do not overlook applications other than injecting medicines.

Solid needles can be used to stitch wounds (using animal sinew, fibers from plants) and also for acupuncture. Today, even conventional medicine includes acupuncture as  valid treatment for pain and other ailments.

As long as you know how to sterilize the makeshift needles and where to apply them, there are plenty of ways you can use this remedy as part of your wilderness survival kit.

Crutches and Carriers

When it comes to making improvised medical supplies, crutches are probably some of the easiest to make.  If you are in a wooded area, simply pick a branch or tree limb that has a fork at one end.  Try to pick one with the widest angle possible in the fork so that your armpit has a larger surface to rest on.

Next, use leave and vines/makeshift cordage to create a cushion that will fit under your arm.  If possible, add an absorbent top layer of leaves so that the padding does not all become soaked with sweat.  You may need to change the pad often for the sake of comfort and to avoid infections.   When cutting the wood for the crutch, make sure that it fits comfortably.

If you are in a group, those who are injured may slow down the entire group.  Rather than leave people behind or take a risk on not getting where you need to go, try making a litter or other form of carrier.  Adults and children can be dragged along far easier than they can be carried.  You can make a simple carrier using the following basic instructions:

  • Take 2 saplings or branches that are about 1/3 longer than the height of the person who needs help being transported.   Next, take 2 more saplings that are a little longer than the shoulder length of the individual.   If the person is very heavy, or you do not have durable materials to make a mat with, then collect 2 or 3 more of the shorter branches.
  • Use vines, bark rope, or other cordage to tie together the saplings.  The longest saplings should be parallel to each other.  Set one of the shorter branches at one end of the longer branches, but leave a few inches so that the bottom of the longer branches is the only thing that will be touching the ground.
  • Set the second shorter branch at the opposite end.  There should be just enough room between the top and bottom for the person to lay down without his/her feet or head flopping over the frame.  You should also have enough room at the top of the litter to pick up the longer branches and drag them along.
  • Add the remaining branches between the top and bottom ones. Try to make them  equal distances apart.  When you are done, the frame of the litter should look something like a ladder with the longer sides extending  out further than the “steps”.  Alternatively, you can also have the longer branches aligned so that they cross in front of the area where you will be standing.  You may need longer branches for this method.
  • Next you will need to add padding to the litter.  Moss, leaves, and anything soft can be used for this purpose.  You can also use vines to tie the materials down and make a more compact bedding. You can also used animal hides as long as they are well scraped and have been drying for at least a few days.  Choose leaves and other materials that are as dry and clean as possible.
  • If you have enough materials to make additional cordage, create a belly band or harness that attaches to the handles of the litter.  You can use the harness to drag the litter and keep your hands free or pull along with your hands if you so choose.
  • Unfortunately, in nature, there are not many ways to reduce friction on the bottom of the litter where it can catch on rocks, stumps, and many other things that will make it harder to drag along. You can try attaching very smooth, flat rocks to the impact areas.

Animal Based Remedies

Many people do not study animal based medicines because they think that plants are more diverse, easier to find, and easier to harvest.  On the other hand, some of the most powerful and useful medicines are harbored within “dangerous” animals that you may already be hunting for food.

Study  Ayurvedic and Chinese medicine to learn how to prepare medicines from these animals. It should be noted that there are a number of newer drugs based on compounds found within these animals, however it may be difficult to find out how the important molecules are isolated. Given that the Chinese traditional healers, Indian practitioners of Ayurvedic medicine, and Native American medicine people may have been using these animals to reliably treat illness, they are your best source of information on this matter.

Here are a few animals you can ask about as long as they are relevant to the local area for you and the practitioner has direct knowledge of the species of animals in the area:

  • Frogs – produce natural antibiotics on their skin.  Some frogs also produce neurotoxins and other poisons that may work in lower doses as painkillers and muscle relaxants.
  • Pit Vipers – aside from carrying compounds in their venom that work as ACE Inhibitors (used to treat high blood pressure), snake venom may also be used as an anti-coagulant,  to treat heart failure and preserve kidney function in diabetics.  While venoms vary from one species of viper to another, local and indigenous medicine people may still know which animals can best suit your needs as well as how to safely milk the vipers of venom without killing them.
  • Gila Monster – if you happen to be in the desert and need a stimulant to produce insulin, venom from these lizards may be of some use.
  • Spider Venom – some species of spiders and tarantulas produce venom that can treat cancer, reduce pain,and relax muscles.
  • Spider webs – as fragile as spider webs look, they can act as a strong, gentle network that allows flesh to grow back into place.
  • Cone snail – if you are near a body of saltwater or near the ocean, cone snail venom may be an option for treating pain, managing heart disease and preventing epileptic seizures.
  • Horseshoe Crab – if you aren’t sure if a bacterial infection is present, expose water, food, or other materials to the blood from a horseshoe crab. If the blood becomes thick and coagulates, then you know a dangerous infection is present.
  • Centipedes – centipede venom can be used as a painkiller.
  • Scorpion Venom – this venom can be used to treat cancer and also as a painkiller.

Poison Antidotes

Chances are, you already know that activated charcoal is one of the best antidotes for swallowed poisons. As long as you have trees and a fire, you can make charcoal as a form of poison antidote.  To get the most out of the charcoal, crush it up and mix with water.

While some people recommend mixing tannic acid with charcoal, researchers have found that the tannic acid is actually absorbed by the charcoal, thus making less room available to remove the poison.  If you need to draw poison from a wound, you can try using a charcoal poultice.  Mud poultices and some herbal poultices may also draw poisons out of a wound.

Some modern research suggests that honey badgers, squirrels, and opossums have molecules in their blood that can neutralize venom from snakes, spiders, and other venomous animals that you might encounter. As with other animal remedies, try asking indigenous people in the area about how they treat venomous bites, and if they use preparations from these animals.

If you already know how to hunt these animals and use them for food, then you may already be on your way to an important natural  remedy for venomous bites.

Worldwide, thousands of people die each year from consuming poisonous plants or mushrooms, getting bitten by venomous animals, or ingesting poison from some other source.   While activated charcoal can help in some cases, there is very little else in nature that can act as an antidote.

You can still try to mitigate the effects of some poisons if you know what you came in contact with and how it affects your body. Once again, you should never experiment  with these ideas.  Take them to a certified herbalist or other practitioner of Chinese or Ayurvedic medicine to see if they already have experience with these methods.

For example, if you know that you have been bitten by a snake whose venom acts as an anti-coagulant, it may be possible to wash the site with some herb that has the opposite effect, but will not interact in ways that multiply the effects of other parts of the venom.

If you need to induce vomiting, warm salt water can be used for that purpose. Try to avoid herbs (unless you know they are safe to take with the poison in question)  that induce vomiting because they can also interact with the poison and make it more dangerous. As a means of last resort, you can still try and focus on herbal or animal based remedies that counter the effects of the poison.

Fire Cupping

In ancient Chinese medicine, Fire Cupping was often use for pain relief.  This particular treatment basically relied on creating suction by heating a round, hollow object, and placing it on the skin.

fire cup
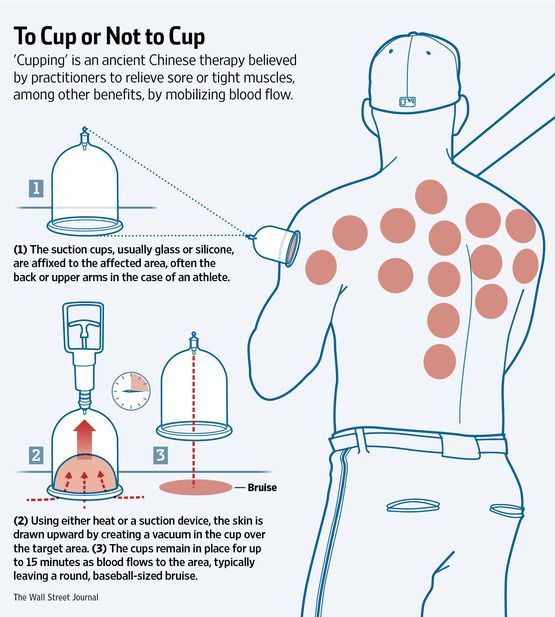
If you can generate heat and suction as in fire cupping, then you may be able to create a makeshift venom removal kit. Some things you might try using for the “cup” include hollowed bones, or mud that has been shaped into a bowl with a narrow opening and fired. Needless to say, if you have, or find  a small glass bottle or a cup, then you can use that to for suction purposes.

When choosing natural materials to make a fire cup, choose items that:

  • Can easily be fashioned into a small, round cup with a narrow neck.  If you cannot create a rounded cup, a longer, narrower form will do as long as the neck is still narrower than the body.
  • The cup should be able to retain heat well.  If the material loses heat easily, it will not generate sufficient suction.  The material should be able to retain the heat for at least 3 – 5 minutes.
  • If you are going to keep an open flame on the cup while in use, it should be non-flammable.
  • You can try boiling a wooden cup, however it may not work as well as other materials.

Rocks for Generating Steam

From winter colds to spring allergies, and other respiratory ailments, inhaling steam or herbs mixed with steam is often the best remedy.   While this may seem like a novel idea,  generating steam for these purposes is possible using natural resources. As with heating rocks to cauterize wounds, you need to be very careful about which rocks you use and how you use them.

Here are some important things to keep in mind:

  • When rocks are heated, they can crack or break apart causing sharp projectiles to fly all over the place.  Porous rocks are usually the most problematic because water from rain, dew, and other sources seeps into the rock.  Once the rock is heated by a fire, the water turning into steam will create pressure that causes the rock to break apart.
  • Heated rocks can also emit gasses that are poisonous.  It does not matter if the rock is porous or not, since even surface contaminants can emit poisons when heated.
  • When you pour water onto hot rocks, the sudden changes in temperature can also cause the rock to fracture or explode.
  • As hot water seeps into the rock, it can mix with other chemicals hidden deep in the pores. These chemicals will escape with the steam and can be poisonous if you inhale them.
  • Because rocks very so much in composition and formation, you need to work with a reputable geologist in your local area in order to help reduce the risk of choosing rocks that can cause more harm than good.
  • When creating a steam bath, many people try to keep the steam in an enclosed area.  Never put yourself in a position where the materials used does not allow adequate ventilation.  For example, never use plastics or any kind of tarp that does not allow air to flow through it.  It is better and safer to take the time to create a leaf or bark mat then wind up suffocating in a steam bath.  When choosing plants to make the covering, make sure that you wash and dry them thoroughly so that you do not pick up stray chemicals that can be harmful if inhaled with the steam. Only work with plants that you know to be safe and non-toxic for this purpose.
  • Never use steam sweats unless someone else remains outside the steam area and can monitor you for signs of trouble.  This includes making sure that you exit the steam area every few minutes so that you do not dehydrate or suffer from heat stroke/exhaustion.

Leeches and Maggots

When science was in the process of overtaking religion for control of the masses, the use of leeches and maggots was dismissed as quackery.  Today, modern doctors have had to substantially revise their opinion on the use of these animals as part of sound medical treatment.

Here is how you can use leeches and maggots in time of need:

  • Leeches can be used to suck blood from serious injuries. Basically, if you had to sew up a limb that was amputated or almost amputated, or some other injury that caused damage to the blood vessels, the blood will pool and slow down healing.  If you apply leaches for a few hours each day, they will absorb the blood pool and allow the veins to heal.
  • Historically speaking, leeches were often used in “bloodletting” for colds, and many other diseases.  At this time, it is believed these therapies do more harm than good.  That being said, if you need to stimulate blood production, sucking out small amounts may actually do more harm than good.
  • Maggots are used to manage deep infections where the flesh is rotting or is very close to that stage.  To use maggots for this purpose, simply let flies rest on the wound.  Once the eggs from the flies hatch, they will become maggots that eat up the rotted flesh. Once you see blood an feel pain from the wound, then you know it is clean. Wash out the maggots and let the wound continue to heal.

In these times, we are often led to believe that there are very few, if any alternatives to modern medicine.  Throughout the world, indigenous people have been using medicines for thousands of years from items found in nature.  While herbal remedies are the most commonly discussed treatments, there are truly many other medicinal wonders that nature has to offer.

As a prepper, you should learn all you can about wilderness medicine and how to use it in a time of need. Aside from courses aimed at basic treatments, also consider studying indigenous methods so that you can expand your skill sets even further and utilize more materials in different geographic settings.

This article has been written by Carmela Tyrell for Survivopedia.


Using Natural Sunscreens To Survive Summer

Sunburns are no fun and are really bad for your skin. Not only are sunburns bad, too much sun can damage your skin and cause sun spots and wrinkles.

While it’s true that you may look great with a tan, you’ll pay for it with elephant skin later. The problem is that commercial sunscreens are packed with chemicals and have a limited shelf-life, which makes them poor stockpile items.

You know there are cancer-causing chemicals in your food, and sunscreen is the same. You may slather on the sunscreen to prevent skin cancer, some of the chemicals in it have actually been linked to cancer. Oh, the irony.

Some ingredients can also disrupt your endocrine system and many people have skin allergies to sunscreens/blocks. Three great reasons to make your own sunscreen.

The first thing you need to understand before venturing into the land of homemade sunscreen is the difference between sunscreen and sunblock. Though the two terms are used interchangeably, they function differently.

Also, it’s important that you know the difference between UV rays before setting out to make your own sunscreens. UVB rays are main cause of sunburns and UVA rays, which penetrate more deeply, are more closely associated with skin damage such as wrinkling and leathering, and play a larger role in causing skin cancer.

In other words, you want something that’s going to protect you from both!

What is Sunscreen?

Sunscreen is a chemical protectant. It’s absorbed by your skin and chemically filters out and absorbs the sun’s UV rays before they can penetrate and damage your skin. They use benzophenones that screen UVA rays and salicylates that screen UVB rays. Oxybenzone, octyl methoxycinnamate, and octyl salicylate are common ingredients.

If you’re buying commercial sunscreen, make sure that they contain both classes because older formulas don’t have the UVA protection.

What is Sunblock?

Sunblock, as the name implies, actually blocks the rays from penetrating your skin. It’s a physical protectant that provides broad protection from both UVA and UVB rays. The two most common ingredients are titanium dioxide and zinc oxide. This is the white stuff stereotypically seen on lifeguards’ noses. It’s available in clear, too.

Let’s Go Natural!

OK, now that we have that straight, let’s talk about natural alternatives.

Unless you’re going to be out long enough to be worried about burning, it’s a good thing to get a bit of sun because that’s how our bodies get vitamin D. With so many of us working inside, vitamin D deficiency, which is linked to cancer and mood disorders such as depression is becoming more prevalent. Moral of the story – get a little sun each day.

To determine how much protection you need, use the SPF. You probably know how long you can be in the sun without burning. All an SPF number indicates is how many times longer you can be out in the sun with the product on without burning. In other words, if you can be outside for 20 minutes without getting pink and you get an SPF 10, you can be outside for 200 minutes (3 hrs. 20 min). Easy.

I personally prefer to use zinc oxide as block in addition to my oils, which are typically low SPFs, plus most oils only protect against UVB rays. Also remember that if your mixing oils, don’t ADD the SPFs together.

For example, hemp seed oil has an SPF of 6, and almond oil has a SPF of 5. The total SPF of this combination would be SPF 6. They don’t pile on top of one another but they do have different benefits for your skin and may break down at different rates.

Here’s a guide to help you determine how much zinc oxide or titanium dioxide to add into your oil or cream:

sunscreen spf

You may be thinking right now that neither zinc oxide nor titanium dioxide sound very “natural”, but you’d be wrong. They also aren’t systemic like the parabens and other nasties in commercial sunscreens.

The difference between regular zinc oxide and micronized or nano is that the latter two will make a clear sunscreen, but regular zinc looks white on your skin. You can always add fun colors for the kids – you’ll never wonder if you need to reapply!

Note that you have to use a high percentage of either product to get a high SPF, but it’s not that horrible; when compared to the price of commercial sunscreens, the cost of using either of these ingredients is actually less, especially if you use it in coconut oil or another relatively inexpensive oil.

Warning: If you choose to use micronized or nanoparticles of zinc, use a mask. It’s not toxic on your skin and doesn’t absorb into your system via your skin, but breathing it is a different story.

SPFs of Essential Oils

Now, let’s discuss the SPFs of a few oils. Remember that it’s important to use high-quality, pure oils anytime you’re going to use them on your body or consume them. Also, don’t use citrus oils as they can increase your skin’s sensitivity to sunlight.

Carrier oils such as coconut oil, help stabilize the essential oil and dilute it so that it’s usable. Often, pure oils have an extremely strong smell and can be irritating to the skin if pure. They may also evaporate quickly. Carrier oils help all of these issues. There are plenty of uses for animal fats such as lard, but stick with plant oils.

  • Red Raspberry Oil – SPF 30-50, and protects against both UVA and UVB. Also great for eczema and psoriasis.
  • Carrot Seed Oil – SPF 40 (Definitely needs a carrier oil)
  • Wheat Germ Oil – SPF 20 (Packed with vitamins)
  • Macadamia Oil – SPF 6
  • Avocado Oil – SPF 4-10
  • Olive Oil – SPF 2-8
  • Shea Butter – SPF 3-6
  • Almond Oil – SPF 5
  • Sesame Seed Oil – SPF 4
  • Hemp Seed Oil – SPF 6
  • Jojoba Oil – SPF 4
  • Coconut Oil – SPF 2-8

You may notice that some of the oils with lesser SPFs will make a great carrier oil! Coconut Oil is my personal favorite because it’s inexpensive (relatively) and it actually smells like sunscreen!

sun oils

Textures for Homemade Sunblock

Now that you have your oils and some ideas for carrier oils and know how to use zinc oxide, it’s time to talk about texture.

  • If you want it oily, use an oil carrier such as coconut oil and then leave it as-is after you mix it.
  • If you want it like lotion, use shea butter along with a carrier oil. If you want it just a bit thicker, add more shea butter or a small amount of beeswax.
  • If you want it in a block, or want to make sunscreen lip balm, use beeswax along with shea butter and a carrier oil.
  • If you want it waterproof, use beeswax along with the shea butter and carrier oil.
  • If you want to increase the SPF, add more zinc oxide.
  • Remember that ALL sunscreens need to be frequently reapplied, especially if you’re in the water or sweating.
  • Use 1/2 teaspoon vitamin E or tea tree oil per 8 oz. as a preservative.

How to Prepare Sunblock

Now, let’s pull it altogether! These SPFs have not been evaluated by any authority and are estimates only. You can do the math for yourself when cooking.

Sunblock 1 – about SPF 20, no zinc oxide

  • 3/4 cup coconut oil
  • 2 tbsp. beeswax
  • 2 tbsp. shea butter
  • 15 drops red raspberry seed oil

Melt the coconut oil, beeswax, and she butter together. Allow to cool a bit and add the raspberry seed oil. If you want to boost it to a 30-40 SPF, add 2 tbsp. zinc oxide.

Sunscreen 2 SPF About SPF 20

  • 1/4 cup coconut oil
  • 1/4 cup shea butter
  • 1/4 cup beeswax pellets
  • 1 tsp. carrot seed oil
  • 1 tsp. raspberry seed oil
  • 1 tsp. vitamin E oil
  • 1/4 cup shea butter
  • 2 tbsp. zinc oxide

Melt shea butter, coconut oil and beeswax until it’s liquefied. Combine the zinc with a small amount of oil, or with your essential oils, then add everything to the liquefied carrier oils.

I’ve included these recipes because they’re good base recipes to get you started. Add your own touches and do the math to figure the SPFs. Now that you know what the SPFs of some of the best oils for sunscreen are and have a decent knowledge base about the entire subject, play around with some recipes of your own.

Try some lip balm, too – remember, all you need to do is add more shea butter or beeswax to thicken it up a bit!

TLW_banner2

If you have anything to share about making natural sunscreen or other natural remedies, please share it with us in the comments section below!

This article has been written by Theresa Crouse for Survivopedia.