
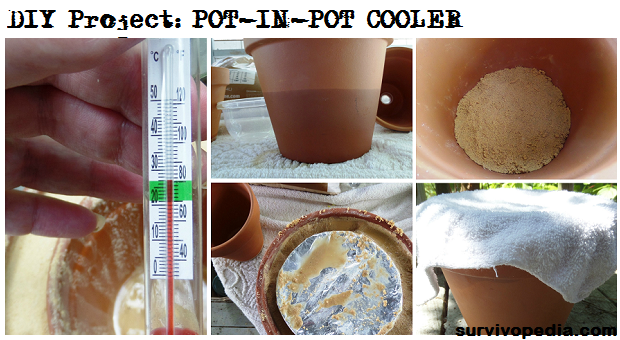
As temperatures warm up, there is a natural tendency to look for ways to keep outdoor lunches cool, or even store other items without spending a fortune on ice and plastic chests. The flower pot cooler is easy to build, easy to use, and will never wear out.
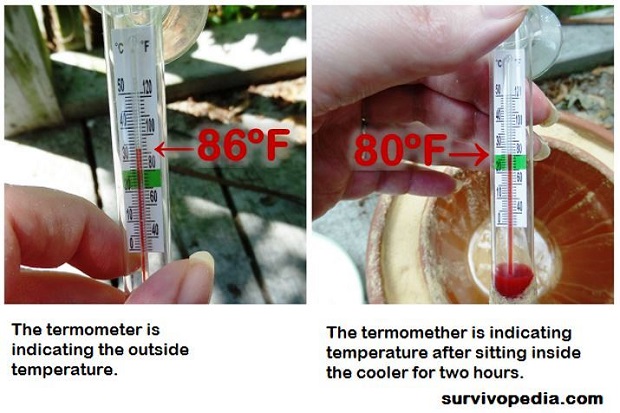
When placed in a sunny location, it will produce a minimum of 10 degrees reduction in temperature, and as much as 30 degrees lower on a hot, dry day. With the addition of a fan, this device can produce even lower temperatures that will enable you to store perishable items.
How and Why it Works
The flower pot cooler uses an inner terra cotta pot surrounded by sand and an outer terra cotta pot. As water evaporates from the sand, it leaches into the outer pot more than the inner one, thus creating a wicking action.
As humidity is pulled from the sand and the inner pot, the temperature inside the inner pot cools down.
Overall, the cooler the inner pot is in relation to the outer temperature, the faster the water will evaporate. This also tends to lead to accelerated cooling across time instead of simple steady decline in temperature. Interestingly enough, this type of evaporation is similar to the way refrigerators and air conditioners work.
The only difference is they use higher temperatures, motorized fans, and other materials to create a cooling effect.
Tools and Parts:
Required Tools: small cup or laddle for sand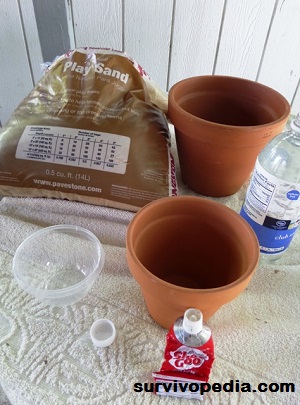
Required Parts:
- 1 – 8“ unglazed terra cotta flower pot (approx $3.50)
- 1 – 6“ unglazed terra cotta flower pot (approx $2.50)
- Approx 3 – 4 pounds of sand (approx 4.00 for 20+ pounds)
- 1 quart of water (less than $1.00)
- 2 bottle caps or something else waterproof to cover holes in bottom of terra cotta pots (less than $1.00)
- Shoe Goo or other water proof glue that can bind clay to plastic (approx $3.00 to $5.00 depending on brand and tube size)
- Saucer or plate to cover inner pot ($1.00 or less)
- White towel to cover plate ($1.00 or less)
Building the Flower Pot Cooler
 Step 1: Use one bottle cap and sealer to glue the cap to the inside bottom of the 8“ flower pot. The cap should cover the hole in the bottom, and have enough glue/sealant to create a full ring around the cap.
Turn the flower pot upside down and add additional sealant to completely fill the hole. This will help prevent leaks.
Repeat the same procedure with a second bottle cap for the 6“ flower pot. Let both pots dry a minimum of 24 hours before proceeding to the next step.
Step 2: Place enough sand in the bottom of the 8“ flower pot so that the lip of the 6“ flower pot is even with the 8“ flower pot.
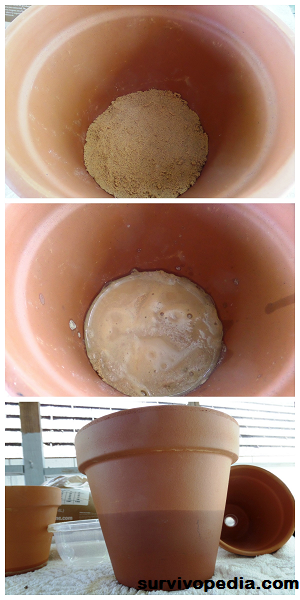 Step 3: Once you have enough sand packed into the 8“ flower pot, add water to the sand. You will see some bubbles as air is pushed out of the sand.
Let the flower pot sit for a few hours and check for leaks.
Water will begin seeping into the pots and turn them a darker color.
When operating the flower pot cooler, it should start with the darker color so that you know enough water is in place for effective evaporation.
Step 4: After the water has had a chance to disburse through the sand, place the 6“ flower pot inside the 8“ one.
Cover the inner pot with a saucer or tin foil so that sand and water cannot get into the inner chamber.
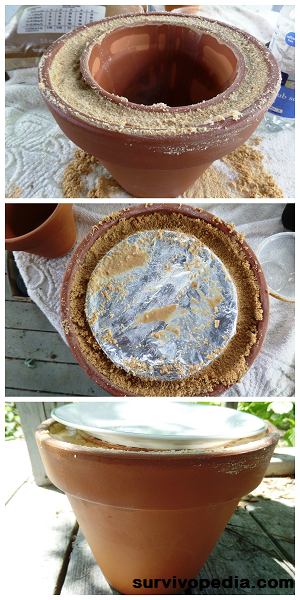 Step 5: Add sand to the area between the two pots, and then add water to push the sand down.
Once you reach the top, leave approximately one inch below the top of the pots so that you have a small channel for adding water later on.
If built correctly, you will not need to disassemble the cooler to stir up the sand or make it more permeable to the water.
Operating the Flower Pot Cooler
You can use the flower pot cooler as long as the sand is moist. Simply place whatever needs to be kept cool in a water proof bag and then put that in the 6“ flower pot.
Next, cover the inner flower pot with a saucer, and then place a white towel on top of that.
White will deflect heat, and thus keep the inner chamber a bit cooler without preventing the sides of the outer flower part from being exposed to as much heat as possible.
Notes for Future Development
Here are some ideas that may make your flower pot cooler more effective, and also enable you to transform the basic concepts into a permanent outdoor cooler that harnesses solar power for cooling.
- Try using an ice cube inside the inner chamber of the flower pot cooler because it will create a difference between internal and external temperatures faster. I do not recommend using cool water to moisten the sand because that will slow down evaporation rates; however warm water might accelerate the process.
- Use two wooden boxes and sand between them, or sponges for holding the water. Other highly porous materials might also work for building larger, permanent outdoor coolers
- When using a fan with the flower pot cooler, do not aim the fan into the pots, instead let the air hit the sides of the pot. While it is possible to build a cooling system with a fan aimed into a bucket, clay or wooden walls will not allow the air to diffuse effectively. In addition, the cool air will be blown out of the inner pot, which results in the loss of a cooling chamber.

This article has been written by Carmela Tyrell for Survivopedia.


Ronald F. Bradford | June 15, 2014
|
Would it be possible to use a very large clay pot, (say 10-20 gal) with a smaller (5-10 gal) clay pot and accomplish the same thing with sand. Would the evaporation principle be the same? Also, wih the fan idea could a small solar panel be utilized for power for the fan since a smaller fan would not need much amperage? It might work even better if there were some type of surround for the air to be blown into a port and around the pot and out the other side to give full airflow.
Just brainstorming …what do you think?
Colin | June 15, 2014
|
Yup, yup, & yup.
Ronald F. Bradford | June 16, 2014
|
Thank you for your prompt response to my question re the larger clay pot the small solar panel and the fan. That’s good news all the way around. Super tips!
Robert | August 9, 2014
|
Mid-eastern countries have been doing that very thing for a long time. These cooling pots are called “zeers”. They work best in low humidity environments where there’s a steady breeze. Here in Florida they don’t work as well. You might get a 10 degree temperature difference.
Ronald F. Bradford | September 7, 2014
|
Re the off grid fridge discussion…does it need to be in the shade or does the full sun speed the convection process. What about combining the idea of a hole about three feet deep with the small solar fan forcing air into one inlet and out a separate exit. The tubing beginning at ground level at 4″ dia. and ending being a pipe reduced to 2″ for stronger force of air pointing around the pot below ground and exiting through the second pipe also 4″
carmela tyrrell | June 16, 2014
|
Ronald,
All excellent ideas!
The solar panel should work. If it is underpowered, you might want to look into making a joule thief.
Ronald F. Bradford | June 16, 2014
|
Carmela, I know what a joule is, but a joule thief? Never heard of it. I assume from the sound of it is the idea of taping electricity that is not….” I did not say that.
carmela tyrrell | June 17, 2014
|
Heh. 😀
Actually a joule thief is a little electronic gadget that uses a coil, a transistor, and a resisistor. When enough electricity is built up, it releases more than what comes from the source. Example – a 1.5 volt battery can be used to power a 1.8 volt light bulb. Here is a video to consider.
https://www.youtube.com/watch?v=Ah0jAyLv-3M
I plan on intergrating this with the tesla turbine and solar heat collector in my own meanderings into power independence.
PS – husband has all our kitties fitted for kevlar vests and helmets. 😉
Manster | June 27, 2014
|
Hey girl any schematics or drawings for Joule Thief?
Thanks Frank
jean | June 27, 2014
|
girl? Jean is french for John
CoLIN | June 15, 2014
|
Your flower pot cooler article is good but for a couple of mistakes.
1. the two photos of the thermometer show the exact same temperature.
2. adding cold water (instead of warm) will keep it cool. Warm will make it hotter. The wet sand in between is cooled by diffusion action on the outer pot skin. The wet sand will be as cool or cooler than the inside pot at all times (unless you add warm water) adding warm water will result in warming of the sand and the inside pot.
carmela tyrrell | June 16, 2014
|
Colin,
I haven’t tried the warm water; but I do plan on trying it as evaporation speed is also a factor.
jean | June 27, 2014
|
the 2 pics of the thermos don’t show the same temperature. Have a closer look. There’s around 20 degrees difference.
RFYT | June 15, 2014
|
Why wouldn’t the system work the same if the inside pot were glazed? The water would still evaporate from the sand and should do the same thing.
carmela tyrrell | June 25, 2014
|
RFYT – Glazed pots won’t work because the moisture inside the inner pot must also be pulled out into the sand to create a cooling effect. Also, most of the evaporation from the sand will go through the walls as opposed to the very narrow space on top. Speed of evaporation is the key to this system as much as it is refrigerators and conventional air conditioners.
You can also make a system like this using wood or anything else where water can permeate from the inner chamber, through the water retaining medium, and through the outer chamber.
Pingback:Bio Prepper | DIY Project: The Easiest Off-grid Fridge | June 16, 2014
|
Pingback:Prepper News Watch for June 16, 2014 | The Preparedness Podcast | June 16, 2014
|
Pingback:Monday Musings: 6/23/2014 | Apartment Prepper | June 23, 2014
|
Pingback:Essentials for Building Off-Grid Houses | June 27, 2014
|
Julia Snoke-Morales | September 6, 2014
|
Maybe this is a dumb question, but of what use is a container that only reduces the inside temp by 10-20 degrees? I mean, nice idea/cool science, and anything is better than nothing; but since food is supposed to be kept at about 40 degrees F. to be considered safely refrigerated, how much difference is keeping meat at, say, 80 degrees vs. 86 degrees going to be? Meat and medicine will still spoil.
carmela tyrrell | September 6, 2014
|
Julia,
Hello!
First – no question is ever dumb.
This design can get a lot more than a 6 – 20 degree difference if you use it with a fan or on hotter days. It works best in a dry climate where evaporation happens faster. I did this one showing the minimum – it is better than nothing and will buy a few hours if you need them.
Julia Snoke-Morales | September 6, 2014
|
Ah! thanks, I guess it would help for a short term need…I was thinking more along the lines of long term. Hopefully digging an underground storage area will help more with that. Depending on the depth or amount of ground & rock insulation, they can be quite cool; I remember cavern tours I have taken stating they maintain a year-round temp of 52 degrees F. But even a traditional “root cellar” keeps things a lot cooler.
carmela tyrrell | September 7, 2014
|
True about the underground cellars.
I also saw some versions of this clay pot that use a wood box and layers that get down to 40 degrees or so. I haven’t tried that one out yet, so can’t say if it actually works or how easy it is to build. The clay pots are simple and can work well if the conditions are right.
Pingback:5 Ways To Preserve Food For Off-Grid Survival | January 13, 2015
|
Pingback:DIY Project: Off Grid Air Conditioner And Dehumidifier | Survival skills, survival guns, survival guide | June 5, 2015
|
Pingback:DIY Off-Grid Project: Air Conditioner And Dehumidifierdisasterdefense.usdisasterdefense.us | disasterdefense.us | June 6, 2015
|
Pingback:The Basic List For Your EMP Survival | Survival skills, survival guns, survival guide | November 20, 2015
|
Pingback:The Basic List For Your EMP Survival | Prepper's Survival Homestead | November 20, 2015
|
Pingback:The Basic List For Your EMP Survivaldisasterdefense.us | disasterdefense.us | November 20, 2015
|
Pingback:The Basic List For Your EMP Survival | Wichita Observer | November 23, 2015
|
Pingback:The Basic List For Your EMP Survival | The Prepper Dome | November 23, 2015
|
Dan Sellers | December 1, 2015
|
Do they work indoors – I’m thinking of getting an apartment.
Pingback:Earthquake Survival: How To Restore Your Electricity | Survivopedia | December 21, 2015
|
Pingback:Earthquake Survival: How To Restore Your Electricity | Prepper's Survival Homestead | December 21, 2015
|
Pingback:Earthquake Survival: How To Restore Your Electricity - Backdoor Prepper | December 21, 2015
|
Pingback:30 Creative Ways To Use Terra Cotta Pots | January 3, 2016
|
Pingback:The Resilient Master List – Invest in the Health of our Planet | February 6, 2016
|
Pingback:7 Uses For Clay Pots That Every Prepper Should Know | Survivopedia | August 17, 2016
|
Pingback:Off-grid Survival: How To Generate Energy In The Desert | Survivopedia | June 1, 2017
|
Pingback:Q&A On Storing Meat Without Refrigeration In Hot Areas | Survivopedia | September 21, 2017
|